Contents
1. Project Management & Control Module
1.1 Enhanced Project Information in Task Report Excel ExportThe Task Report Excel export (accessible from Project > Tasks) now includes Project-level information alongside the existing Task data. Previously, exported task data did not carry any project context, making it difficult to filter, group, or report on tasks by their parent project. Every exported row is now fully self-contained, supporting reliable use in Excel Tables, Pivot Tables, Power Query, and other reporting tools.



New Project Columns
The following Project columns have been added:
- Project Number
- Project Name
- Project Description — blank if the Project has no description saved.
- Project Status
- Project Progress
- Project Latest Comment Date and Project Latest Comment — shows the most recent Project comment. If the Project has been updated but no comment was entered, this shows the update date with "No comment." If there are no comments or updates, both fields are blank.These columns are populated on the Project summary row (if displayed) and on every Task row belonging to that Project, so project context is retained even after filtering or sorting.
Renamed Task Columns
Existing Task columns are unchanged in what they show, but have been renamed for clarity:
- WBS, Task Name, Task Description, Task Start Date, Task Due Date, Task Duration, Task Effort, Task Status, Task Progress, Task Latest Comment Date, Task Latest Comment, Task Created By, Task Created Date
- Task Owner (previously labelled "Owner")
Task Comments Remain Task-Specific
Task Latest Comment Date and Task Latest Comment continue to reflect only that Task's own comment history — not the Project's. If a Task has been updated but no comment was entered, it shows the update date with "No comment." If a Task has no comments and hasn't been updated, both fields are blank.
Improved Filtering, Sorting, and Reporting
The export continues to support filtering and sorting on all columns, with a single header row, consistent column names, and no merged cells — keeping it fully compatible with Excel Tables, Pivot Tables, and Power Query. Long text fields (Project Description, Task Description, and all comments)
The Word export options within Project Executions — Export Current Form, Export Select Forms, and Export All Forms — now support the Project Update Histories tab. Previously, every other tab could be exported except Project Update Histories, even though Export All Forms implied a complete export. This meant Project Managers, Administrators, and other stakeholders had to manually copy update history data or take screenshots to include it in exported project records. Project Update Histories can now be included in all three export options, giving users a complete and accurate exported project record without manual effort, while existing export output remains unchanged unless a user explicitly opts in.
What's Changed:
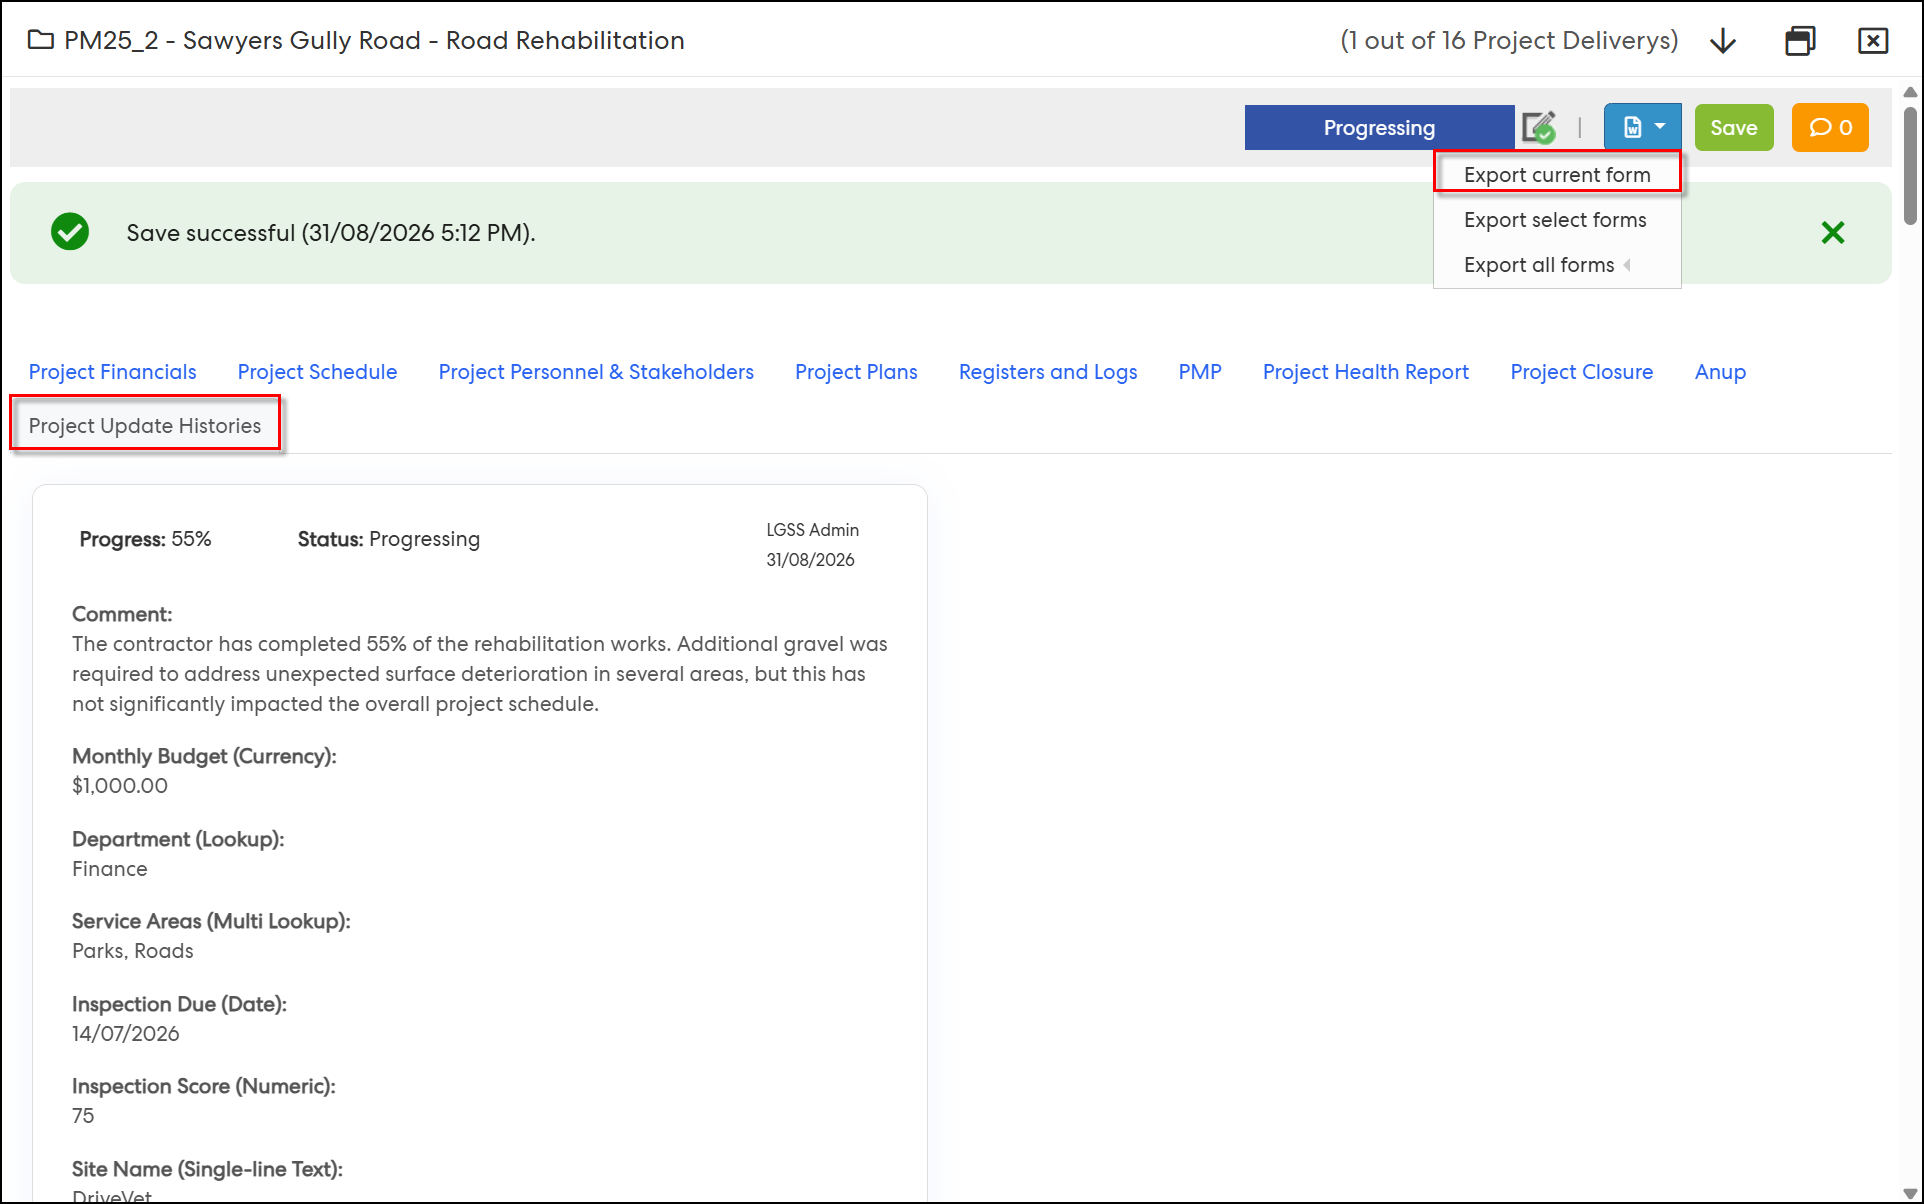
1. Export Current Form now exports the Project Update Histories data when a user is viewing that tab.
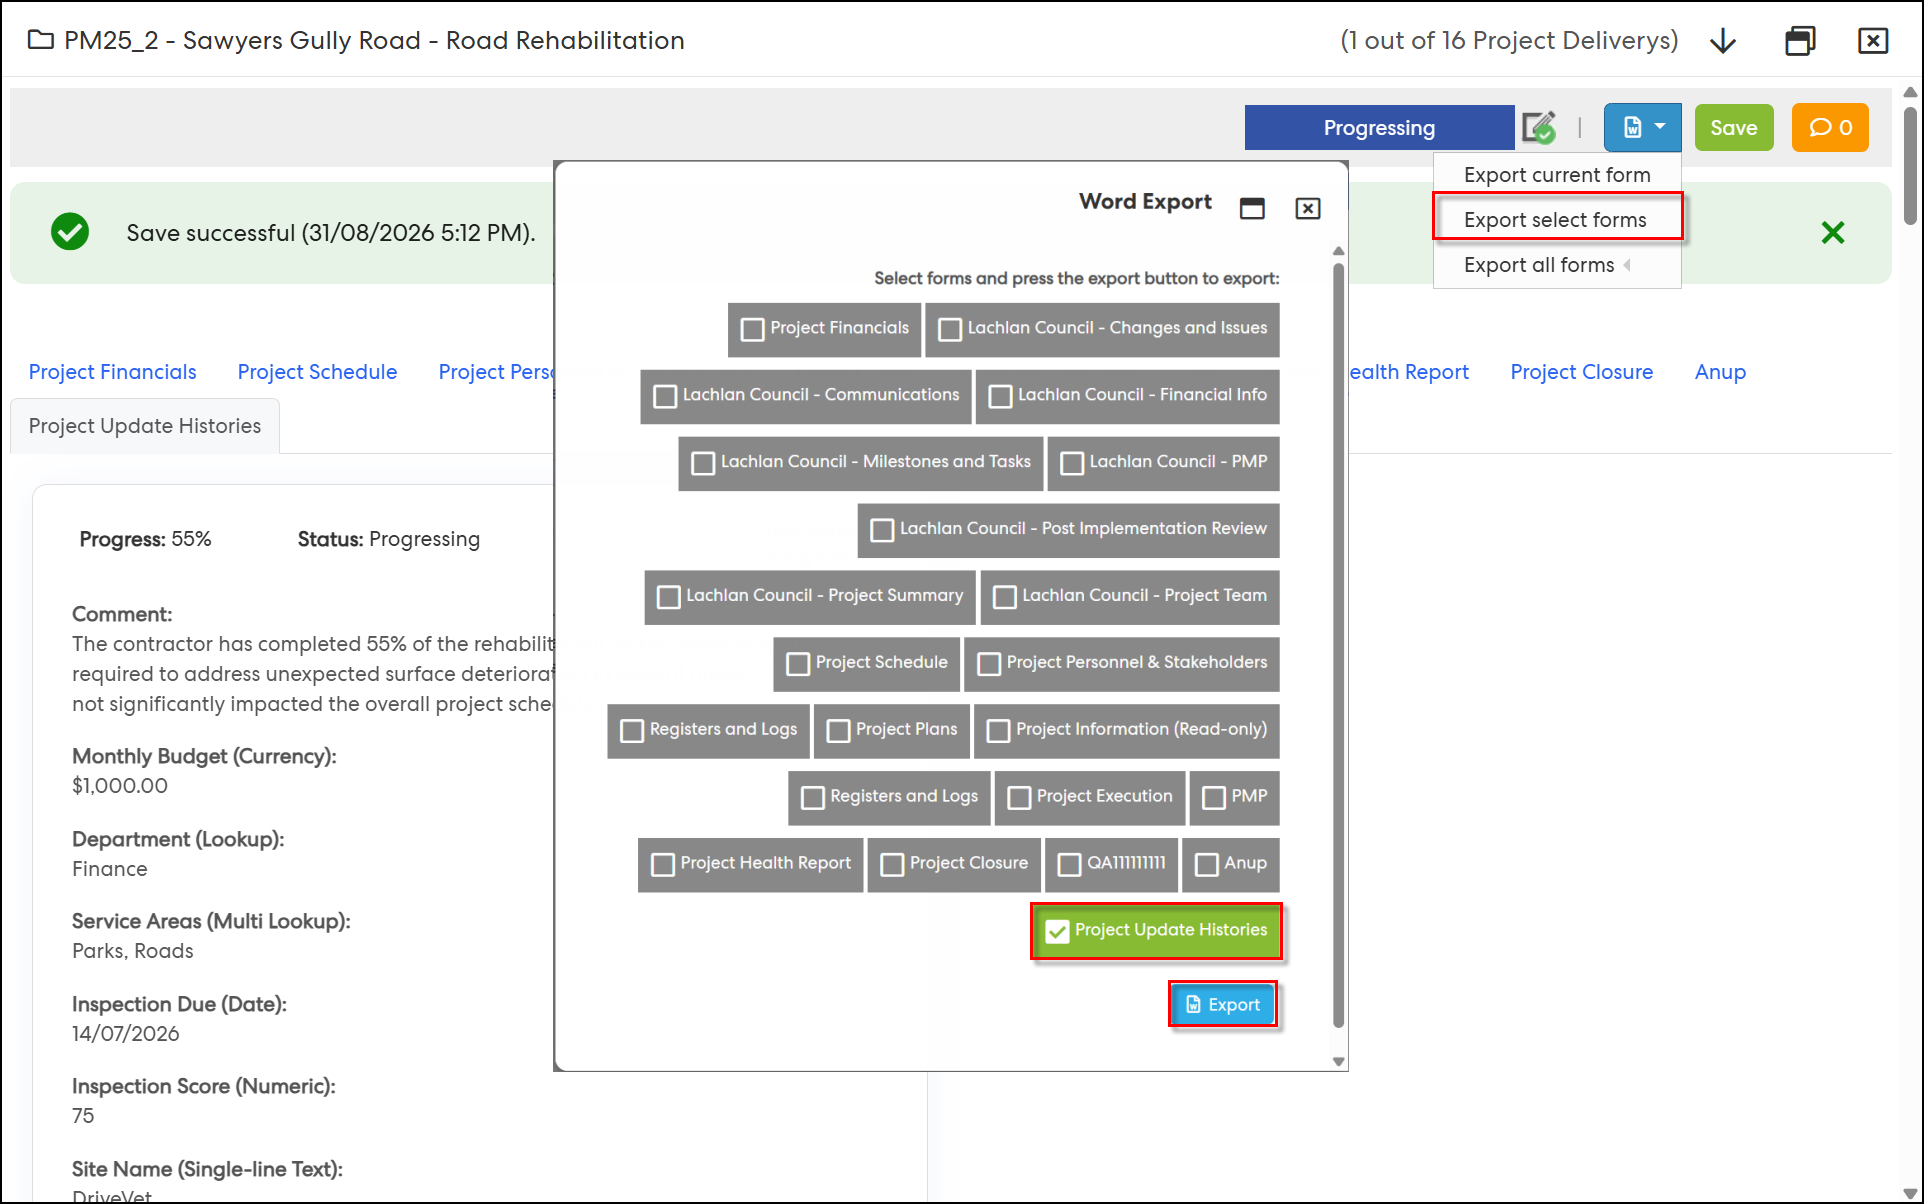
2. Export Select Forms now lists "Project Update Histories" as a selectable option alongside the other forms. Selecting it includes its data together with any other forms chosen in the same export.
3. Export All Forms is now a parent option with two sub-options: "Export all forms excluding Project Update Histories," which reproduces today's output exactly, and "Export all forms including Project Update Histories," which adds the Project Update Histories data to that same output.
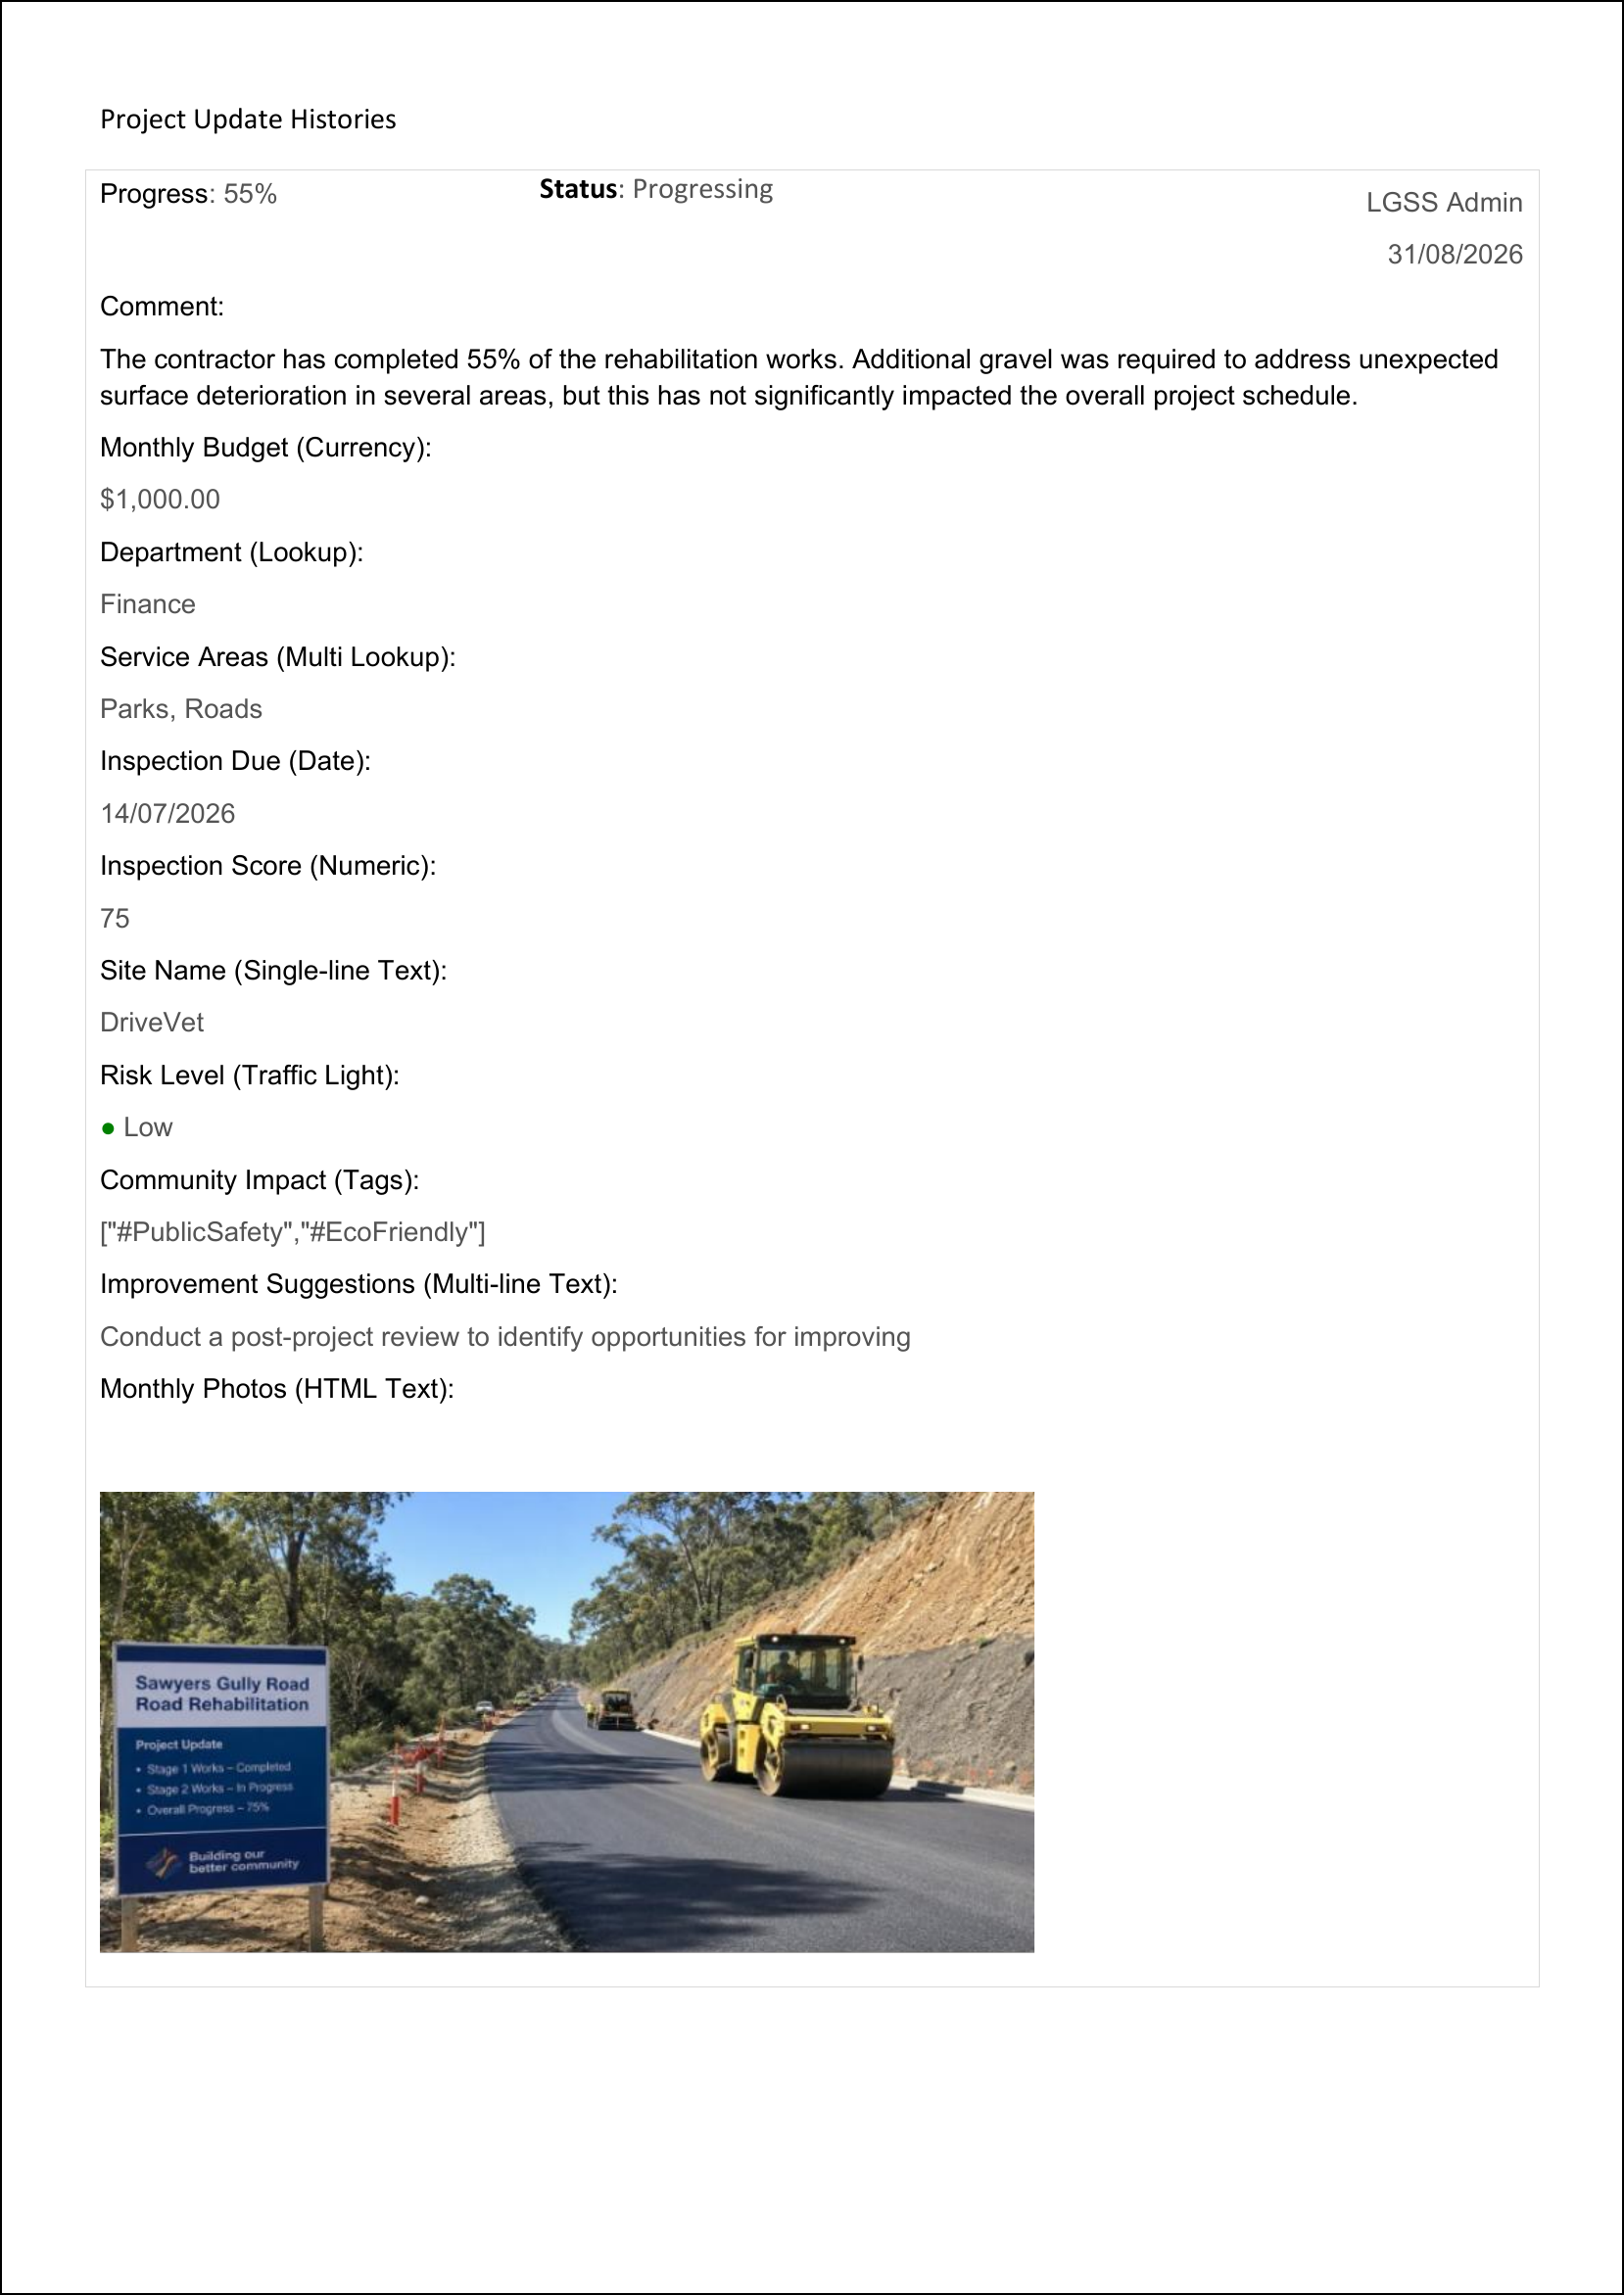
4. Wherever exported, Project Update Histories includes every update history record for the project, in the same chronological order shown on screen, with the core fields — Progress (%), Status, Author, Date, and Comment — plus all configured additional project-update attributes.
5. The export supports all 10 additional-attribute data types configurable from the admin section — Currency, Date, HTML Text, Lookup, Multi Lookup, Multi-line Text, Numeric, Single-line Text, Tags, and Traffic Light — each rendered to reflect its data type. Traffic Light attributes display both the value and its coloured icon, matching the UI.
6. Field labels are always shown, even when a field has no value, in which case the label displays with a blank value.
7. The export reflects each customer's own admin configuration — attribute visibility, order, field name, and drop-down values — exactly as it appears on the Project Update Histories tab.
8. Photographs added through HTML Text fields (e.g. Monthly Photos) are embedded as images in the exported Word document.
9. The exported Project Update Histories section follows the same formatting conventions as the rest of the Word export and is positioned consistently with the tab order used by the other forms.
Access and Navigation
Step 1: Navigate to Project Executions > View Project, then open the Project Update Histories tab.
Step 2: Click the Export icon and select Export Current Form. Confirm the resulting Word document contains only the Project Update Histories data.
Step 3: Click the Export icon and select Export Select Forms. Confirm "Project Update Histories" is available as a selectable option, select it (with or without other forms), then click Export.
Step 4: Click the Export icon and hover over Export All Forms to reveal the two new sub-options.
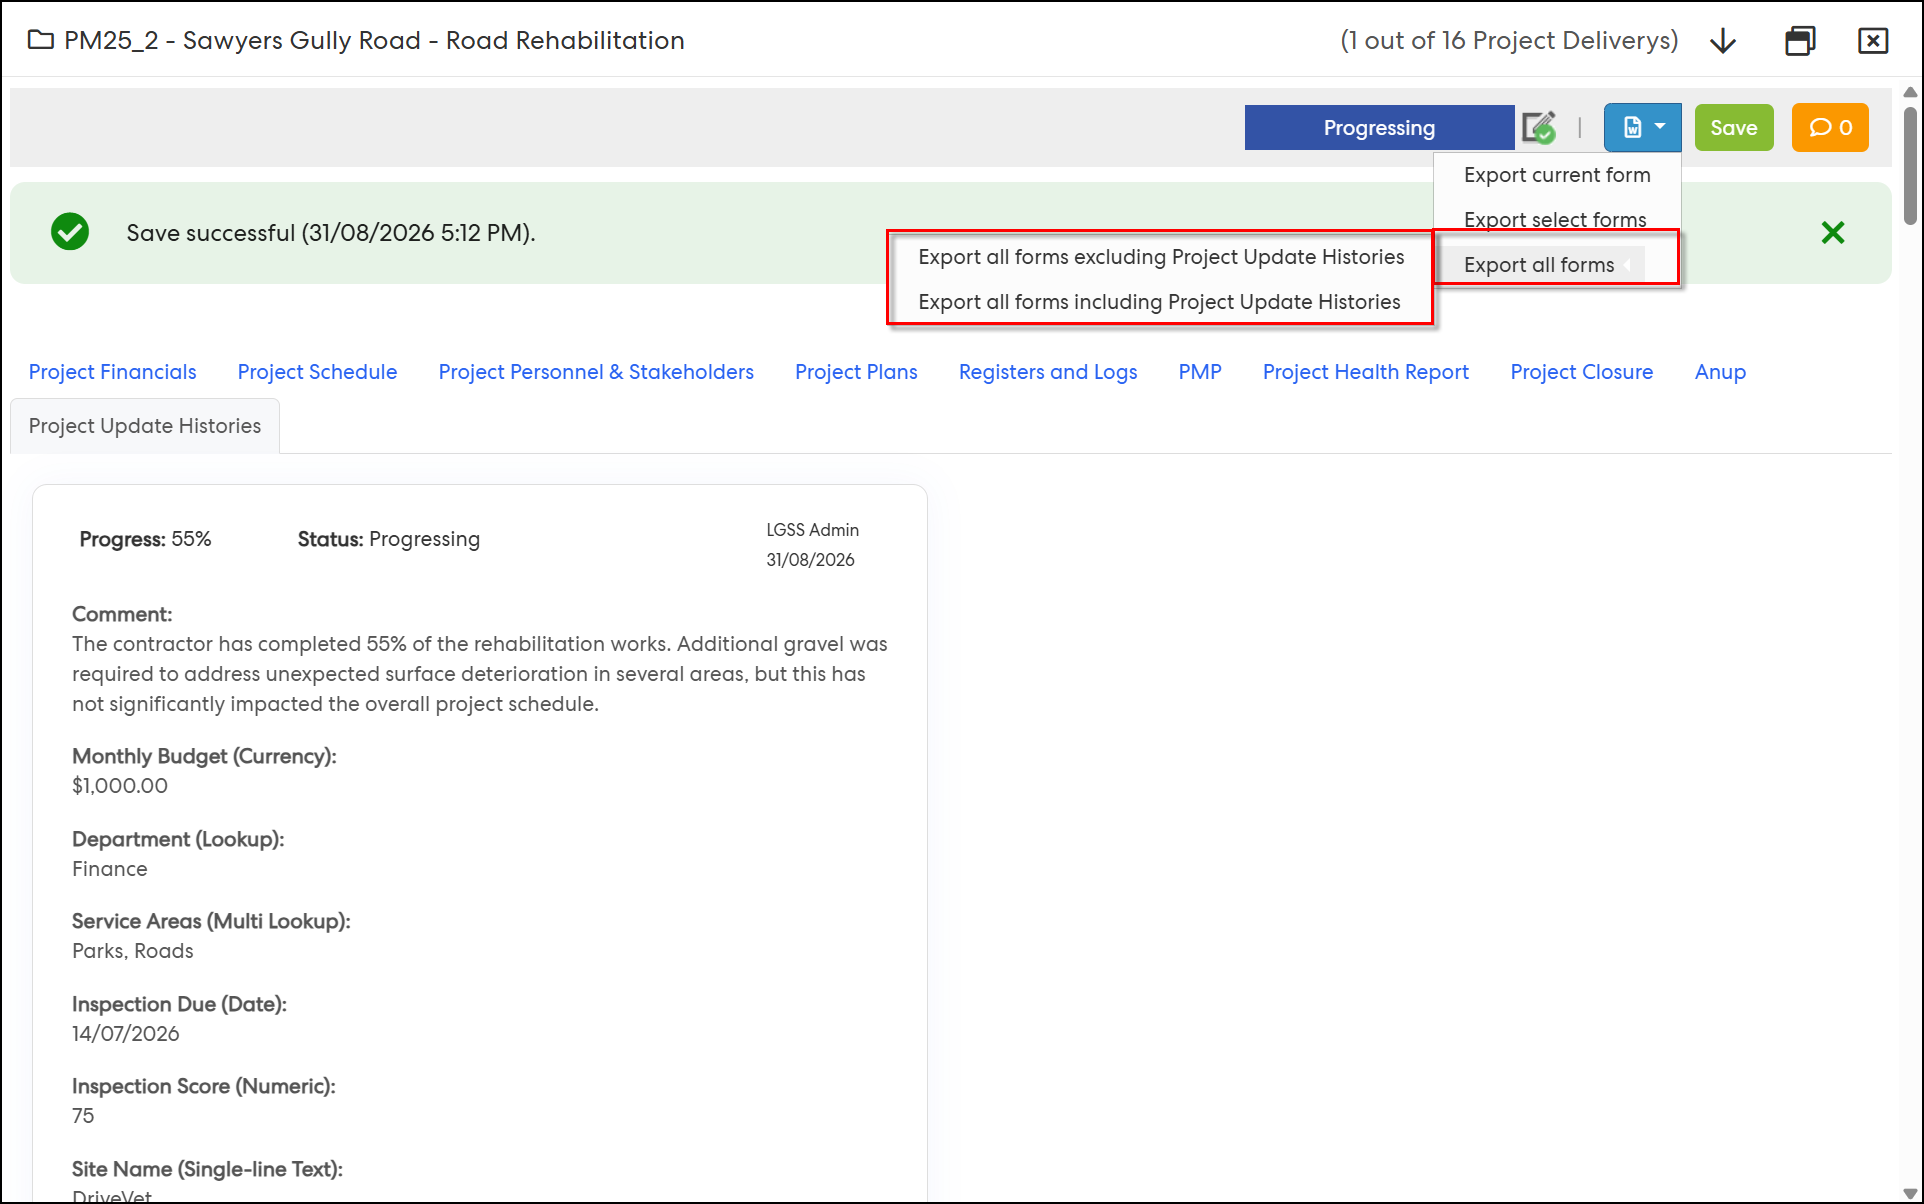
Step 5: Select "Export all forms excluding Project Update Histories" and confirm the output is unchanged from current behaviour. Then select "Export all forms including Project Update Histories" and confirm the same output now also includes the Project Update Histories data.
Step 6: Open any of the exported Word documents and confirm the Project Update Histories section reproduces every update record in chronological order — including the core fields, all configured additional attributes (with blank fields still labelled), Traffic Light values shown with their coloured icon, and any HTML Text photos embedded as images — formatted consistently with the rest of the export.
Submitting a Pre-Project for approval could previously generate pending approvals — and, once approved, projects — for future Financial Years as well as the Financial Year selected on the Pre-Projects page, even though only a single year's submission was intended. Some sites were already configured to submit Pre-Projects for a single Financial Year only and were unaffected; this fix brings all sites in line with that same behaviour. Pre-Project submissions, approvals, and any resulting project creation now apply only to the Financial Year selected at the time of submission. The My Pending Approvals page has also been updated to make each approval's Financial Year clear, with the ability to filter by year.
What's Changed:
1. When a Pre-Project is submitted for approval, the submission now applies only to the Financial Year currently selected in the Pre-Projects page year filter. Approval requests are no longer created automatically for other Financial Years.
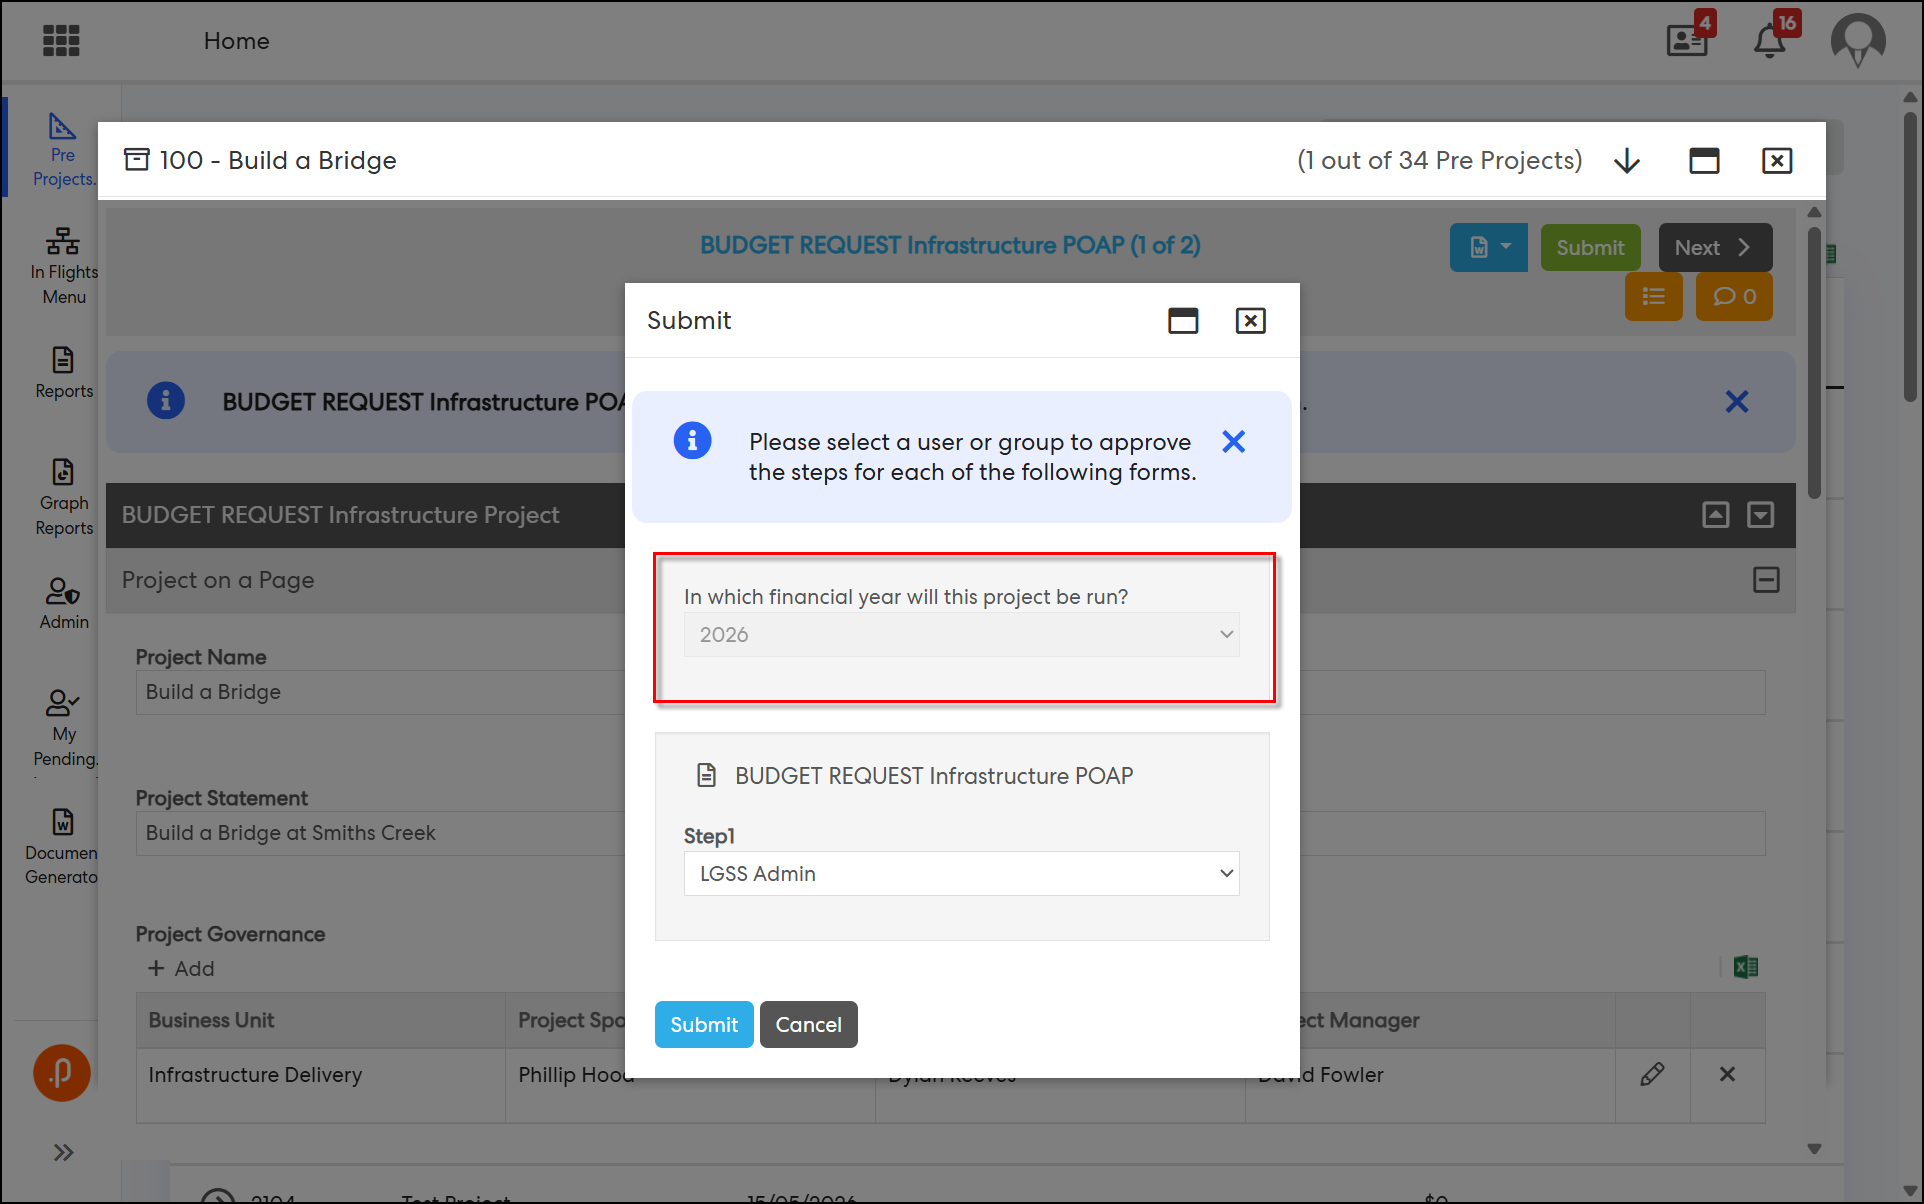
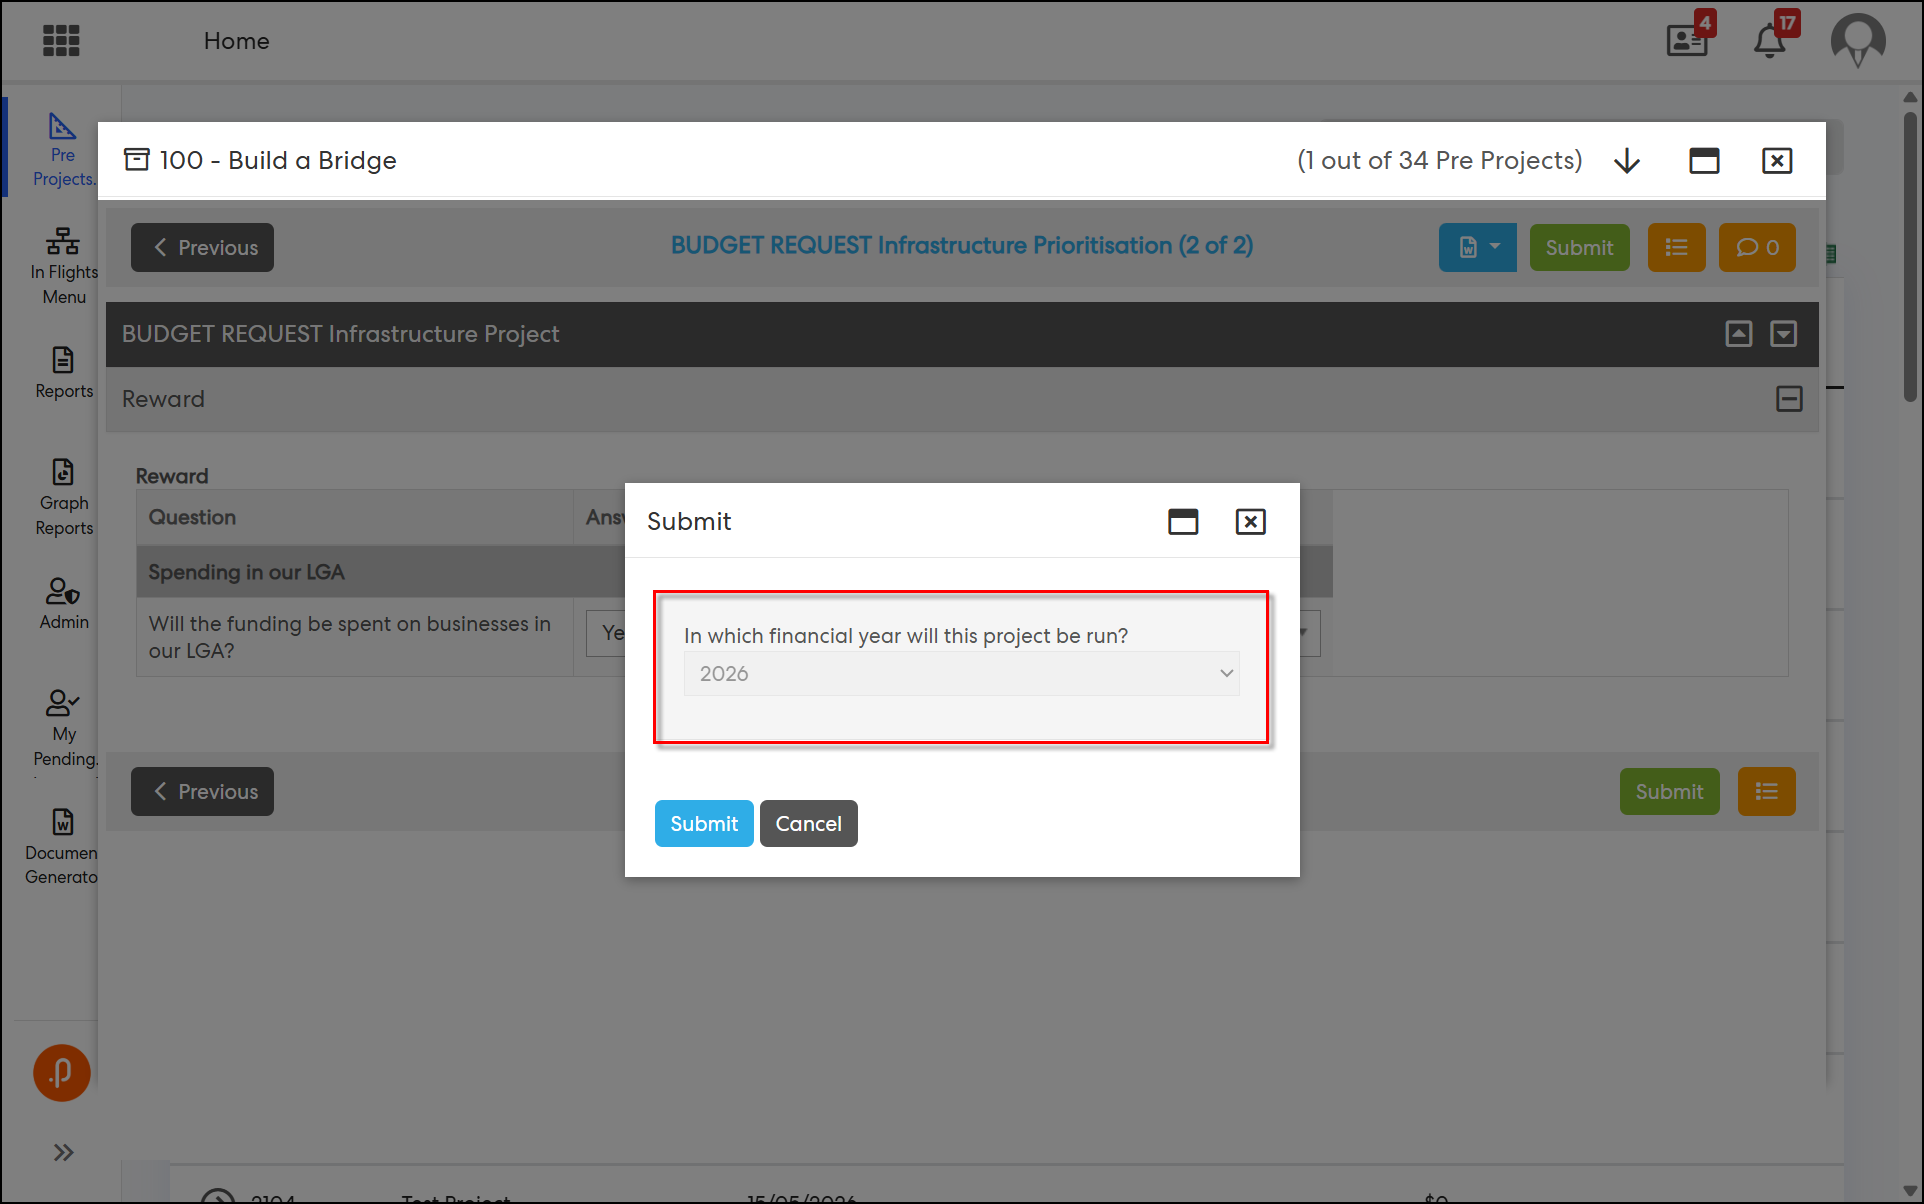
2. Clicking Submit now shows a popup asking "In which financial year will this project be run?" The Financial Year shown is preselected based on the year currently selected on the Pre-Projects page and cannot be changed — this applies whether or not the form requires approval.
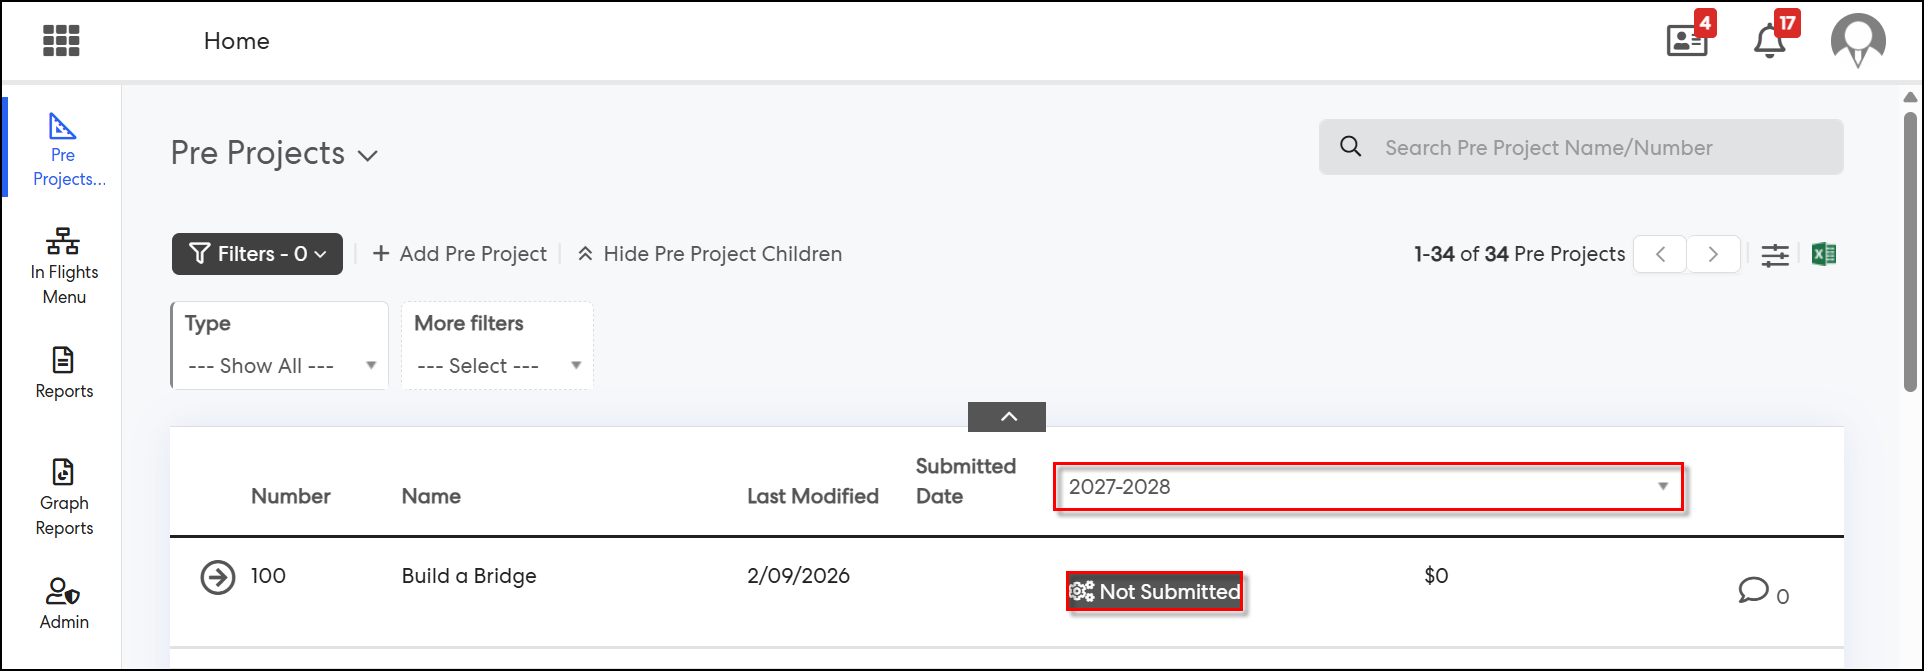
3. The same Pre-Project remains visible across all Financial Years, but its submission status is tracked separately for each year. If a Pre-Project has not been submitted for the Financial Year currently selected, its status shows as Not Submitted, and it can be submitted for that year independently.
4. The My Pending Approvals page now shows an approval request only for the Financial Year it was submitted for; approvals are not generated or displayed for other Financial Years.
5. Once a Pre-Project is approved and pushed to Project Execution (manually, or automatically where that configuration is enabled), only one project is created — for the Financial Year the approval was granted for. Projects are not automatically created for other Financial Years.
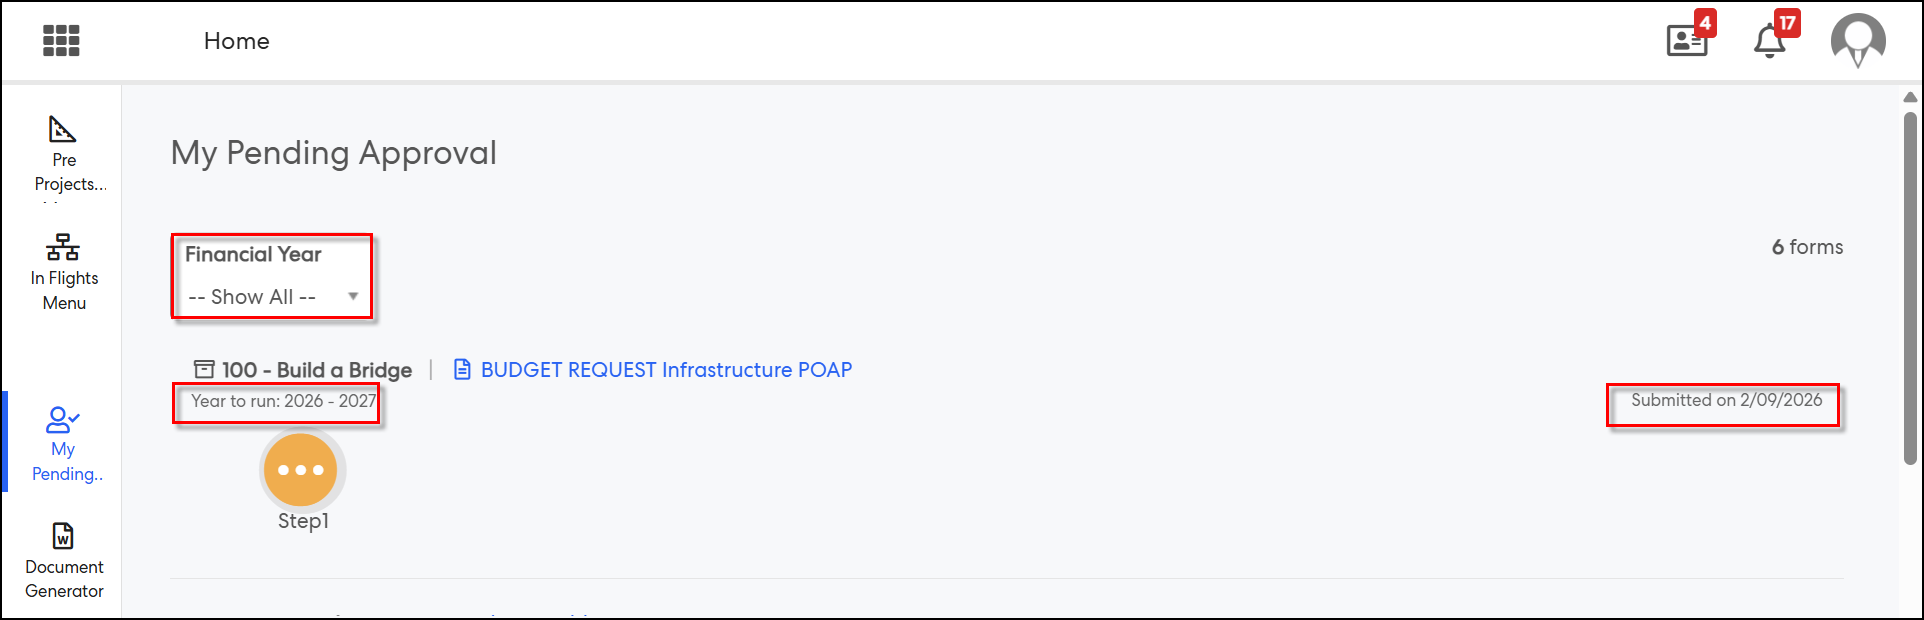
6. On the My Pending Approvals page, the existing "Submitted on" field has moved to the rightmost side of the approval card, and its previous position now shows a new "Year to run" label indicating the Financial Year of the approval request.
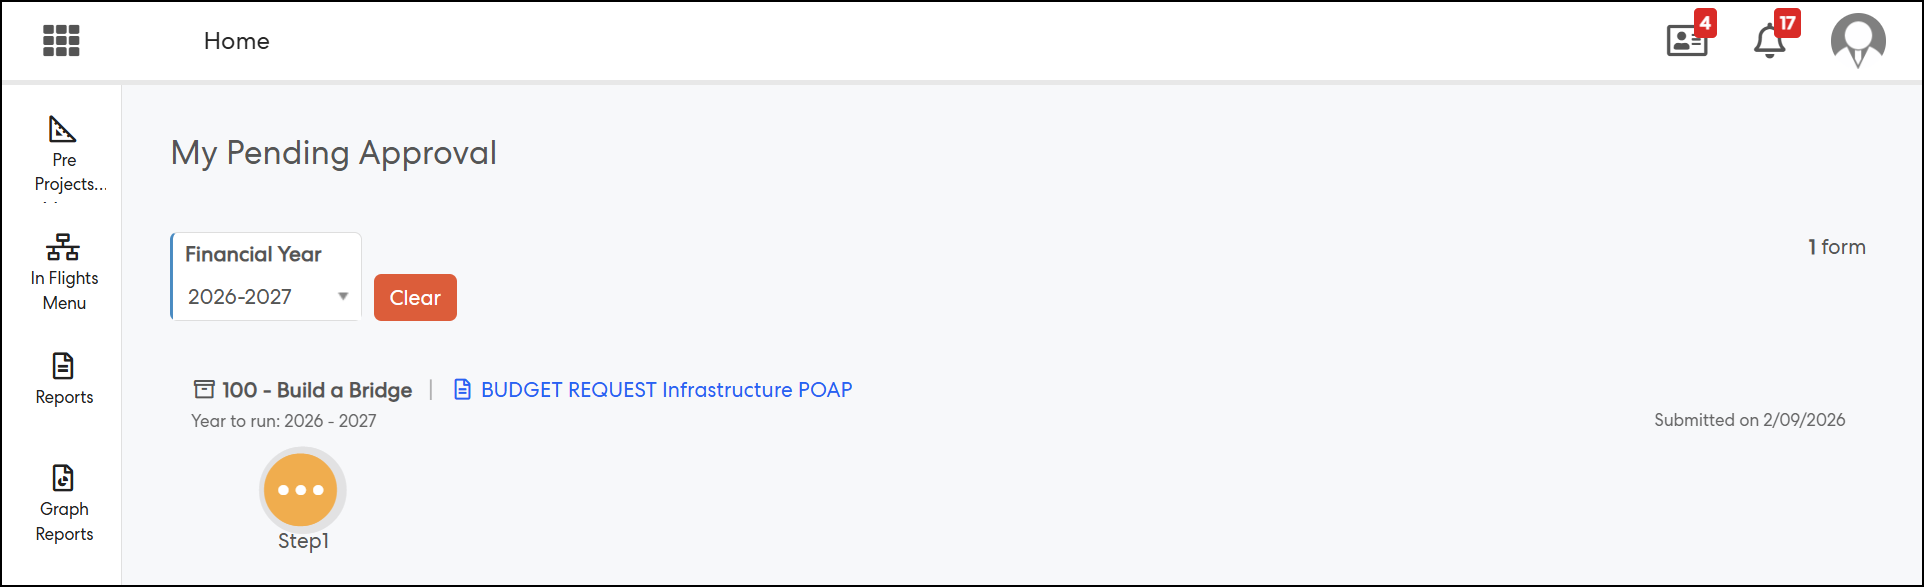
7. The Financial Year filter on My Pending Approvals now defaults to "--- Show All ---", displaying pending approvals across all Financial Years. Selecting a specific year filters the list to approvals for that year only.
Access and Navigation
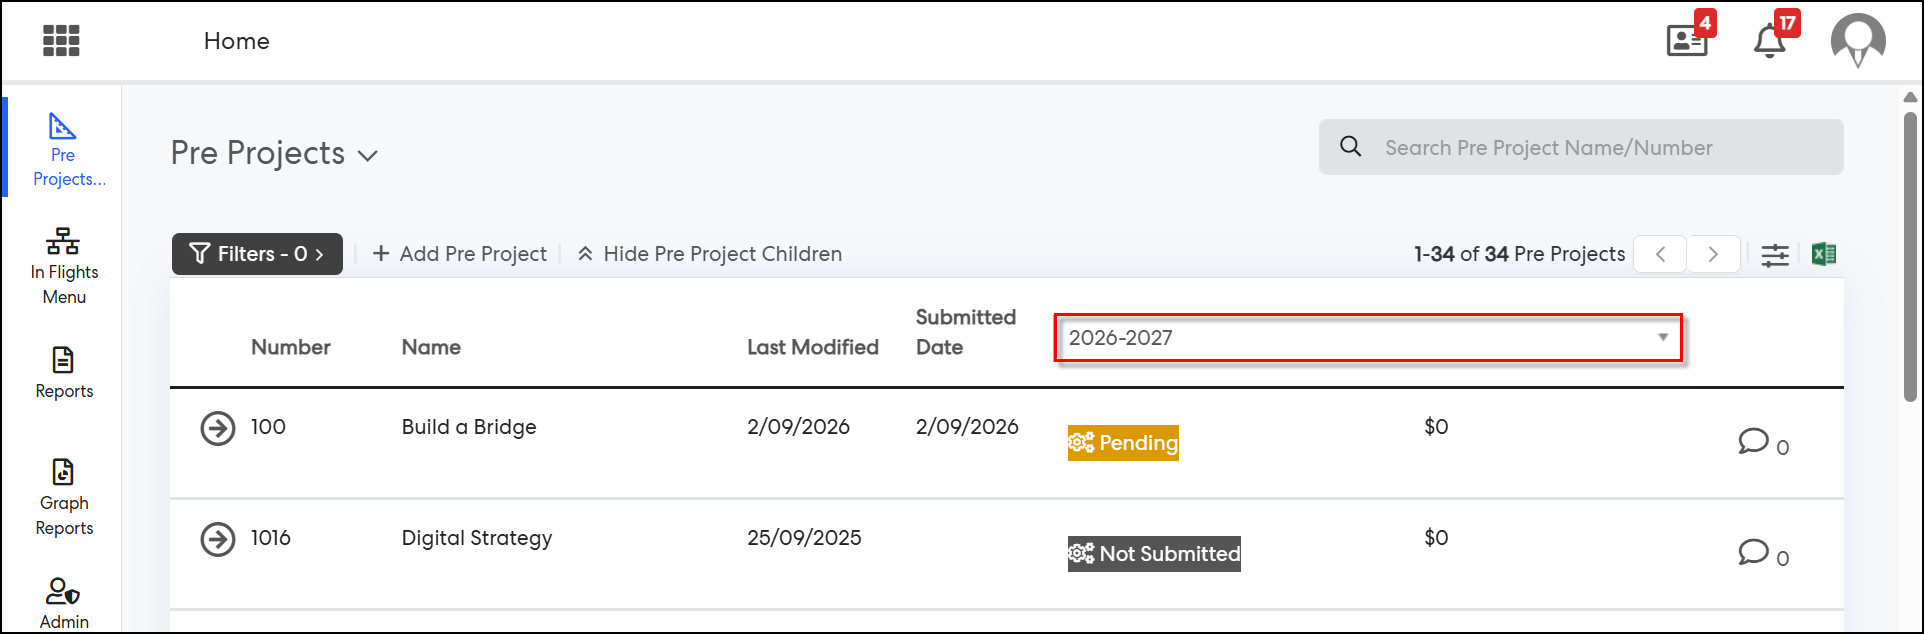
Step 1: Navigate to Pre-Projects (or My Pre-Projects / Manage Pre-Projects) and select a Financial Year from the year filter, e.g. 2026-2027.
Step 2: Open a Pre-Project that requires approval and click Submit. Confirm the popup asks "In which financial year will this project be run?" with the Financial Year preselected to match the Pre-Projects page filter and disabled (not editable). Select an approver and click Submit.
Step 3: Repeat with a Pre-Project form that does not require approval, and confirm the same popup appears with the Financial Year preselected and disabled, even without an approver step.
Step 4: Return to the Pre-Projects page and switch the year filter to a different Financial Year (e.g. 2027-2028). Confirm the same Pre-Project now shows as Not Submitted for that year, independent of its status in the previously selected year.
Step 5: Navigate to My Pending Approval. Confirm the Financial Year filter defaults to "--- Show All ---", and that each approval card shows a "Year to run" label on the left and "Submitted on" on the right.
Step 6: Select a specific Financial Year from the filter (e.g. 2026-2027) and confirm only approvals submitted for that year are displayed.
Step 7: Approve the Pre-Project and confirm that, where "Approving a Pre-Project automatically pushes it to a Project" is enabled, only one project is created in Project Execution — for the Financial Year the approval was granted for.
Notes:
- This fix applies automatically and does not require any site configuration change. It brings sites that previously submitted Pre-Project approvals across multiple Financial Years in line with the single-Financial-Year behaviour already used elsewhere; sites already limited to a single Financial Year will see no visible change.
- Pre-Projects continue to be displayed across the same 10 Financial Years (5 past and 5 future) as before; this enhancement only changes how submission, approval, and project creation are tracked per year.
- Selecting a different Financial Year and resubmitting the same Pre-Project for that year continues to be supported, as does the existing Pending/Approved status behaviour based on whether the form requires approval.
2. Corporate Planning & Reporting Module
2.1 Hierarchy Columns in Corporate Measures Report Excel ExportThe Corporate Measures Report has been enhanced so that exporting to Excel now reflects the "Show measure's position in hierarchy" filter. Previously, enabling this filter added a column to the on-screen table showing each measure's position in the strategic hierarchy, but that information was dropped when the report was exported, leaving users with an Excel file that no longer matched what they had filtered for in Pulse. The Excel export now includes the same hierarchy information, broken out into a Code and a Name column for each hierarchy level, so the exported report matches the filtered view.
What's Changed:
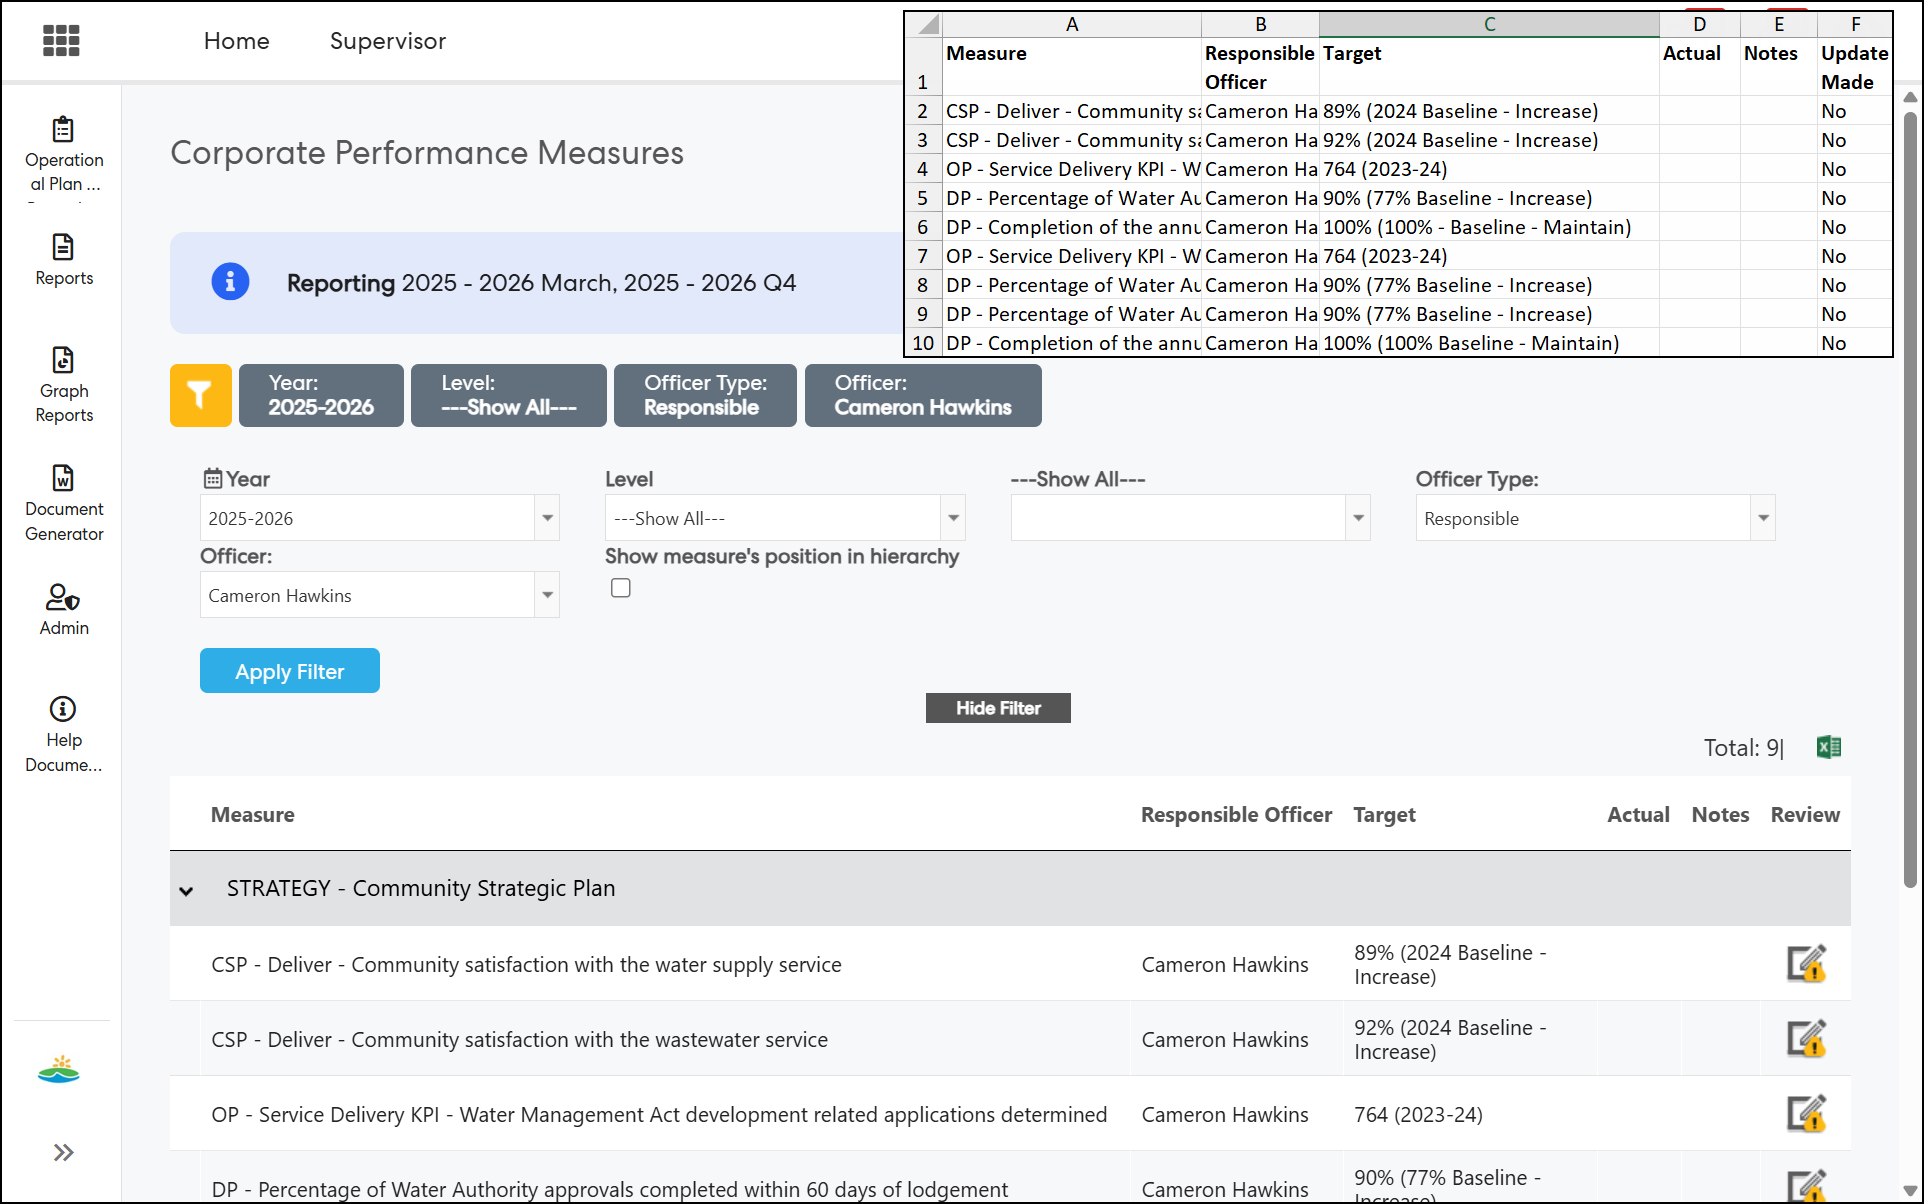
1. When "Show measure's position in hierarchy" is off, the Excel export is unchanged — no new columns are added.
2. When "Show measure's position in hierarchy" is on, the Excel export now includes hierarchy columns, positioned before the Measure column.
3. The number of hierarchy columns reflects each council's own CPR configuration. Every hierarchy level adds two columns — one for the code and one for the name — following the same pattern as the existing Action export (e.g. a 4-level hierarchy produces 8 hierarchy columns).
4. Each measure's row is only populated up to the hierarchy level it is linked to; columns for levels below that are left blank.
5. All existing columns — Measure, Responsible Officer, Target, Actual, Notes, Update Made — remain exactly as they are. The only change is the addition of the hierarchy columns before the Measure column.
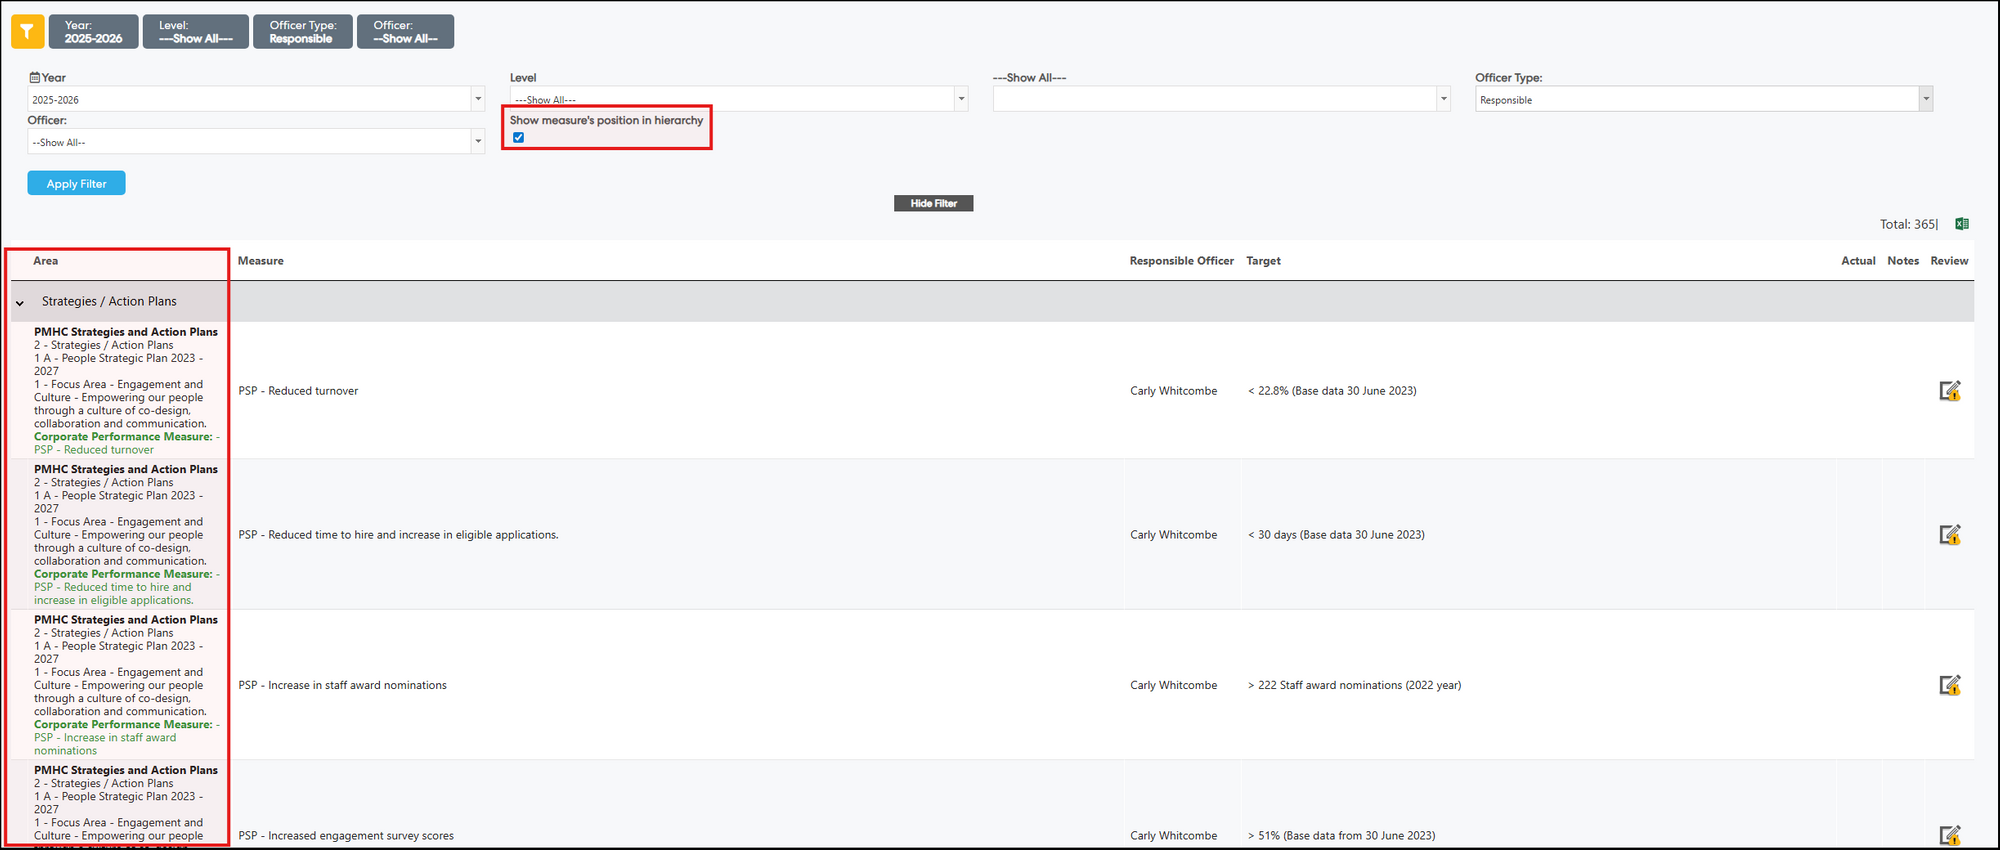
6. The hierarchy data in the export matches what is shown in the Pulse table view — Pulse displays it stacked in a single Area column, while Excel spreads it across separate level columns.
7. Other toolbar filters (Year, Level, Node, Officer Type, Officer) continue to control what is displayed on screen only and have no effect on the export's column structure — only the "Show measure's position in hierarchy" filter changes it.
Access and Navigation
Step 1: Navigate to Corporate Planning & Reporting > Reports > Corporate Performance Measures.
Step 2: In the filter panel, tick "Show measure's position in hierarchy" and click Apply Filter. Confirm the table view displays each measure's position in the strategic hierarchy under the Area column.
Step 3: With the filter unticked, click the Excel export icon and confirm the exported file looks exactly as it does today, with no hierarchy columns added.
Step 4: Tick "Show measure's position in hierarchy" and click the Excel export icon. Confirm the exported file now includes hierarchy columns before the Measure column — two columns (Code and Name) for each level configured for the council.
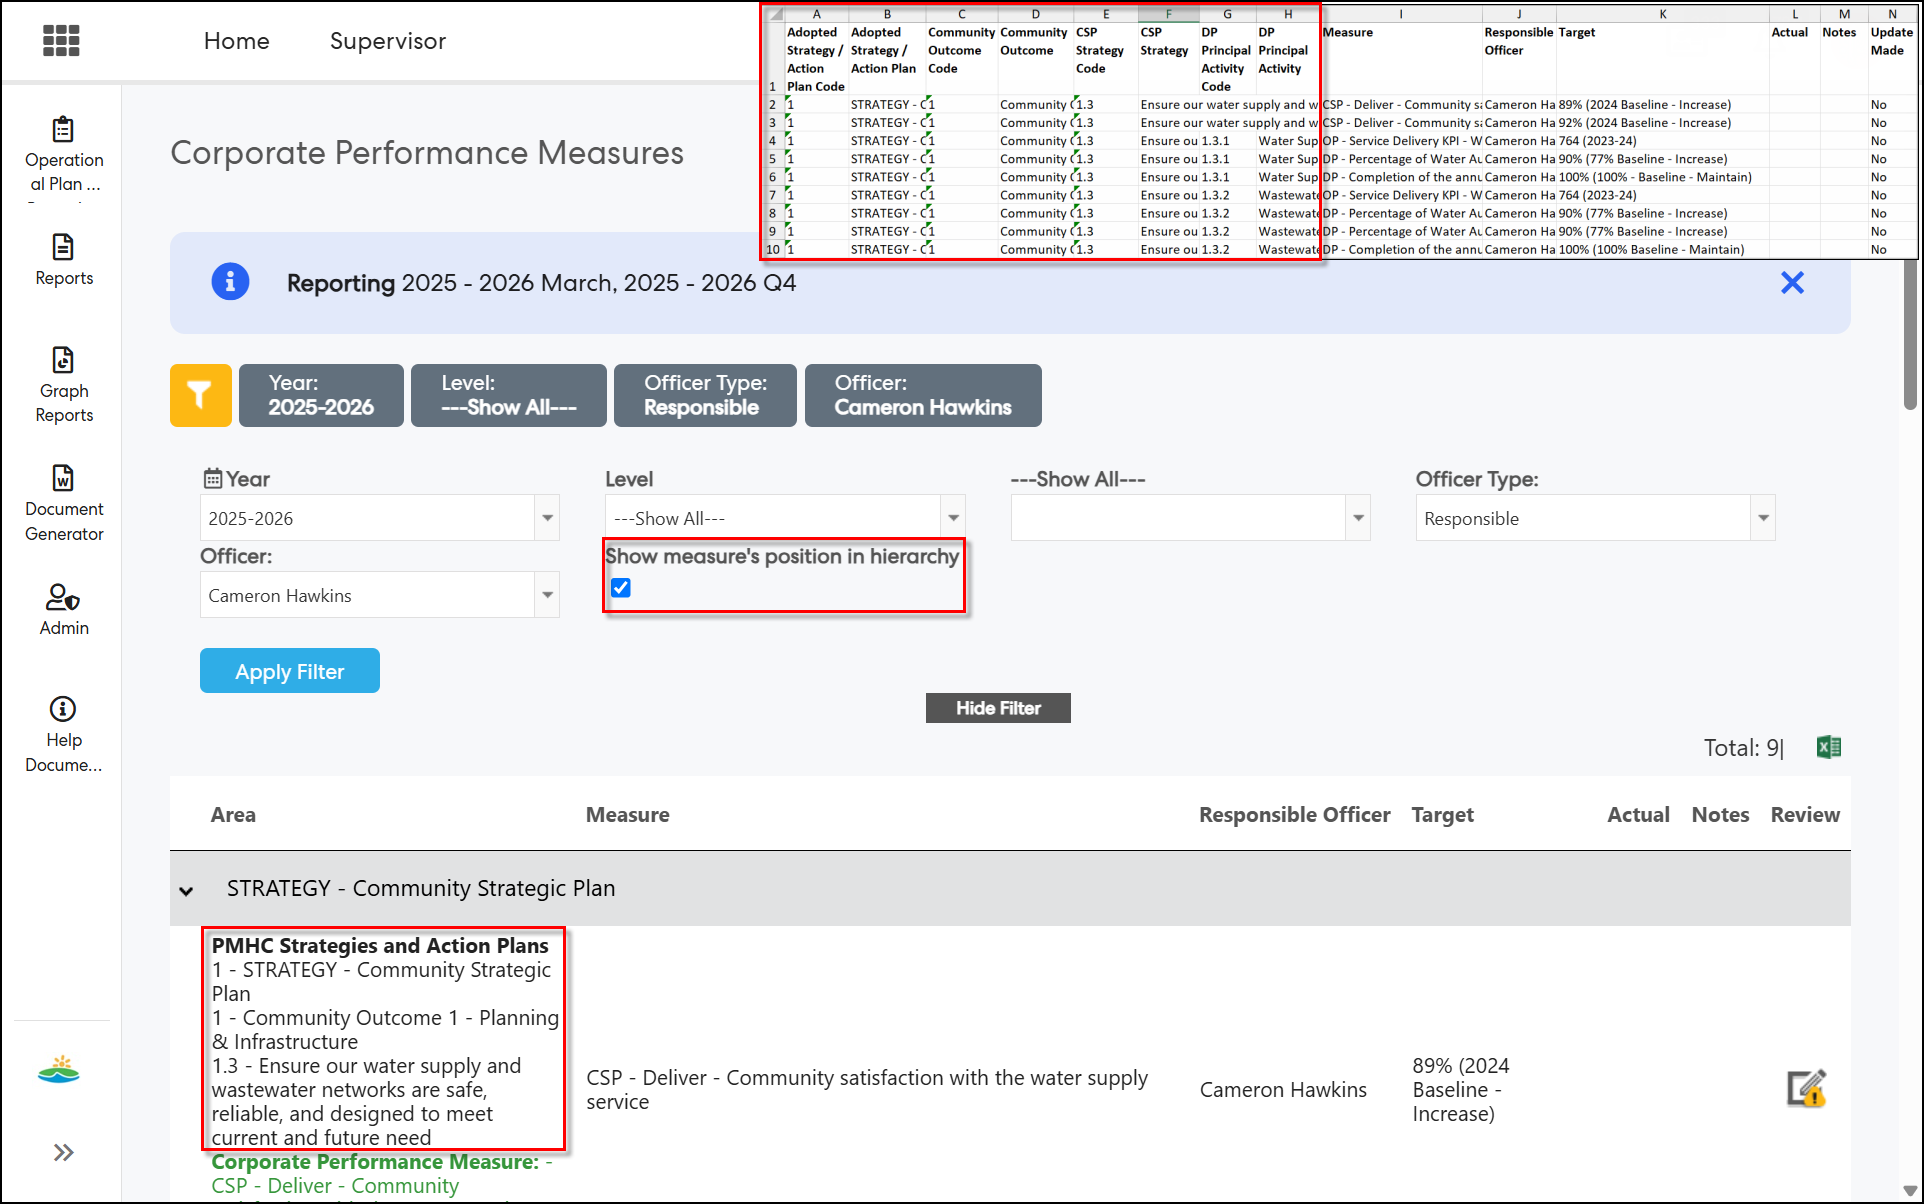
Step 5: Confirm each measure's row is populated up to the hierarchy level it is linked to, with columns for levels below left blank, and that the hierarchy data matches what is shown in the Area column of the table view.
Step 6: Apply other toolbar filters (e.g. Year, Level, Officer Type, Officer) and confirm they change what is displayed on screen but have no effect on the export's column structure.
Notes:
- The hierarchy column names and the number of columns reflect each council's own CPR configuration and will vary by site.
- This change affects the Excel export only — the Corporate Measures Report table view in Pulse is unchanged.
Issues resolved
Project Management & Control
- Fixed an issue where unlocked, archived pre-projects could be edited by users of the module regardless of role or permissions.
- Fixed an issue where users in the module could download Tasks from any project on their site, including Confidential Projects.
- Fixed an issue where the Approval Status filter displayed statuses other than the one selected.
Performance Reporting Framework
- Fixed an issue where rolled-over CPIs did not carry across their Periodic Targets.
Corporate Planning & Reporting
- Fixed an issue where Document Generator did not populate placeholders located in a document's header or footer.
Pulse Security
- Fixed an issue where the Reporting Frequency dropdown did not reflect Additional Hierarchy active frequencies for Task update notifications.
Employee Performance Management
- Fixed an issue where downloading all completed reviews returned an error.
HR Forms
- Fixed an issue where Approval Decision placeholders in notifications displayed in the incorrect tense.
eLearning
- Fixed an issue where course entries did not display correctly for contributors on the Manage Entries page.
eRecruitment
- Fixed an issue where an error occurred when closing a job or removing a LinkedIn job listing.
HR Core
- Fixed an issue where dates were displayed one day earlier than expected in the HR Core user import template download.