Contents
1. Corporate Planning & Reporting Module
1.1 View Task Officer Name for Task Updates in Action UpdateWhen updating an Action, each Task now shows the name of its current Task Officer directly in the Tasks section — no need to open the update history to see who's responsible.
- Navigate to one of the actions in any of the Action reports -> Update Action
What's New
- Each Task now shows Current Task Officer: [Name] — the most recently assigned officer.
- If no officer is assigned, this shows as Unassigned.
- The Task update history shows who was responsible for making the updates and the task officer at the time of each past update.
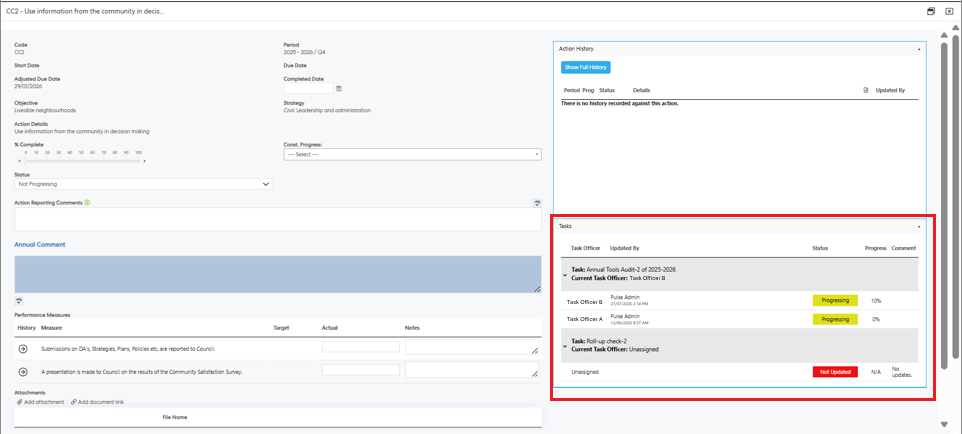
Note: If you are unable to see the task update history section in your Action Update window then please check whether the "Action Tasks Are Visible When Updating An Action" key is enabled for your module.
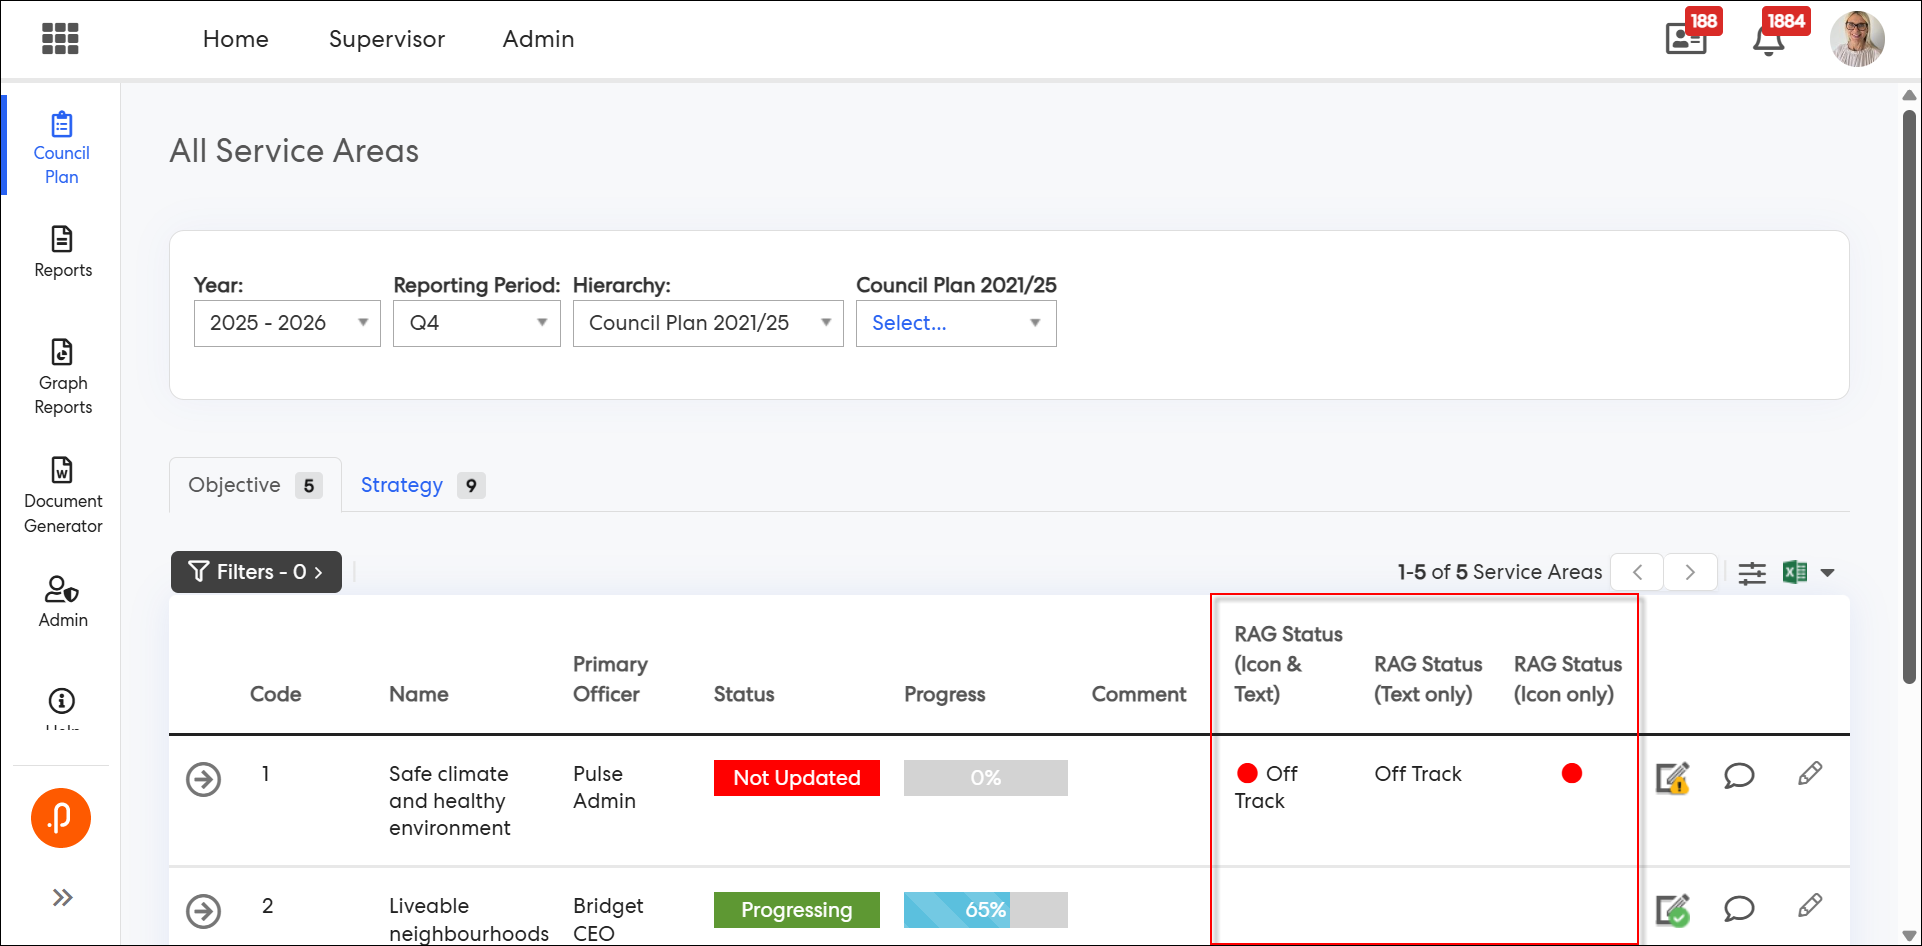
1.2 Display Traffic Lights for Additional Attributes in Action and Service Area GridsTraffic Light type Additional Attributes (AAs) — configured with one or more options, each made up of a description and a HEX colour value — are now rendered as a coloured icon and description directly within Action grids and Service Area grids. This applies across Action, Action Progress Update, Hierarchy Item, and Organisational Hierarchy Item Additional Attributes wherever the Show Attribute toggle is enabled and the attribute's column is added to the grid. Column Configuration has also been enhanced to let users choose between a text-only, icon-only, or icon-and-text display for each Traffic Light attribute, with matching support in Excel exports. This improves at-a-glance readability of status information without needing to open individual records.
What's Changed:
1. Traffic Light type Action Additional Attributes now display as a coloured icon + description in all Action grids, when Show Attribute is ON and the attribute's column is enabled.
2. Traffic Light type Action Progress Update Additional Attributes now display consistently across the same set of Action grids.
3. Traffic Light type Hierarchy Item Additional Attributes now display in Service Area grids for the relevant Hierarchy Level.
4. Traffic Light type Organisational Hierarchy Item Additional Attributes now display in Service Area grids for the relevant Organisational Hierarchy Level.
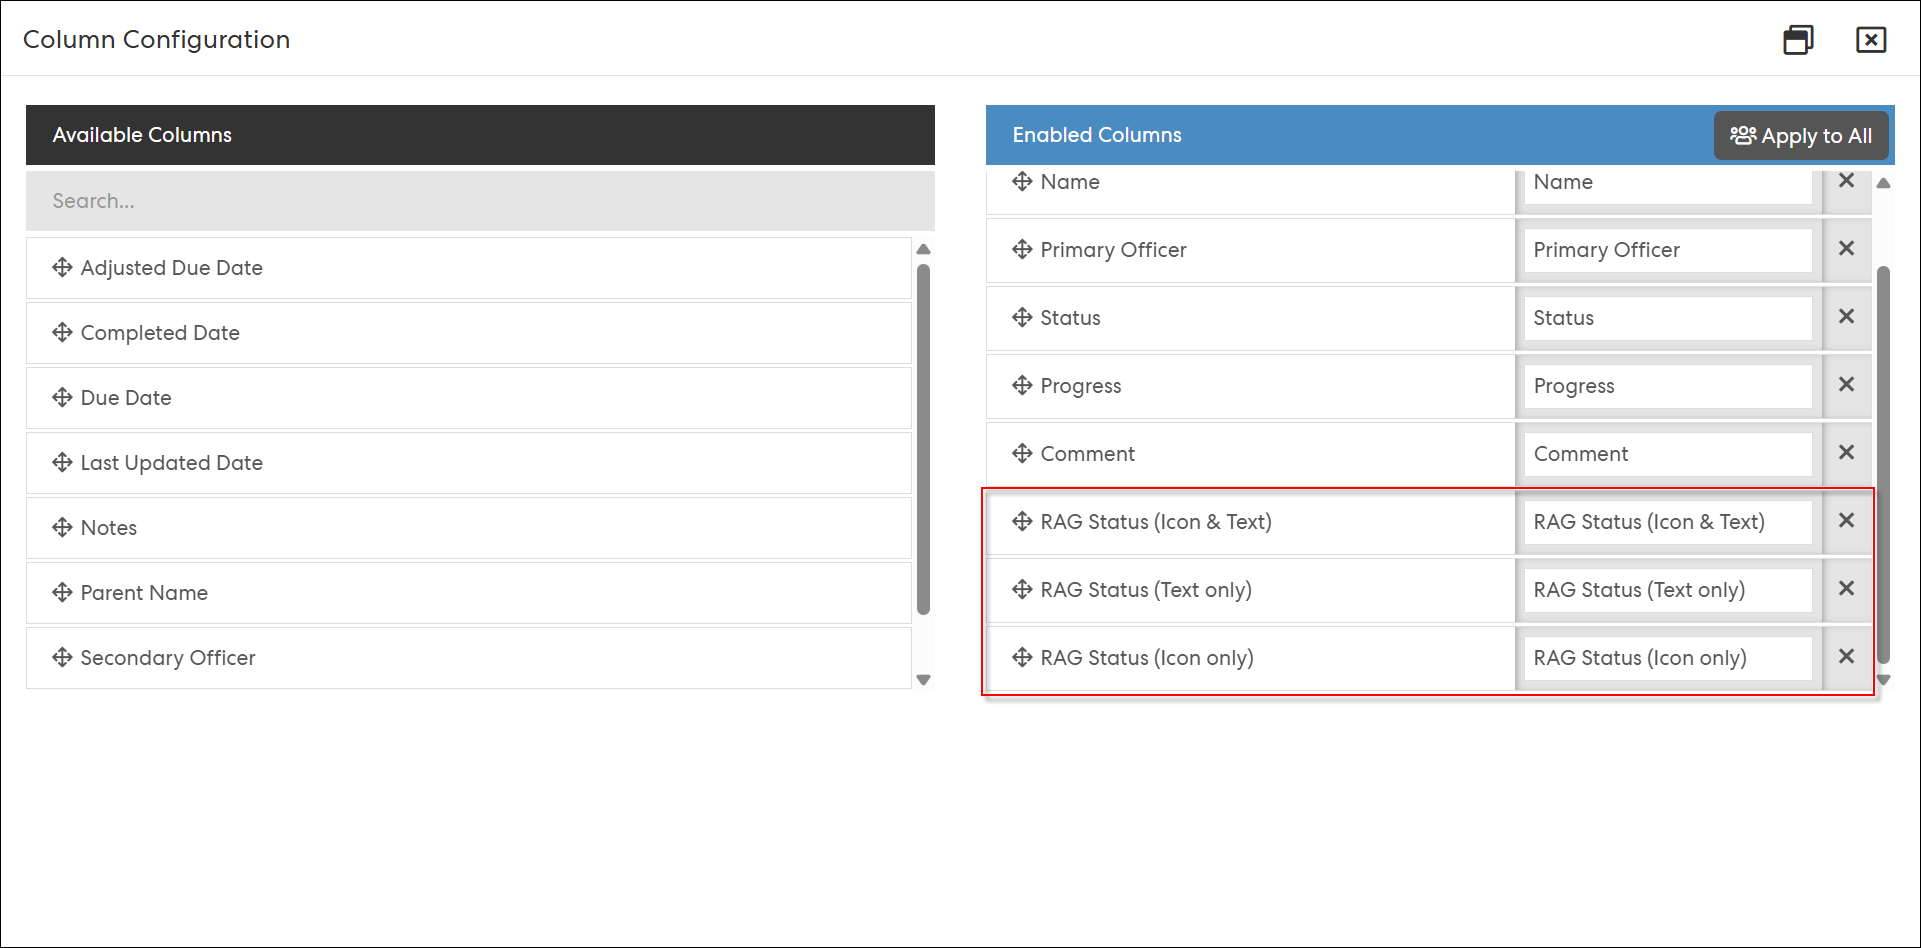
5. Column Configuration for Action grids and Service Area grids now exposes three selectable columns per Traffic Light attribute — (Text only), (Icon only), and (Icon & Text) — replacing the single combined column previously available.
6. Existing (Text only) columns are automatically relabelled with the new suffix in the configuration label only; the rendered grid column and header text are unchanged for end users.
7. Column enabled/disabled state, order, and any custom header name are persisted per user, consistent with existing column configuration behaviour.
8. Excel export supports all three column variants for the attribute's description text. Rendering of the traffic light icon and its configured colour in Excel is not yet supported — consistent with the existing behaviour of PMC project grid exports (see Note below).
Access and Navigation
1. Configuring and Verifying Traffic Light Display — Action Grids
Step 1: Log in as an Admin user and navigate to Admin > General Settings > Action Additional Attributes or Admin > General Settings > Action Progress Update Additional Attributes.
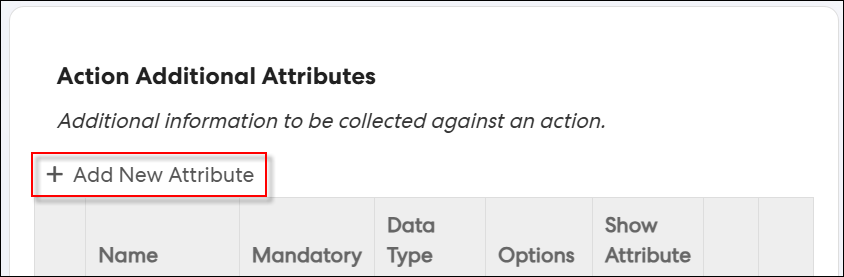
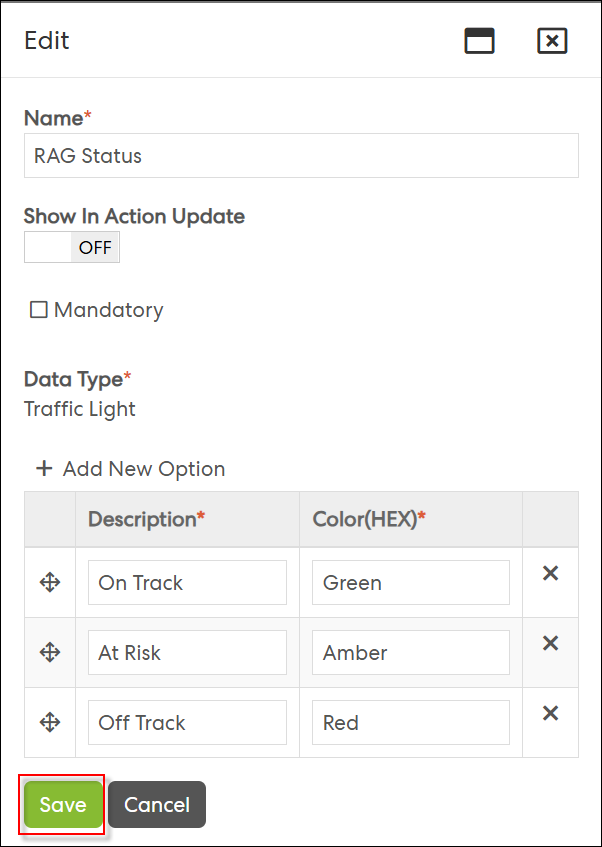
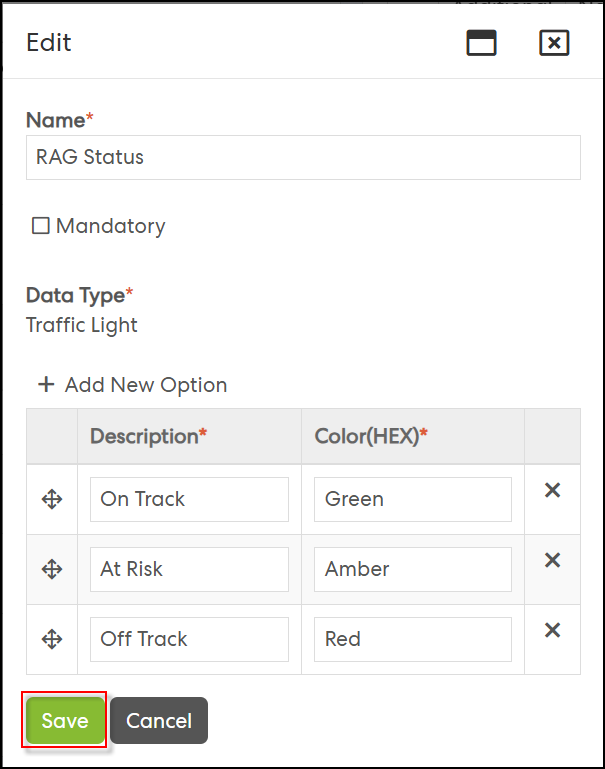
Step 2: Select or create a Traffic Light data type attribute, add at least one option with a description and HEX colour value, and set Show Attribute to ON. Click Save.

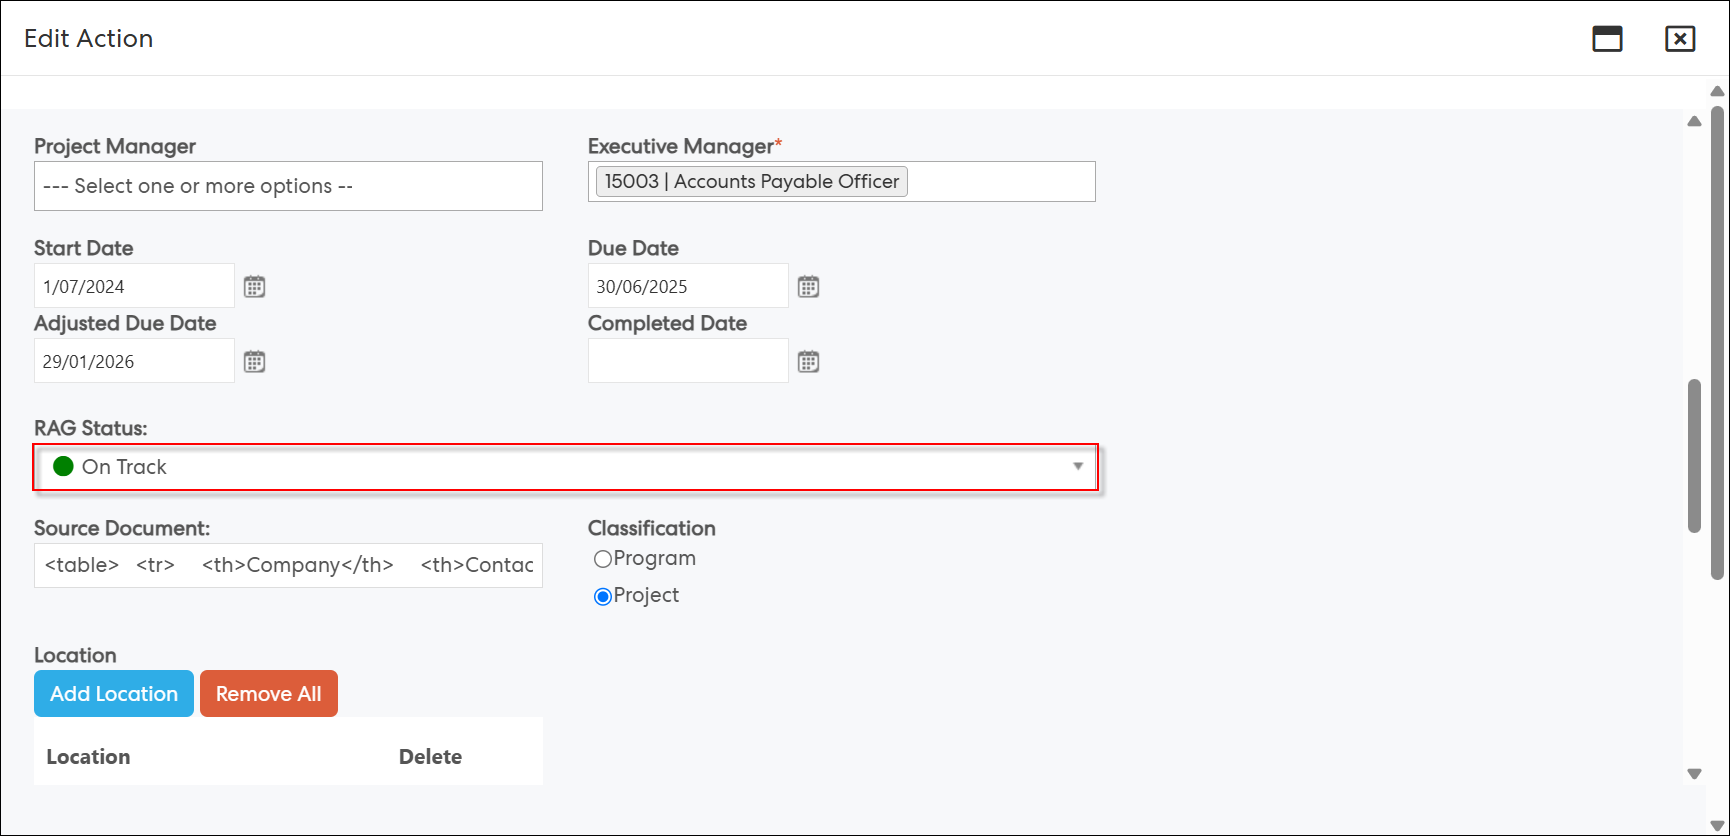
Step 3: Navigate to an Action (Add/Edit pop-up) or an Action Progress Update pop-up and select an option for the configured attribute.
Step 4: On any of the following grids — View All Actions, My Actions (Action tab), My Pulse Summary (Pre-UNIFI view), My Team's Actions (Action tab), Action Authorisation, Action Comments Approval, Action Update Review, My Draft Actions, All Draft Actions — open Column Configuration. Under Available Columns, add the required column for the attribute to Enabled Columns: [Attribute Name] (Text only), [Attribute Name] (Icon only), or [Attribute Name] (Icon & Text).
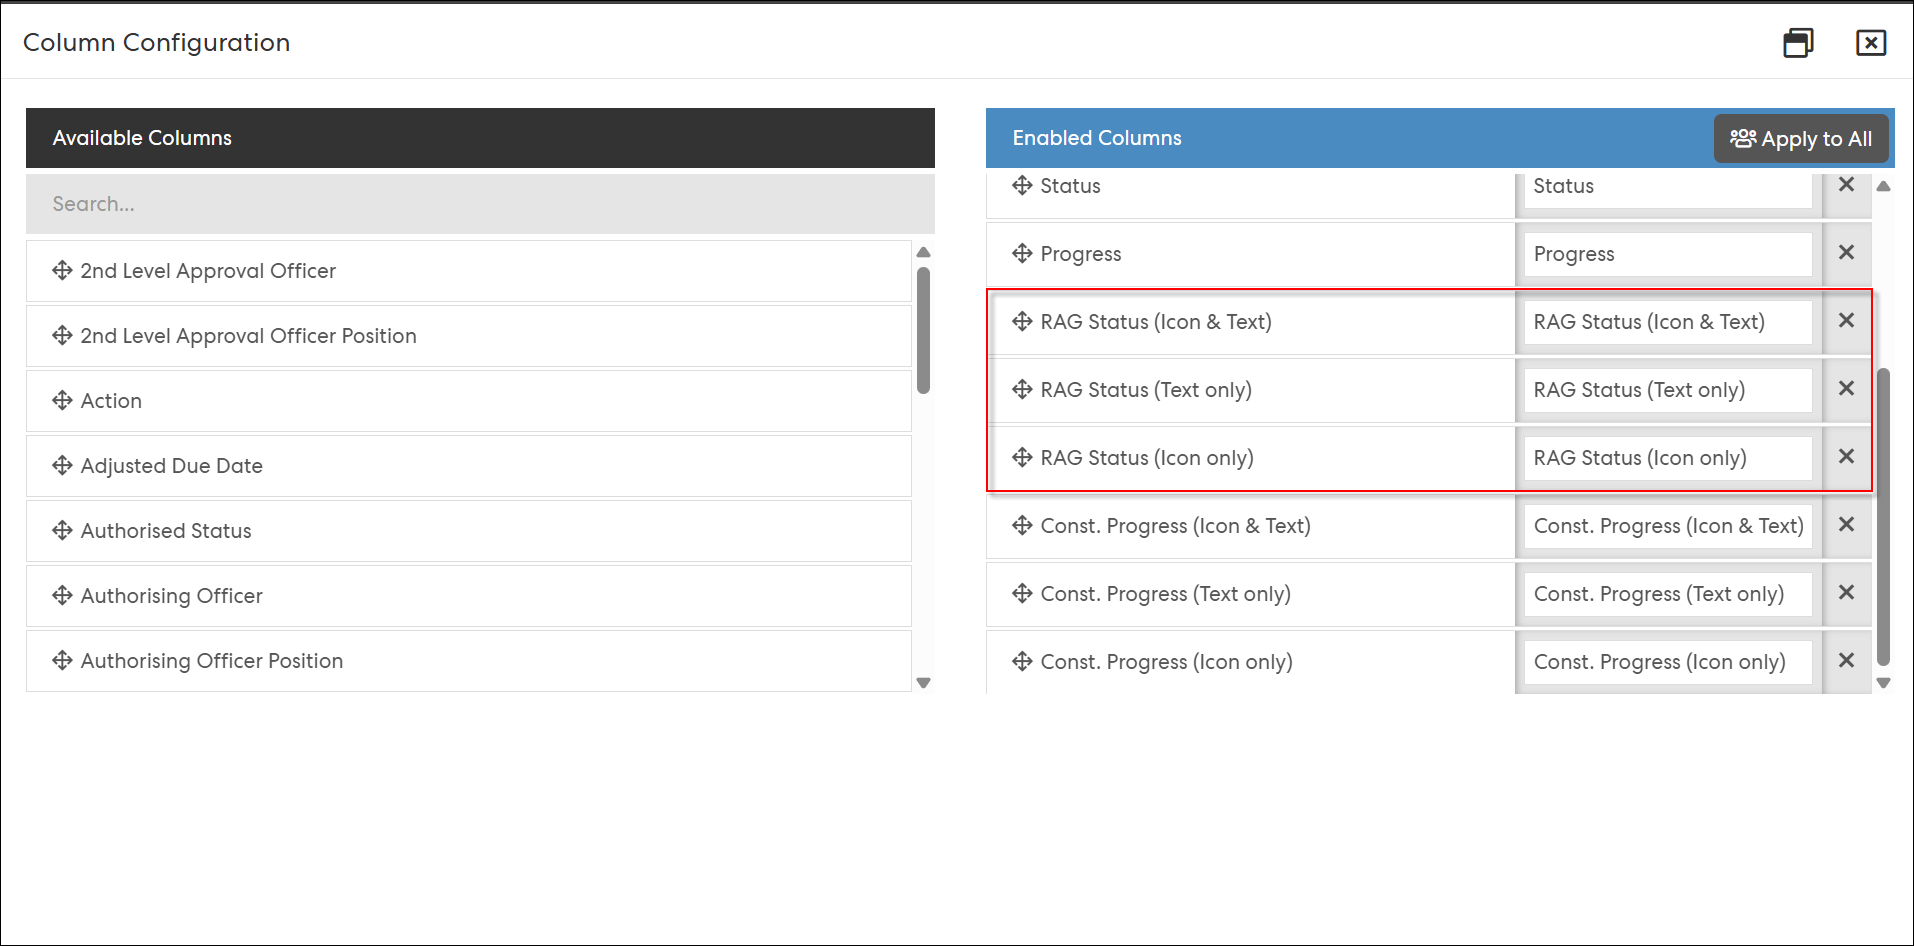
Step 5: On first enabling a variant, confirm the grid column header defaults to the full column name (including the suffix) and remains editable. Verify the coloured traffic light icon and/or description display correctly in the grid, matching the configured colour.
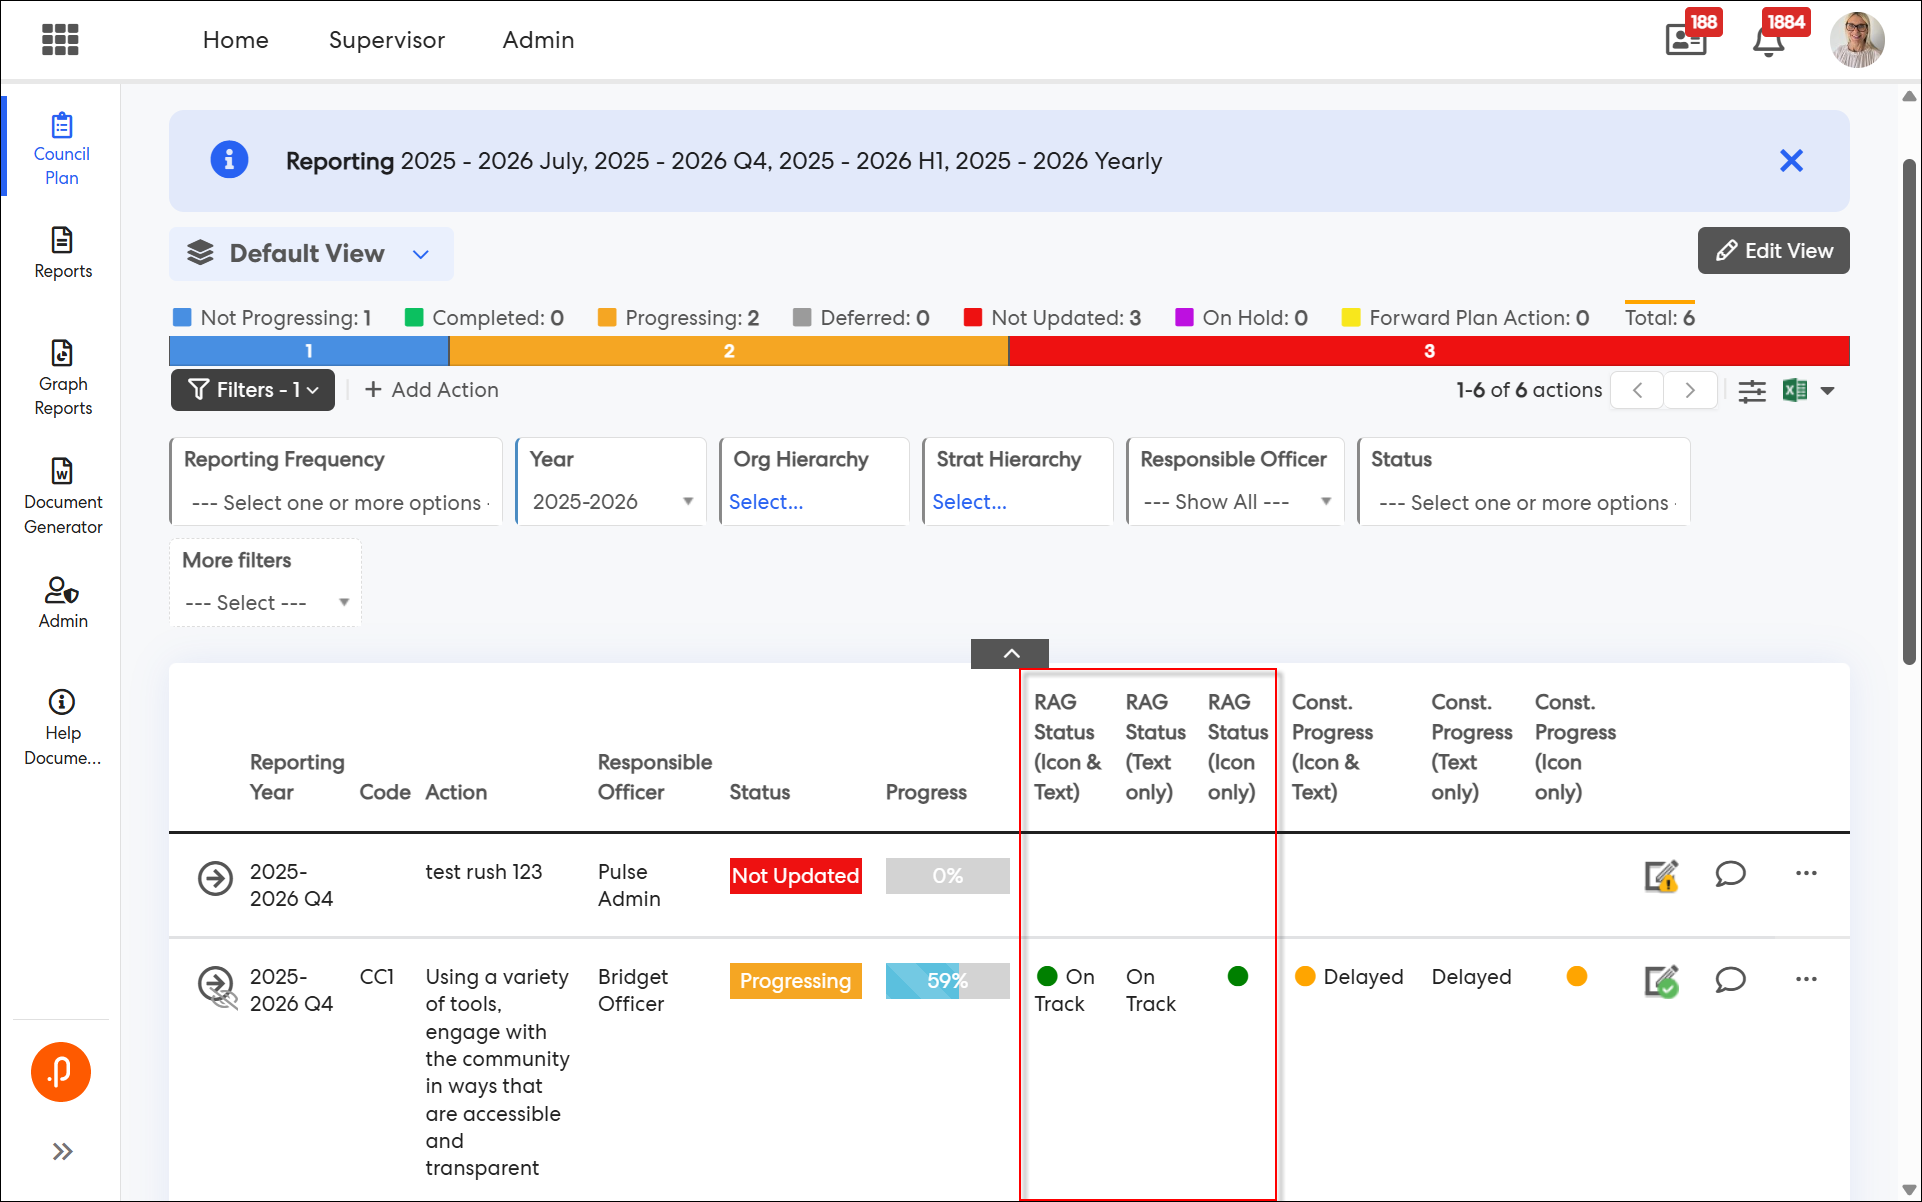
Step 6: Reload the page (or log out and back in) and confirm the enabled column, its order, and any custom header name are retained. Export the grid to Excel and confirm the attribute's description text is exported correctly for each enabled column (see Note below regarding icon rendering).
2. Configuring and Verifying Traffic Light Display — Service Area Grids
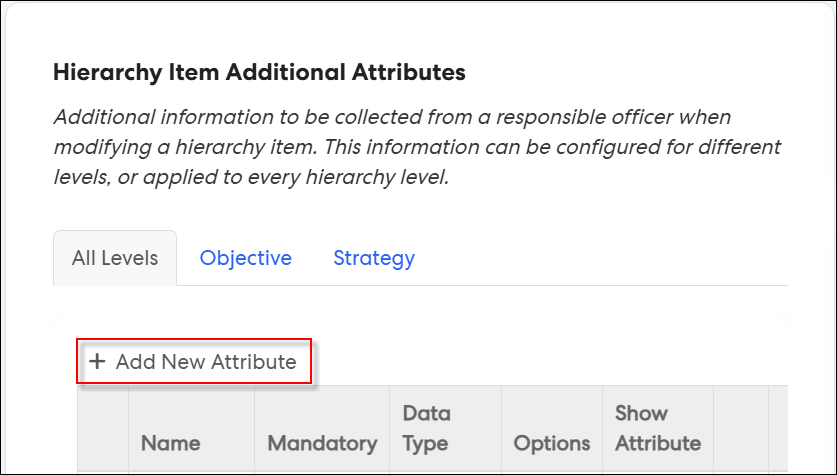
Step 1: Navigate to Admin > General Settings > Hierarchy Item Additional Attributes or Admin > General Settings > Organisational Hierarchy Item Additional Attributes.
Step 2: Configure a Traffic Light attribute with at least one option and set Show Attribute to ON for the relevant Hierarchy Level or Organisational Hierarchy Level. Click Save.

Step 3: Open a Service Area Edit pop-up for a Service Area under that hierarchy level and select an option for the attribute.
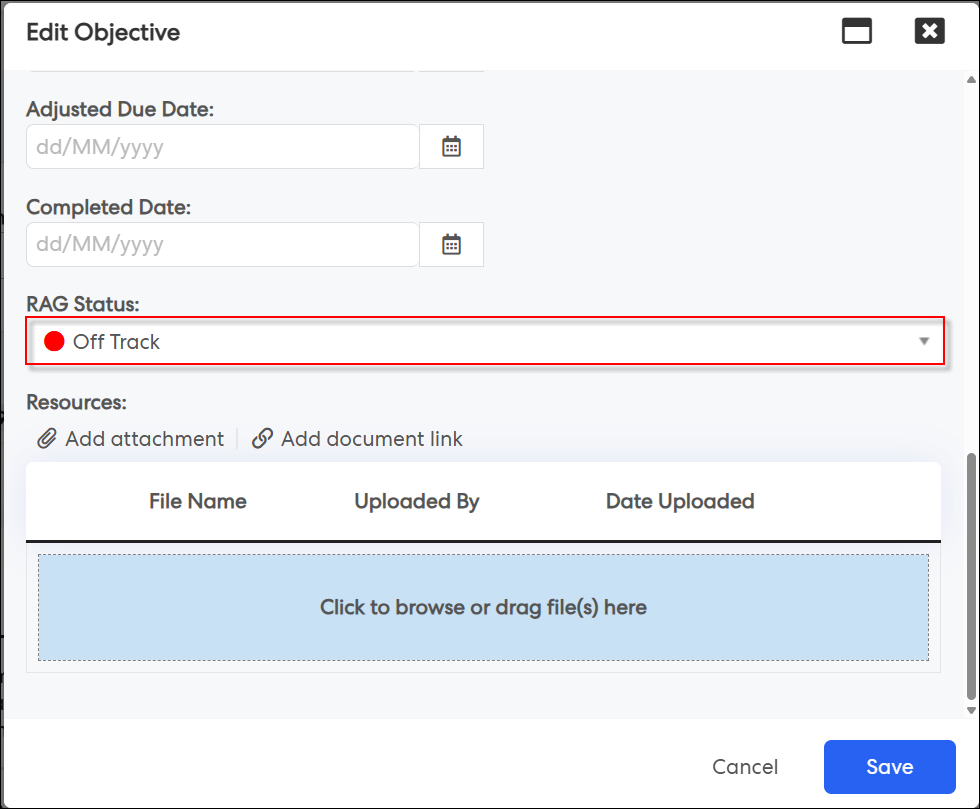
Step 4: On any of the following grids — My Service Areas, All Service Areas, My Actions (Service Area tab), My Pulse Summary (Pre-UNIFI view), My Team's Actions (Service Area tab) — open Column Configuration and add the required column variant for the attribute (Text only, Icon only, or Icon & Text), as described for Action Grids above.
Step 5: Confirm the column header default and editability, then verify the traffic light icon and/or description display correctly for that Service Area.
Step 6: Reload the page and confirm the enabled column, its order, and any custom header name are retained. Export the grid to Excel and confirm the attribute's description text is exported correctly for each enabled column (see Note below regarding icon rendering).
Notes: All four attribute types share a common prerequisite — the relevant Additional Attributes column must be enabled in the grid for the traffic light to appear. Setting Show Attribute to OFF results in the attribute not being displayed in any grid. The new column variants apply only to Action grid and Service Area grid Column Configuration pop-ups; they are not added to Document Generator Action or Service Area column configurations. Traffic light icons and their configured colours are not currently rendered in Excel exports — only the attribute's description text is exported at this time. This is consistent with the existing Excel export behaviour of PMC project grids and is a known technical limitation.
2. Forms 2.0 Module
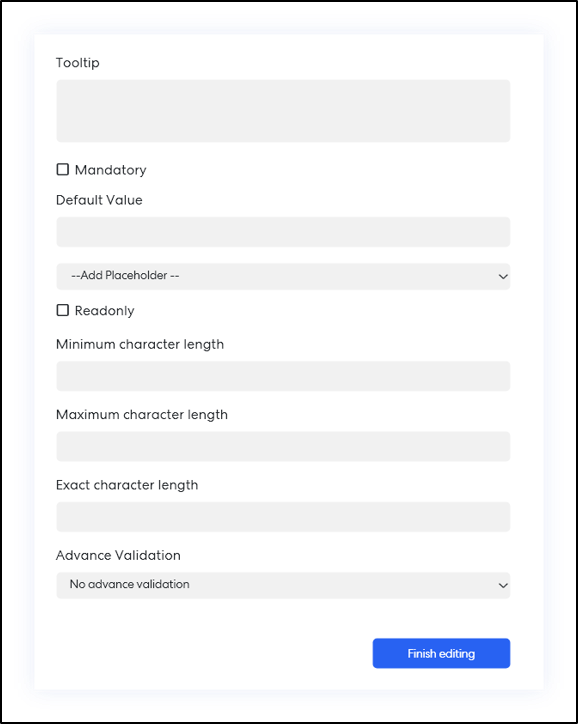
2.1 More Control Over Single Line Answers with Minimum and Exact Character LengthYou can now set stricter rules on how many characters people enter into Single Line Answer fields. This is useful for fields like employee IDs, account numbers, or reference codes, where the length of the answer matters just as much as the content.
Two new options are available when setting up a Single Line Answer field:
- Minimum Character Length — set the fewest number of characters someone must enter for their answer to be accepted. Great for cases where an answer needs to be "at least this long" but can vary above that.
- Exact Character Length — set the precise number of characters an answer must contain, no more and no less. Ideal for fixed-format values like an 8-digit account number.
Helpful hints and clear error messages guide users as they fill out the form, so they know exactly what's expected before they submit. These length rules work independently of whether a field is marked as mandatory, giving you the flexibility to enforce format without necessarily forcing a response.
3. Delegations & Policies Register
3.1 Position Code Display in Delegation ReportsThe "Delegations By Position" and "Delegations By User" document generator reports have been enhanced to optionally surface Position Code alongside Position Name, both in the Position filter and in the report output. Display of the Position Code in the filter follows the same site-level setting already used to show position codes elsewhere in Pulse, so behaviour stays consistent across the system. A new report-level checkbox additionally lets users choose to include the Position Code in the report heading itself, independent of the filter setting. No migration is required — all existing saved reports and configurations continue to behave exactly as they do today unless a user opts in.
What's Changed:
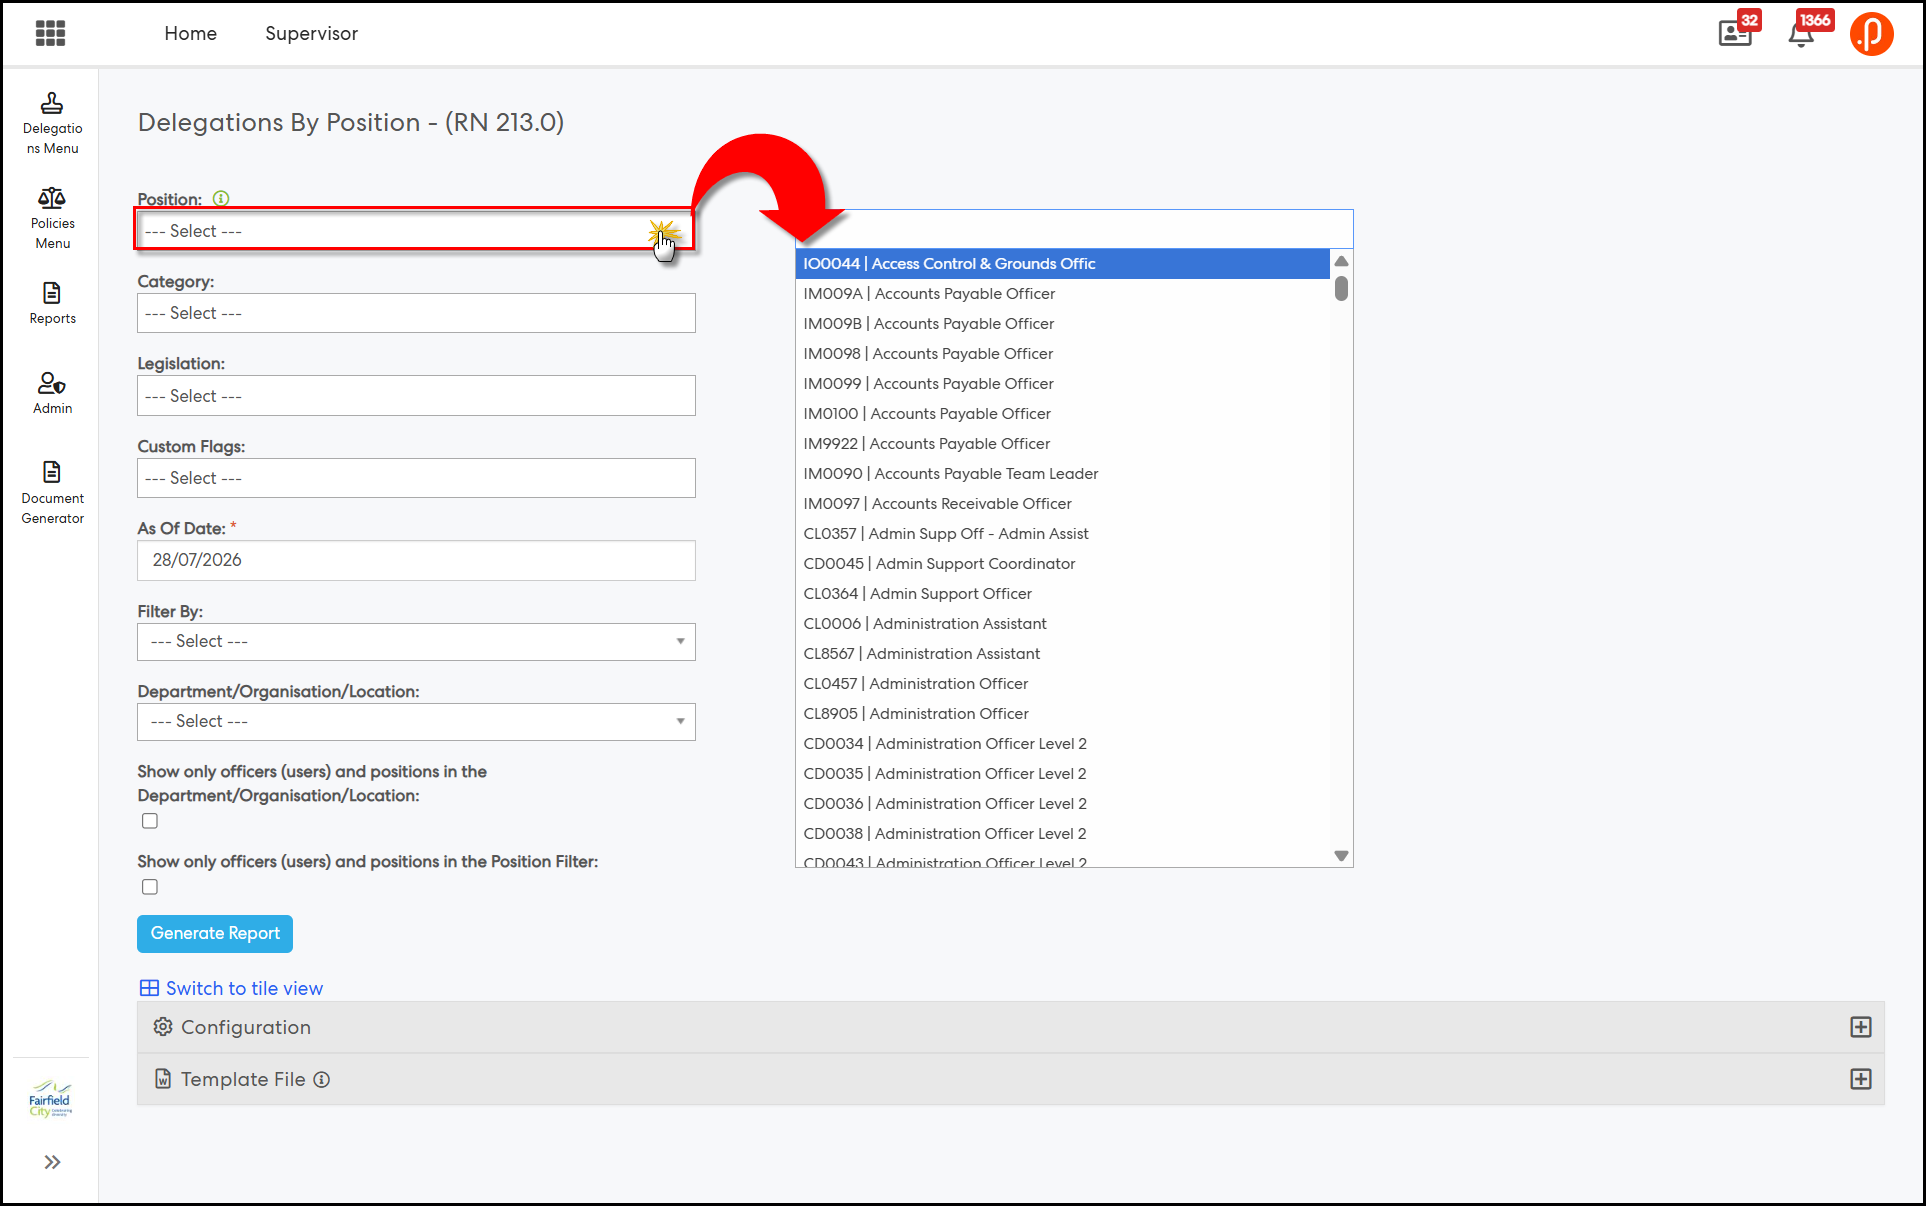
1. In the "Delegations By Position" document generator report, the Position filter now displays each option as Position Code | Position Name (e.g. CS0096 | Contracts Officer) for sites where position code display is enabled. Where it is not enabled, the dropdown continues to display Position Name only, unchanged from current behaviour (see Note below).
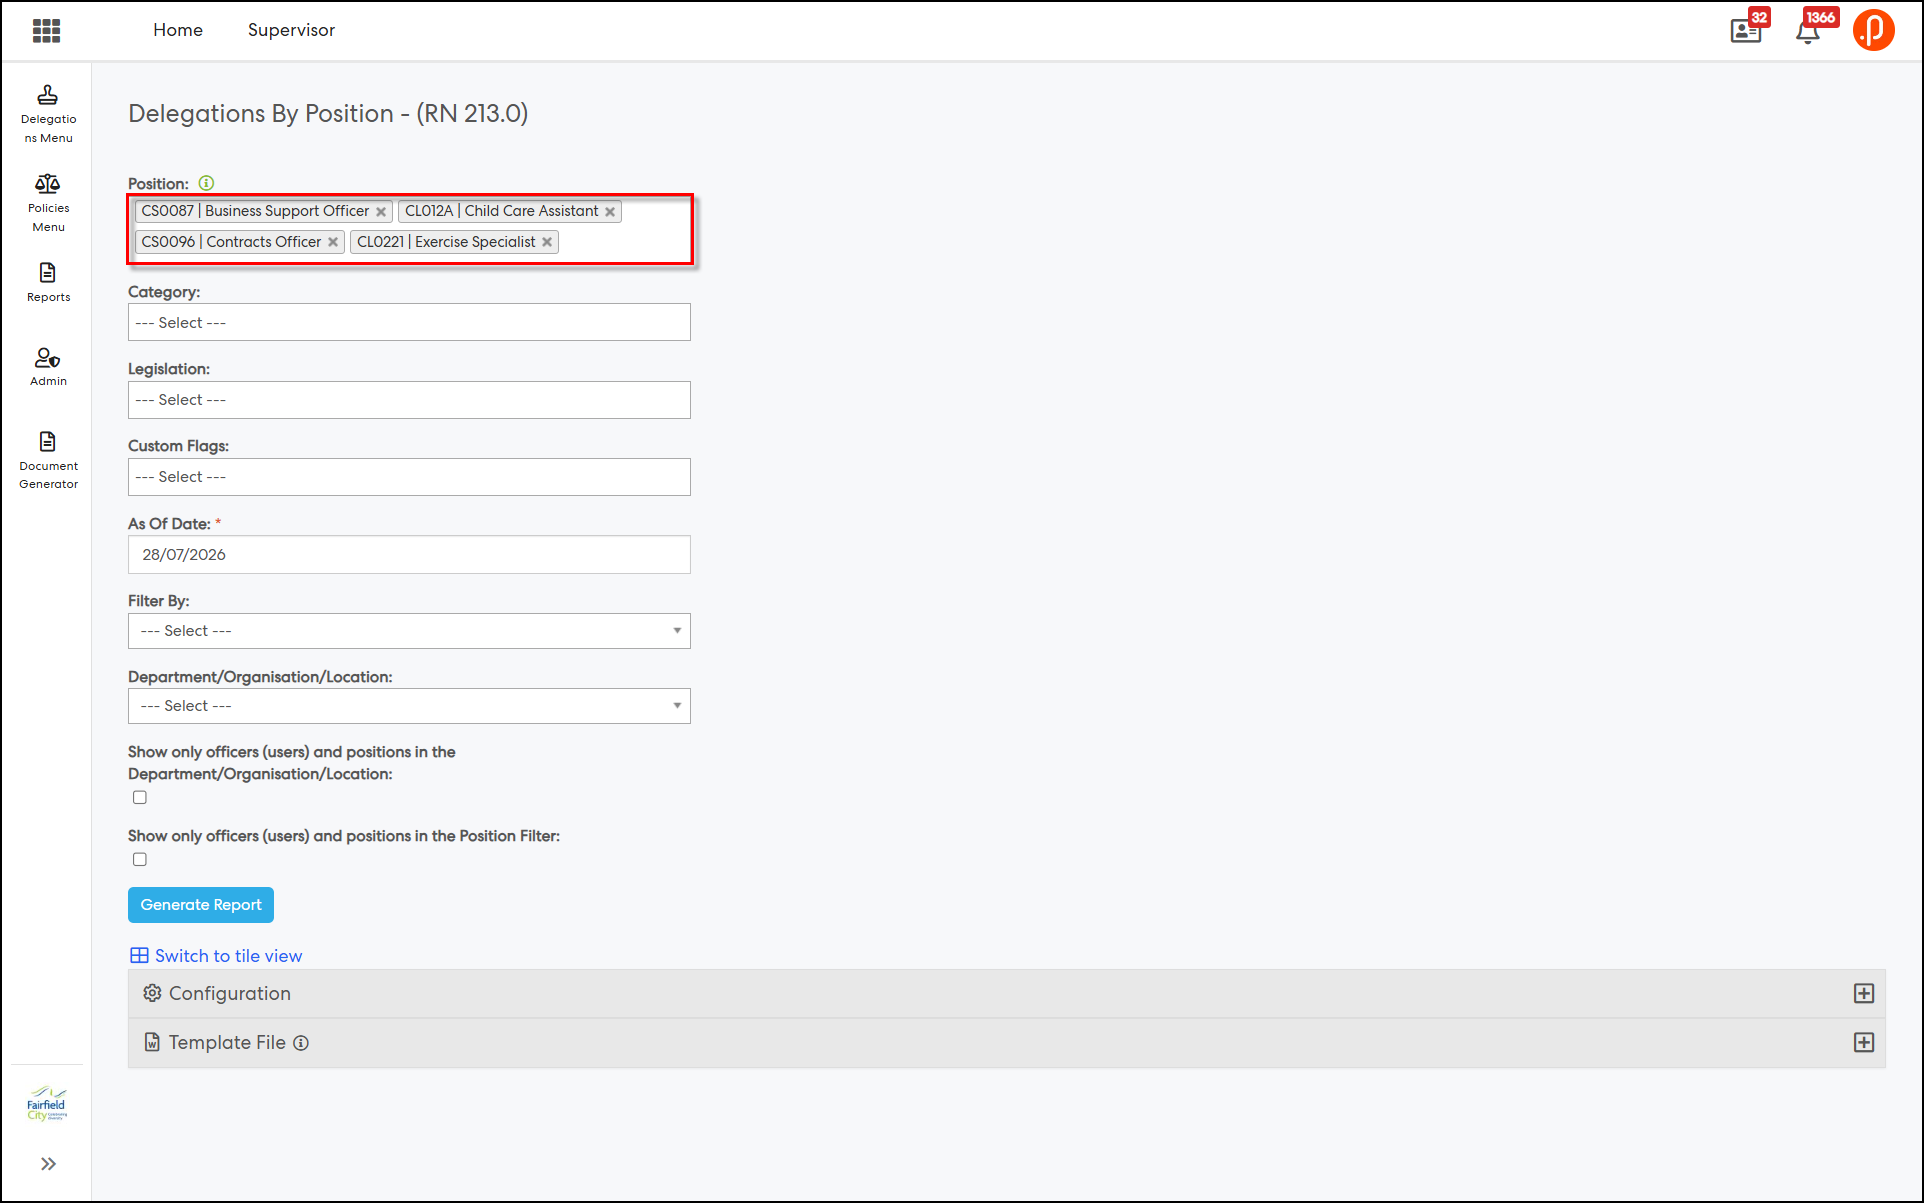
2. This formatting applies consistently to dropdown list items, selected chips, and search results.
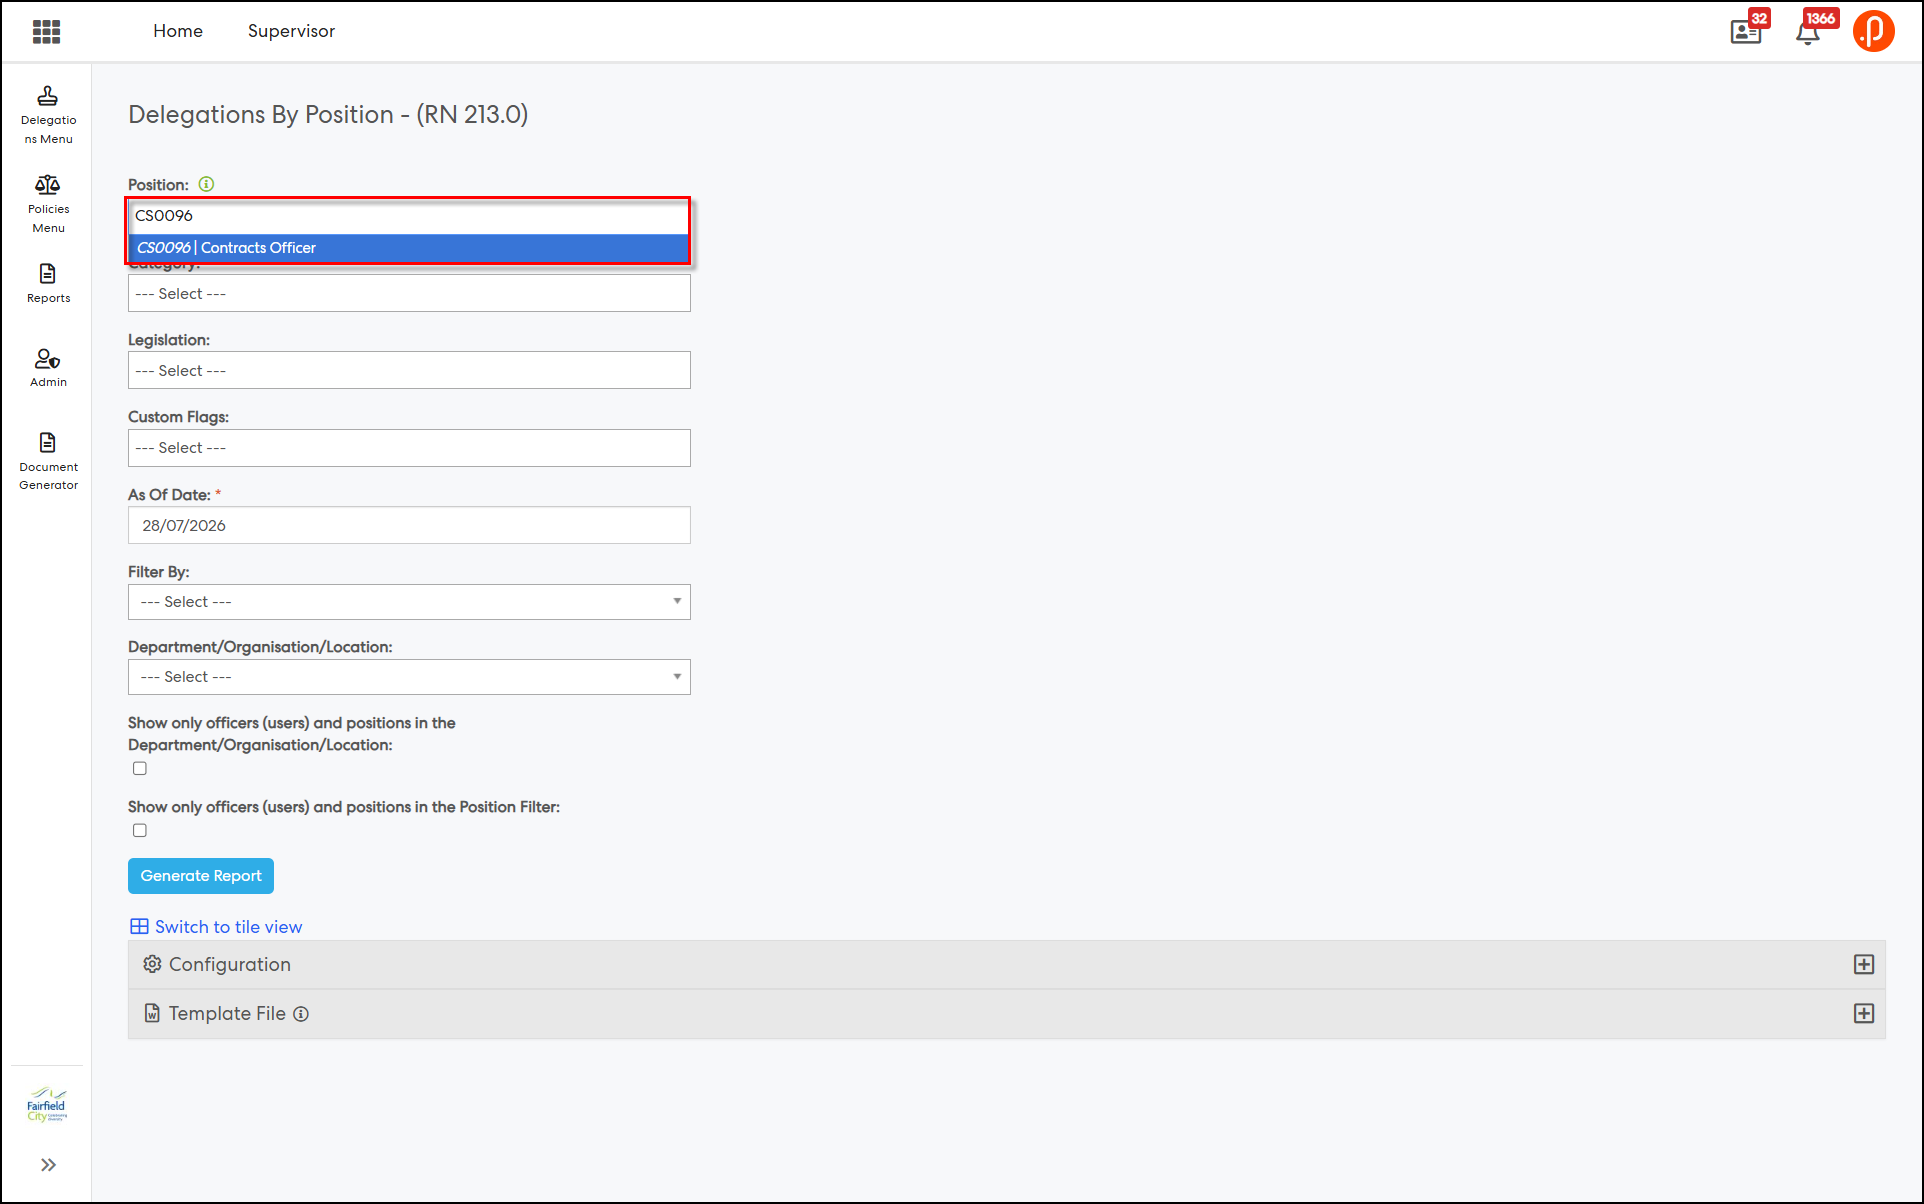
3. Position filter search/filter matching now also matches on Position Code for sites where position code display is enabled (e.g. typing "CS0096" or "Contracts Officer" both return the same result); otherwise, matching is by Position Name only, as today.
4. Previously selected positions on a saved report are restored using the site's current position code display setting, not the state at the time the report was saved — so the display format always reflects the org's current configuration.
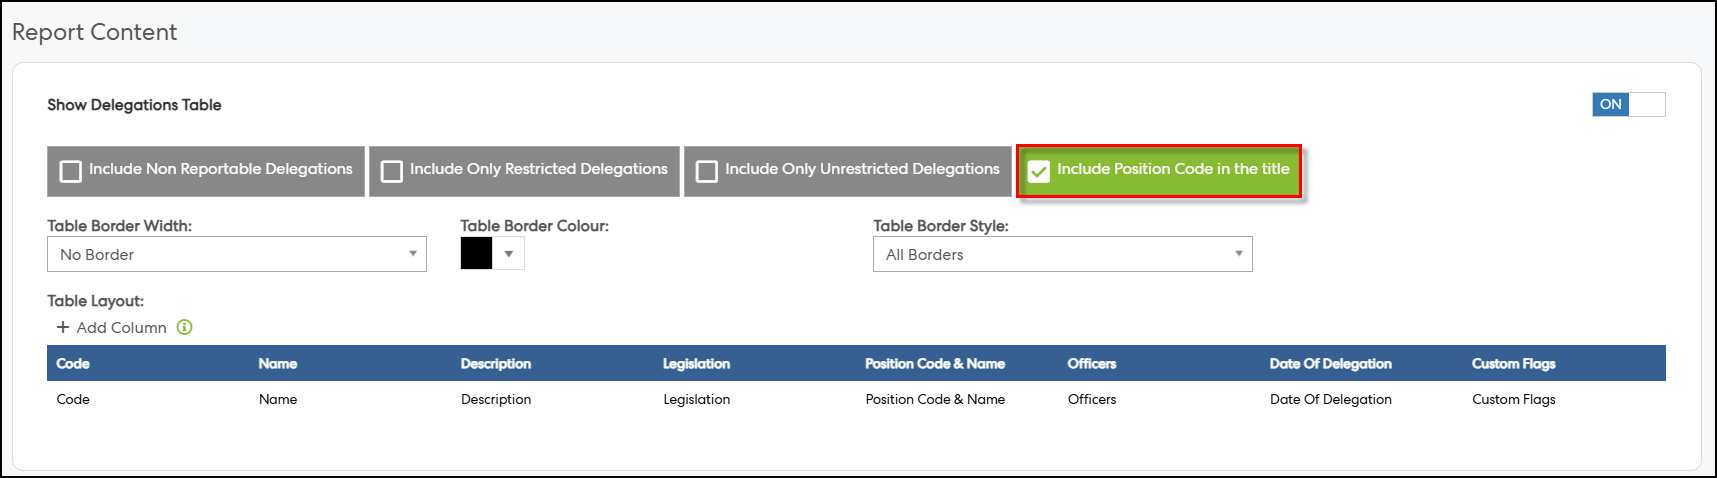
5. A new "Include Position Code in the title" checkbox has been added to the Delegation table configuration for both the "Delegations By Position" and "Delegations By User" reports, alongside the existing Include Non Reportable Delegations, Include Only Restricted Delegations, and Include Only Unrestricted Delegations checkboxes. It defaults to unchecked.
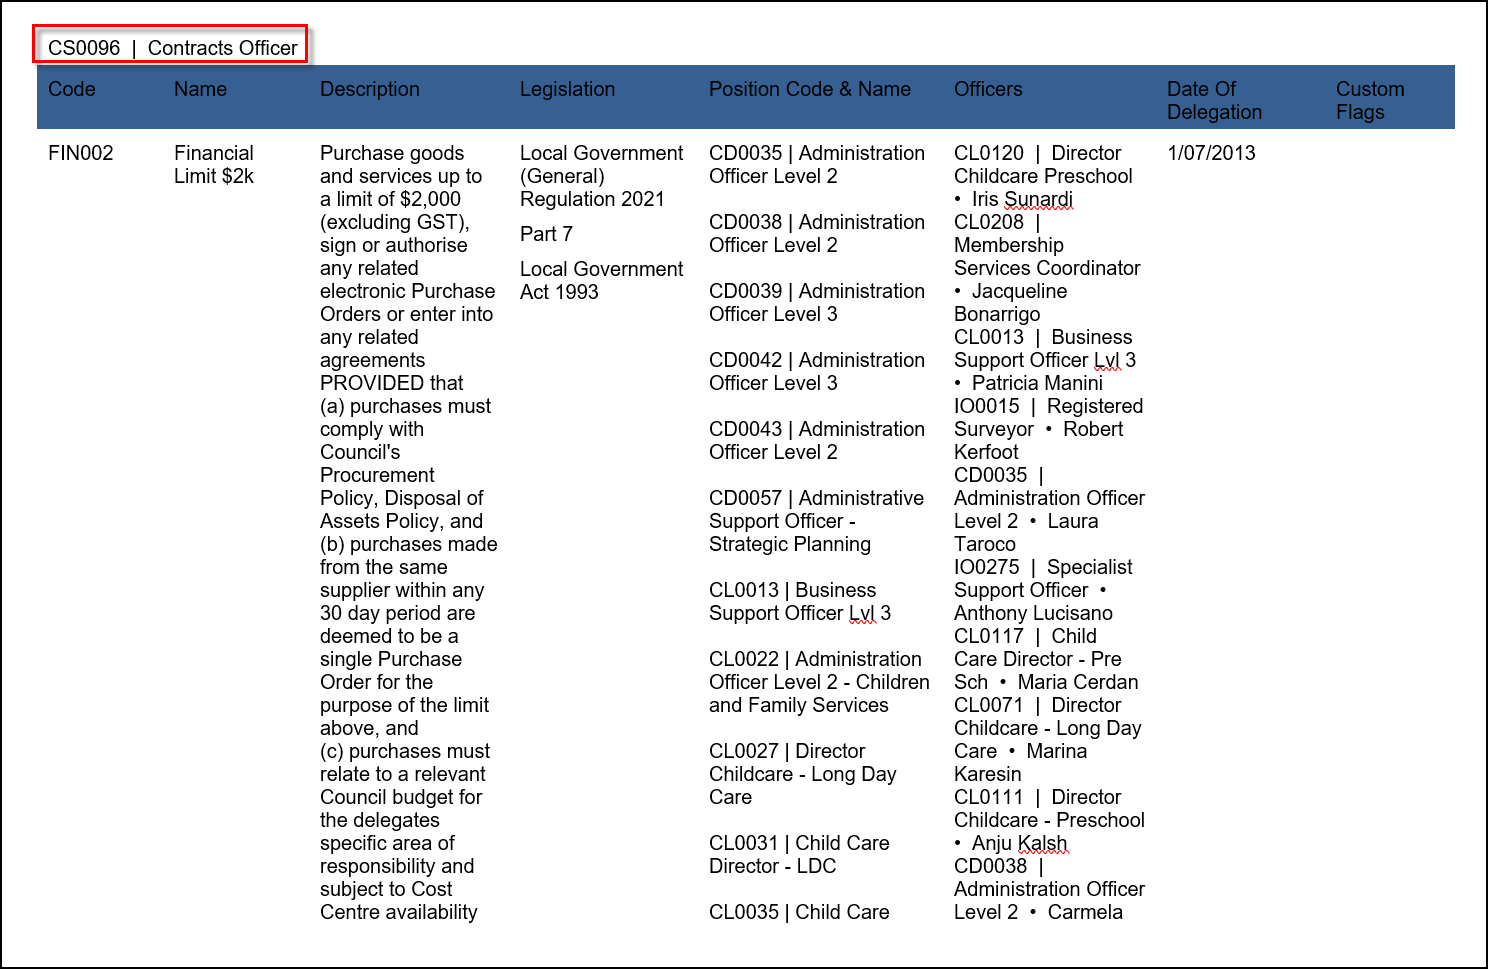
6. When checked, the position heading in "Delegations By Position" displays as Position Code | Position Name (e.g. CS0096 | Contracts Officer), and the "Position:" label in "Delegations By User" displays as Position: CS0096 | Contracts Officer. The "User:" line above the position label is unaffected.
7. The checkbox state is persisted per saved report and restored when the report is reopened. A fresh, never-saved report always defaults to unchecked.
8. Existing saved report configurations are unaffected by this change — no migration or backfill is required.
Access and Navigation
1. Position Code Display in the Position Filter — Delegations By Position
Step 1: Navigate to Delegation & Policies Register > Document Generator > Delegations By Position. (Position code display in the filter must already be enabled for your site — see Note below.)
Step 2: Open the Position filter dropdown and confirm each option displays as Position Code | Position Name (e.g. CS0096 | Contracts Officer).
Step 3: Type a position code (e.g. "CS0096") and separately a position name (e.g. "Contracts Officer") into the filter search, and confirm both return the same result.
Step 4: Select one or more positions, save the report, then reopen it and confirm the selected chips are restored, in the same Position Code | Position Name format.
2. "Include Position Code in the Title" — Delegations By Position & Delegations By User
Step 1: Open the Delegation table configuration area for either the "Delegations By Position" or "Delegations By User" report.
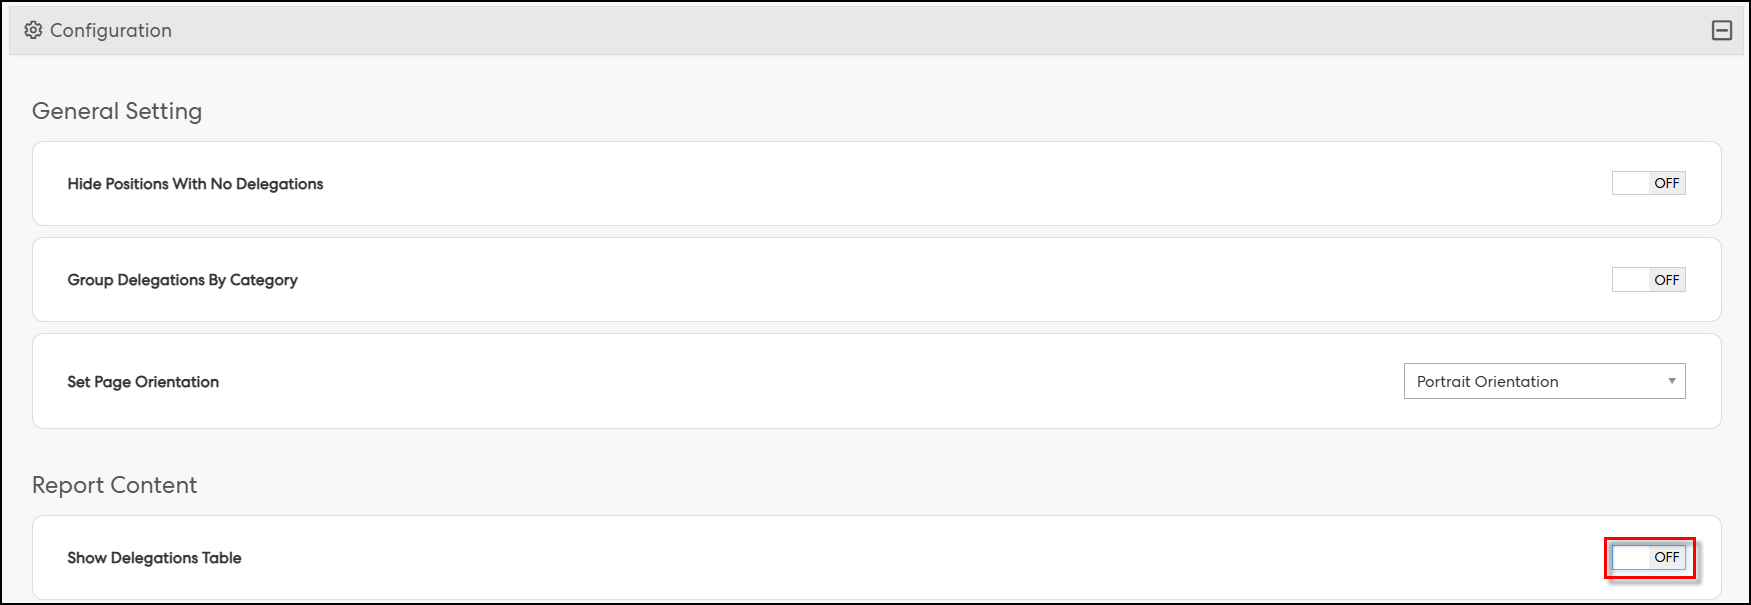
Step 2: Confirm the new "Include Position Code in the title" checkbox is present and unchecked by default.
Step 3: Run the report with the checkbox unchecked and confirm the heading is unchanged — e.g. "Contracts Officer" in Delegations By Position, and "Position: Contracts Officer" in Delegations By User.
Step 4: Check "Include Position Code in the title", run the report again, and confirm the heading updates — e.g. "CS0096 | Contracts Officer" in Delegations By Position, and "Position: CS0096 | Contracts Officer" in Delegations By User. Confirm the "User:" line above the position label is unchanged.
Step 5: Save the report with the checkbox checked, reopen it, and confirm the checkbox state and heading format are retained. Then open a new, never-saved report and confirm the checkbox always defaults to unchecked.
Note: The display of position codes in the Position filter is controlled by a backend configuration and is not available as a site-level setting. If you would like this feature enabled for your site, please contact the Pulse Support team.
Issues resolved
Employee Performance Management
- Fixed an issue where changes to the Goal Instructions made in General Settings and Tab Designer did not update the associated configuration correctly. Instruction text is now synchronized, ensuring changes are reflected consistently throughout the system.
- Fixed an issue where a user's assigned goal types were not updated correctly after their goal grouping changed. The system now synchronizes goal types with the user's current grouping, ensuring archived or removed goal types are no longer retained.
System
- Fixed an issue where the "Notify of a New Position Created" notification was not triggered when a new position was created.
Corporate Planning & Reporting and Additional Hierarchies
- Fixed an issue where the Reporting Frequency and Period in the Required Filters were not filtering the data correctly when set to 'Yearly' in Document Generator.
- Fixed an issue where the Organisation Review document in Document Generator displayed updates from later periods for actions that had no update in the selected reporting period.
Performance Reporting Framework
- Fixed an issue where updating a CPI with a 'Select List' CPI Target triggered an 'All periodic targets are required' error. CPIs with a 'Select List' target can now be updated without error.