Contents
1. HR Core
1.1 Weekly Email Digest to Admins and Supervisors for key datesAdministrators and Supervisors now have the capability to receive weekly digests containing important employee milestones, including Birthdays, Work Anniversaries, Employee Terminations and Employee Commencements.
To enable this notification, please contact Pulse Support via email at <support@pulsesoftware.com> or phone on 1300 363 325
Upon activation, administrators and supervisors will gain access to regular weekly notifications summarizing key events such as Birthdays, Work Anniversaries, Employee termination, and Employee Commencements, ensuring that they remain informed and can celebrate these significant occasions with their teams.
Note: The image below is a preview of the notification.

Admins in the HR core module now have the capability to manage employee skills directly within the system, streamlining the process of skill tracking and development.
Step 1: Login to Pulse > Go to HR core/ Self Service Module
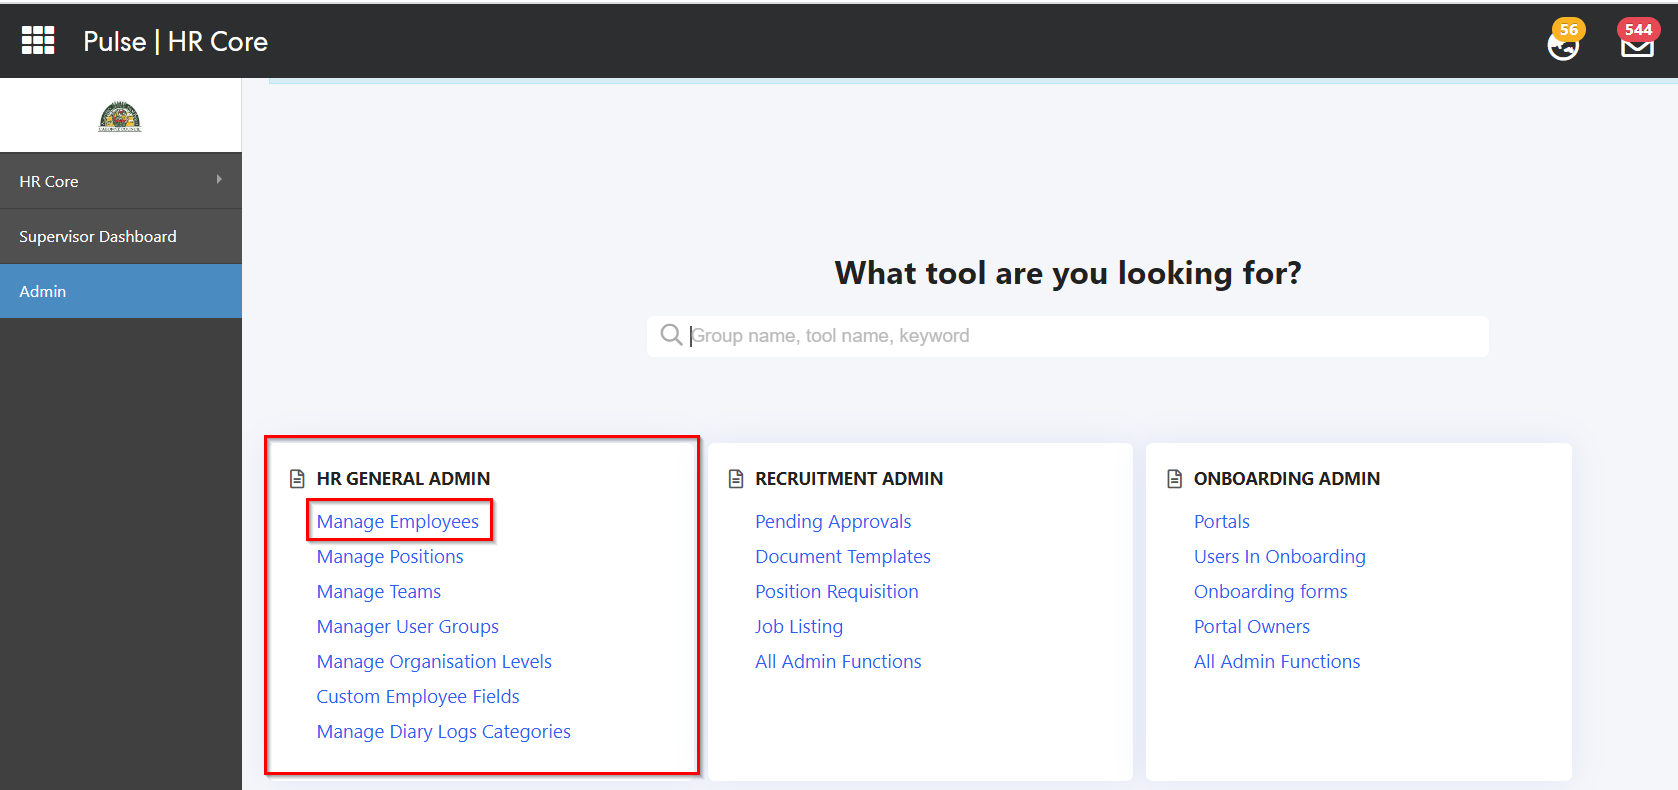
Step 2: Go to Admin page > HR GENERAL ADMIN tile > Manage Employees

Step 3: Click on any employee's profile and navigate to the Skills tab.

Admins can click on the "Edit" button on the skills tab to add or delete any skill.
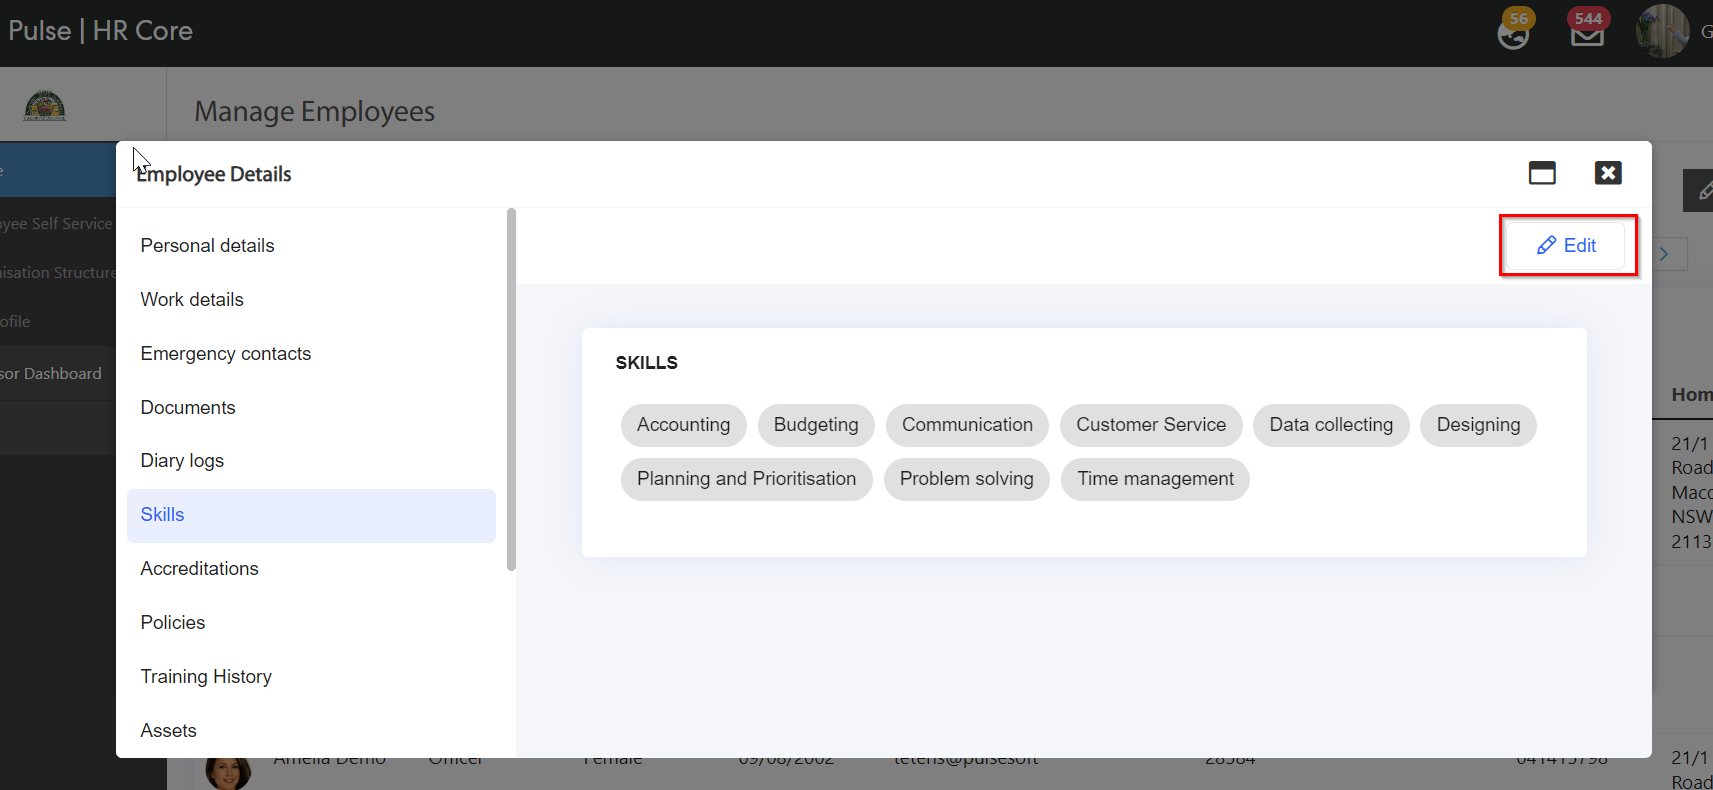
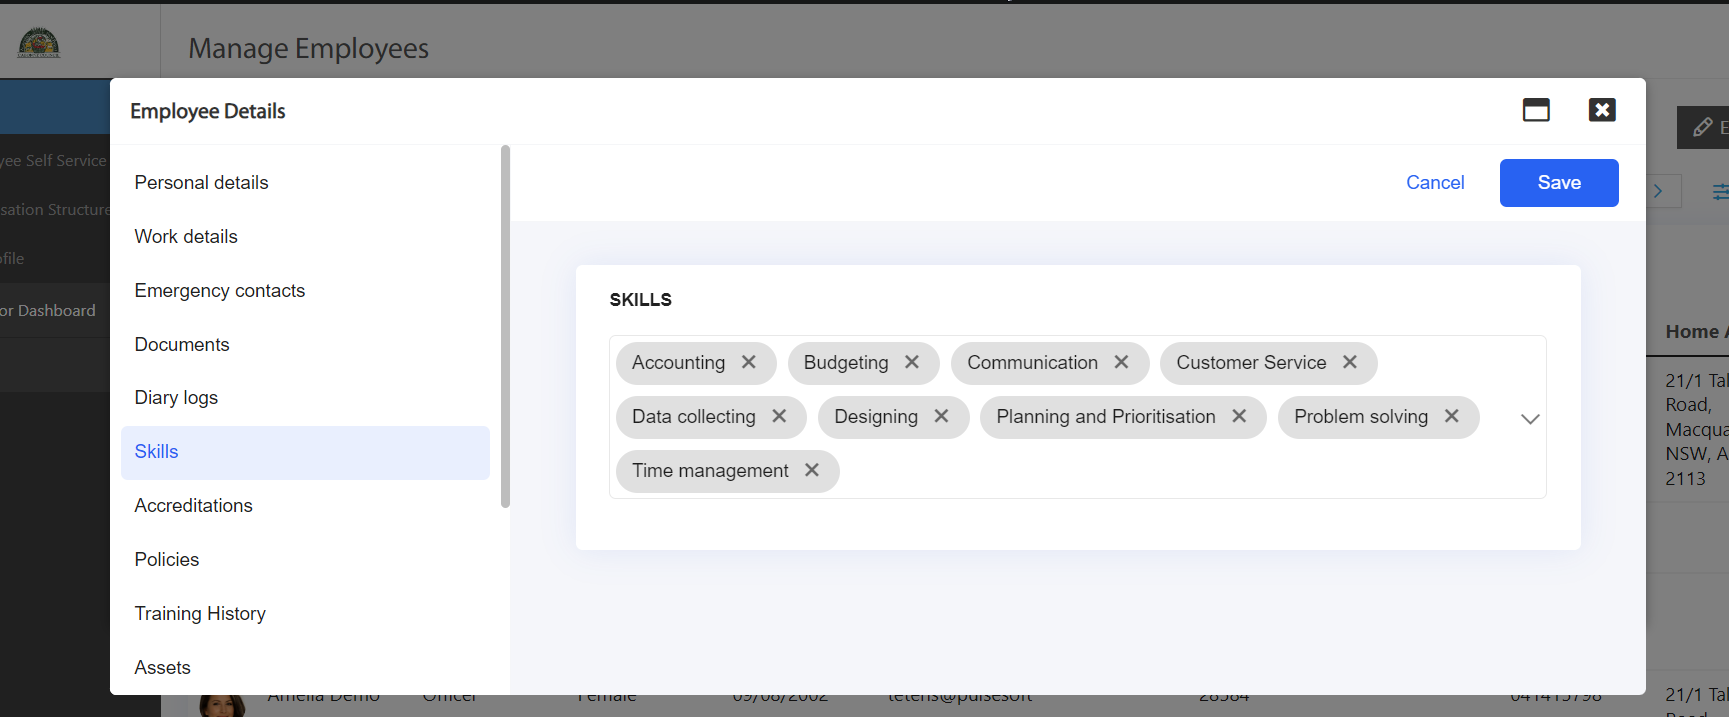
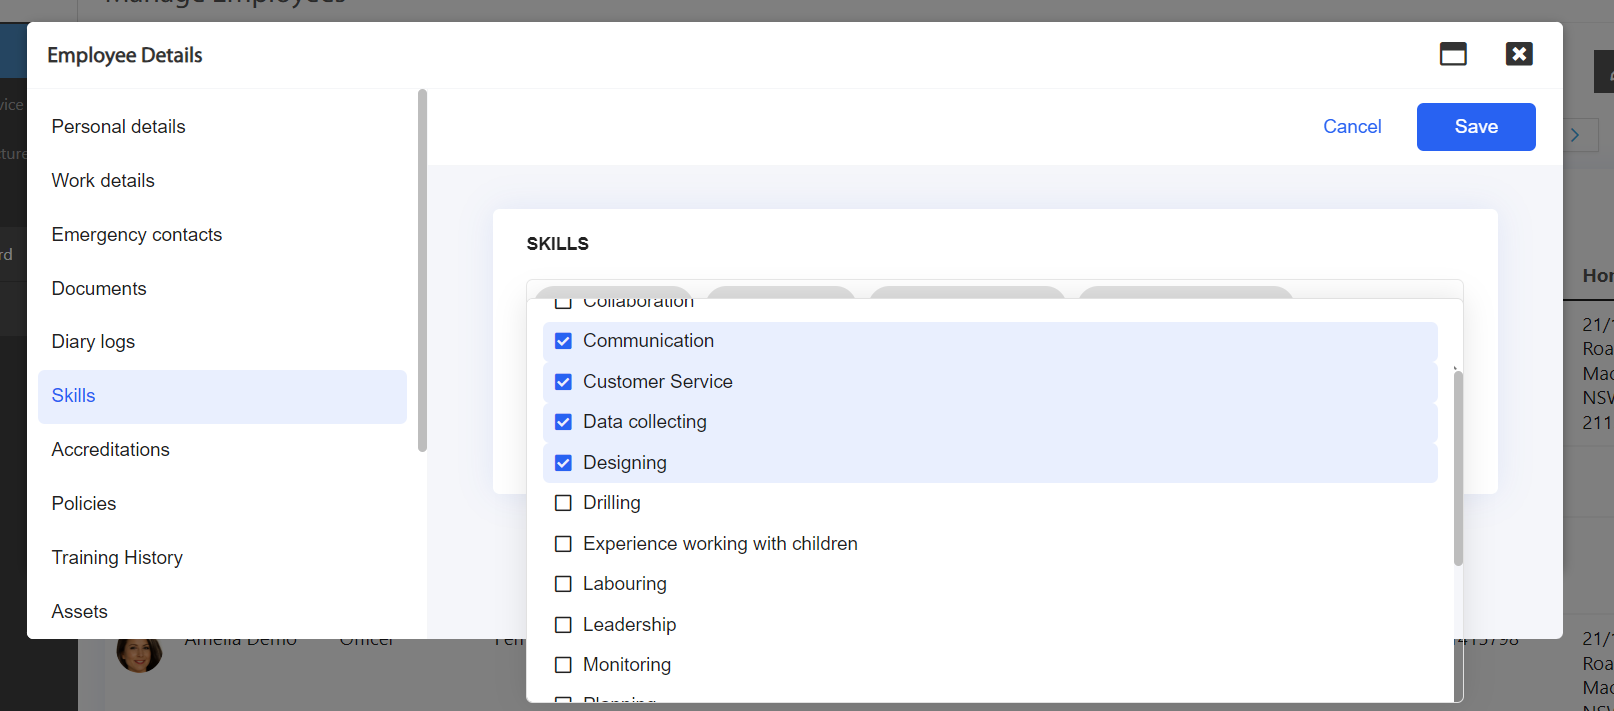
Admins can click on Save to save the configurations or they can click on the Cancel button to cancel any changes.
Note: To enable the permissions, please contact Pulse Support via email at <support@pulsesoftware.com> or phone on 1300 363 325
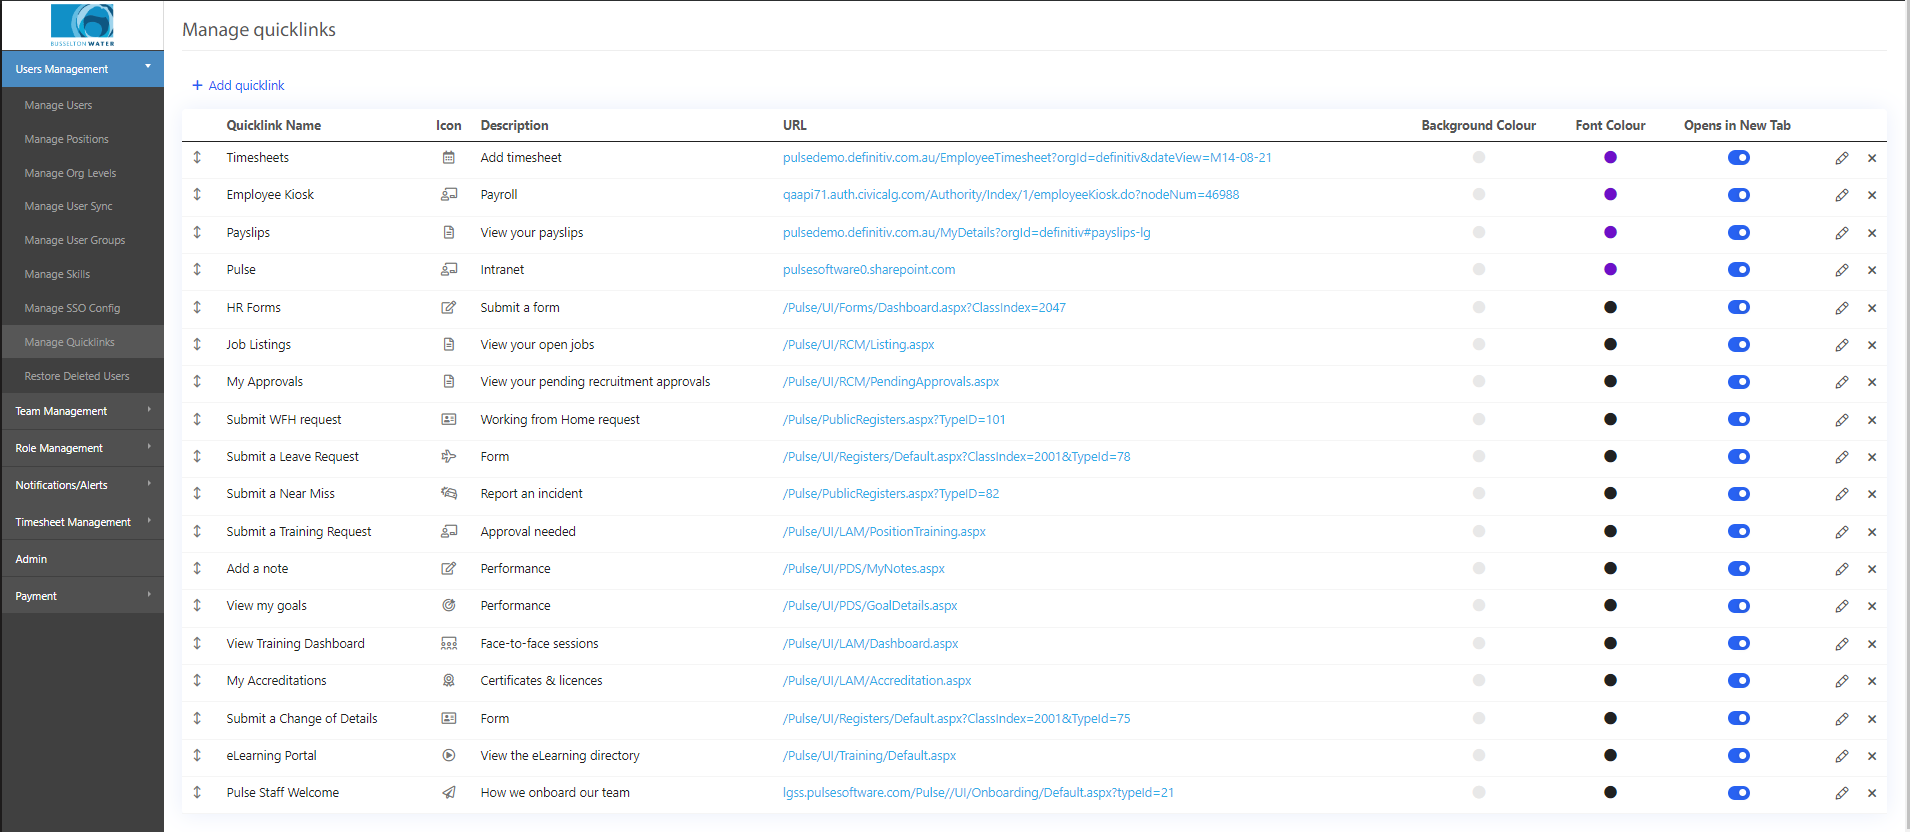
1.3 Ability to add and customise quicklinksUsers of the HR Core Module can now access quick links directly from the Employee Self-Service page (HR Core > Employee Self Service). This feature streamlines navigation and provides quicker access to essential resources and information.
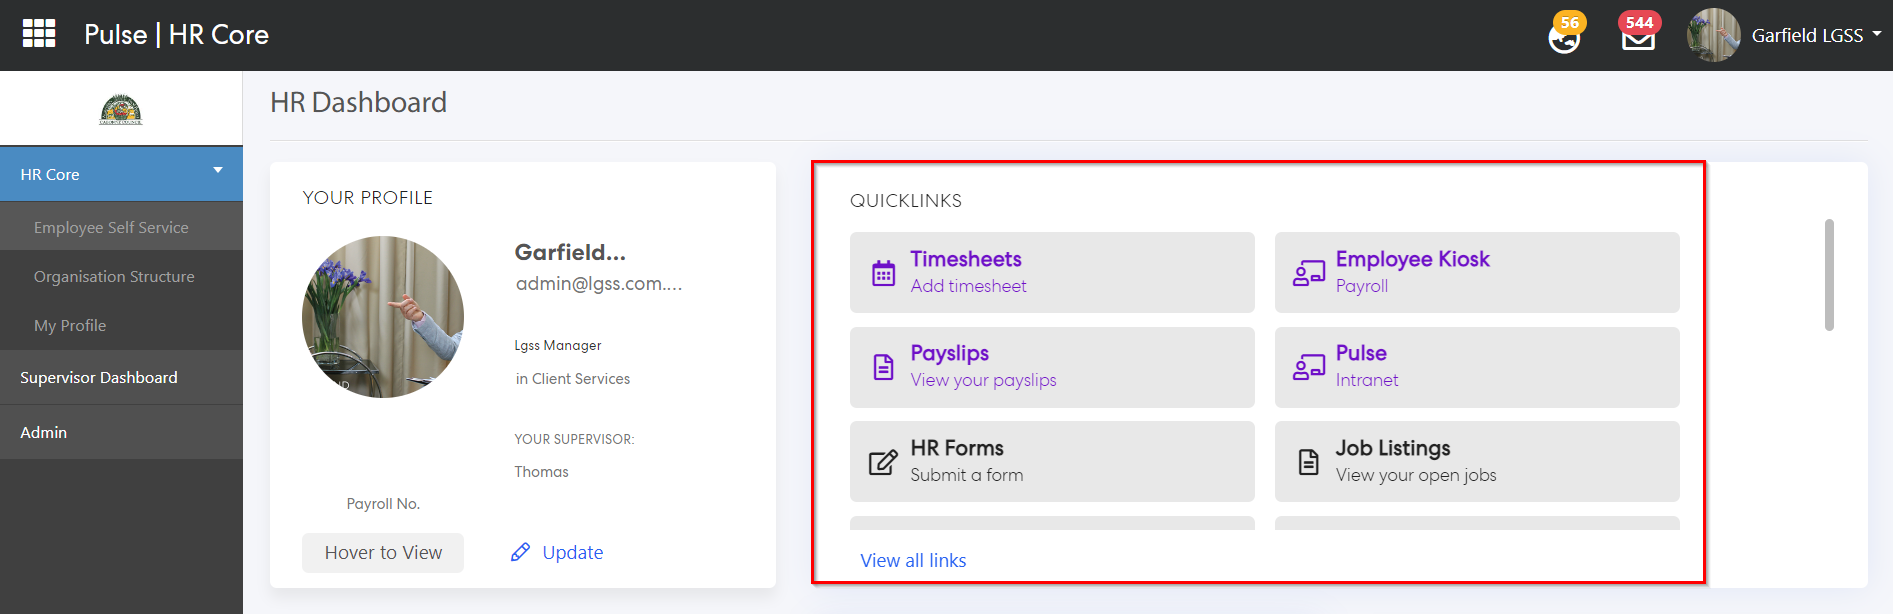
To edit the quick links, go to Pulse security > Manage Quicklinks. Admins can edit, delete and customise them according to their requirements.
Admins can now seamlessly view the profiles of employees directly within the Organisational Chart Viewer (HR Core > Organisation Structure). This streamlined functionality simplifies the process of obtaining comprehensive employee information.
This enhancement will greatly enhance the efficiency of admins in managing and accessing employee information.
Once navigated to the Organisation Structure page, search an employee and click on "Load".
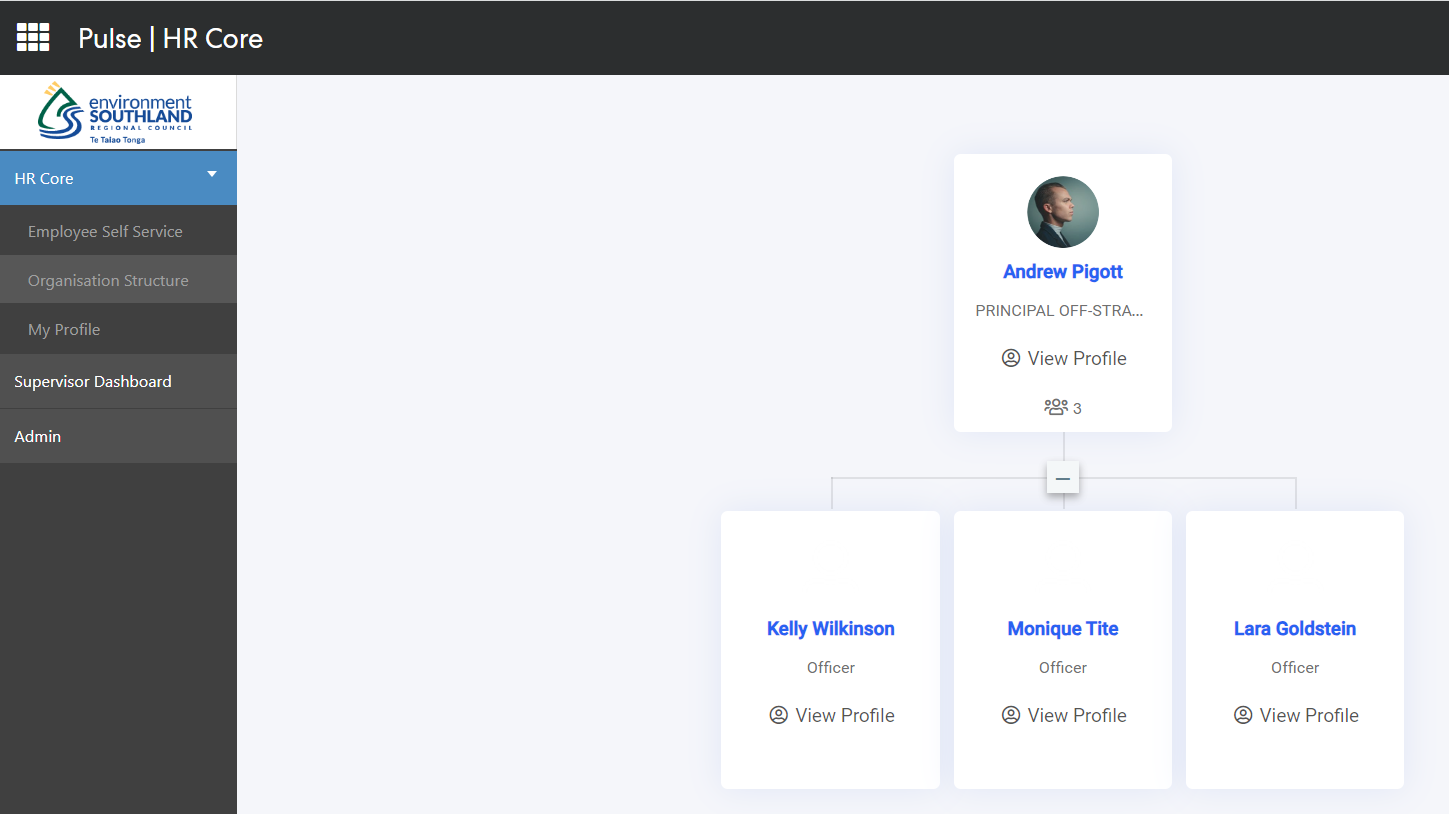
Admins have the ability to click on the View profile from this page. By clicking on the View profile, the admins will be able to see the whole profile of that employee.

Admins and employees will now be able to view their Position history in the Work detail tab.
Step 1: Login to Pulse and go to the HR core/Self Service Module.
Step 2: Navigate to Admin page > HR GENERAL ADMIN tile > Manage Employees
Step 3: Click on any employee's profile and go to the Work details tab.
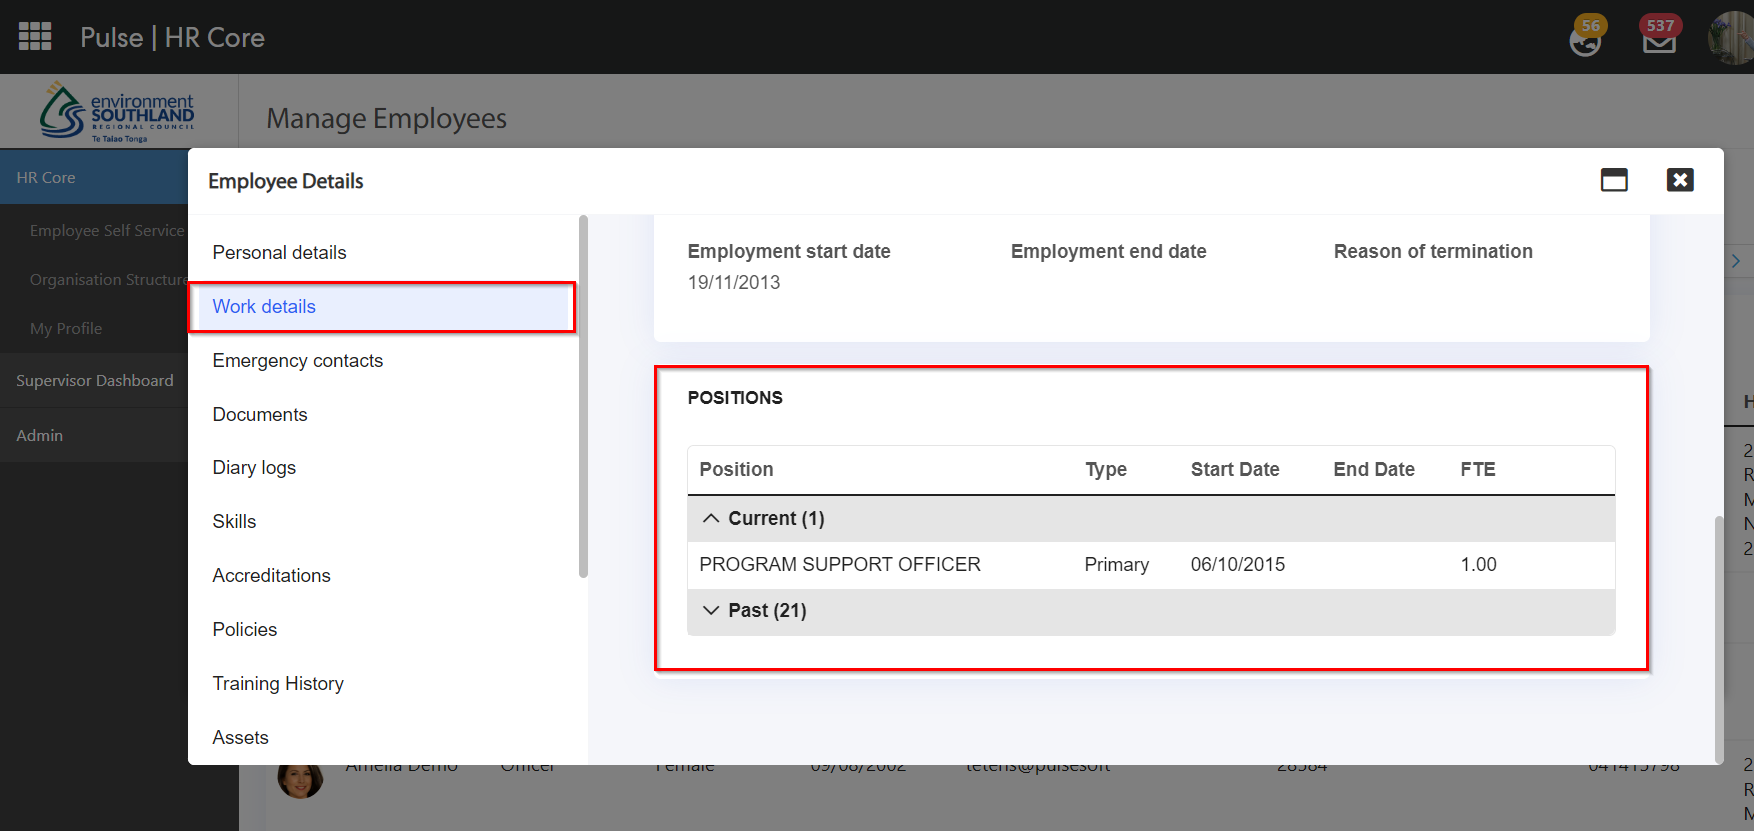
Anyone who has permission to edit the Profile can also assign positions by clicking on the edit button at the top of the page.
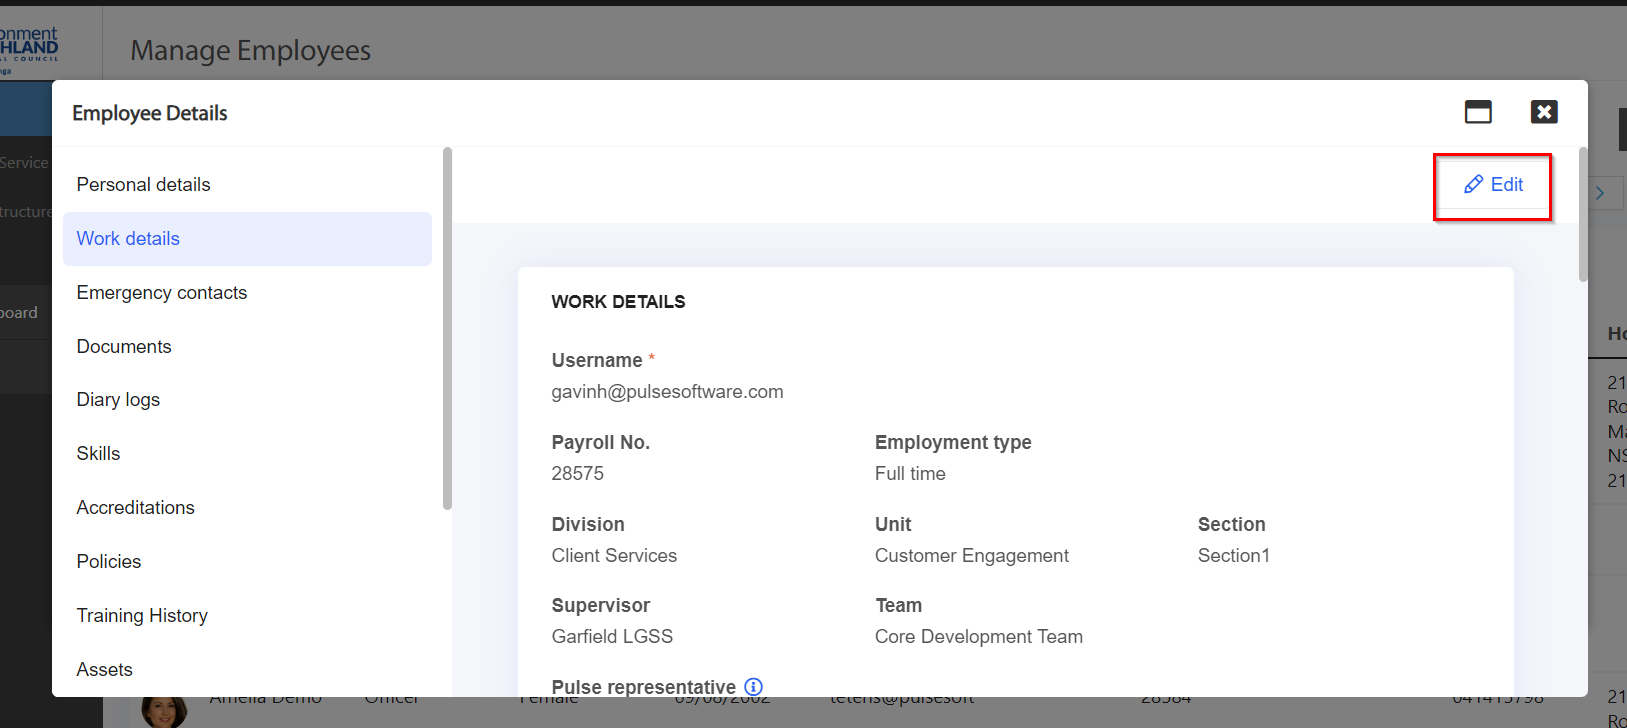
Once clicking on the edit button, admin can also assign new positions against the employees by clicking on the "Assign Position" button.
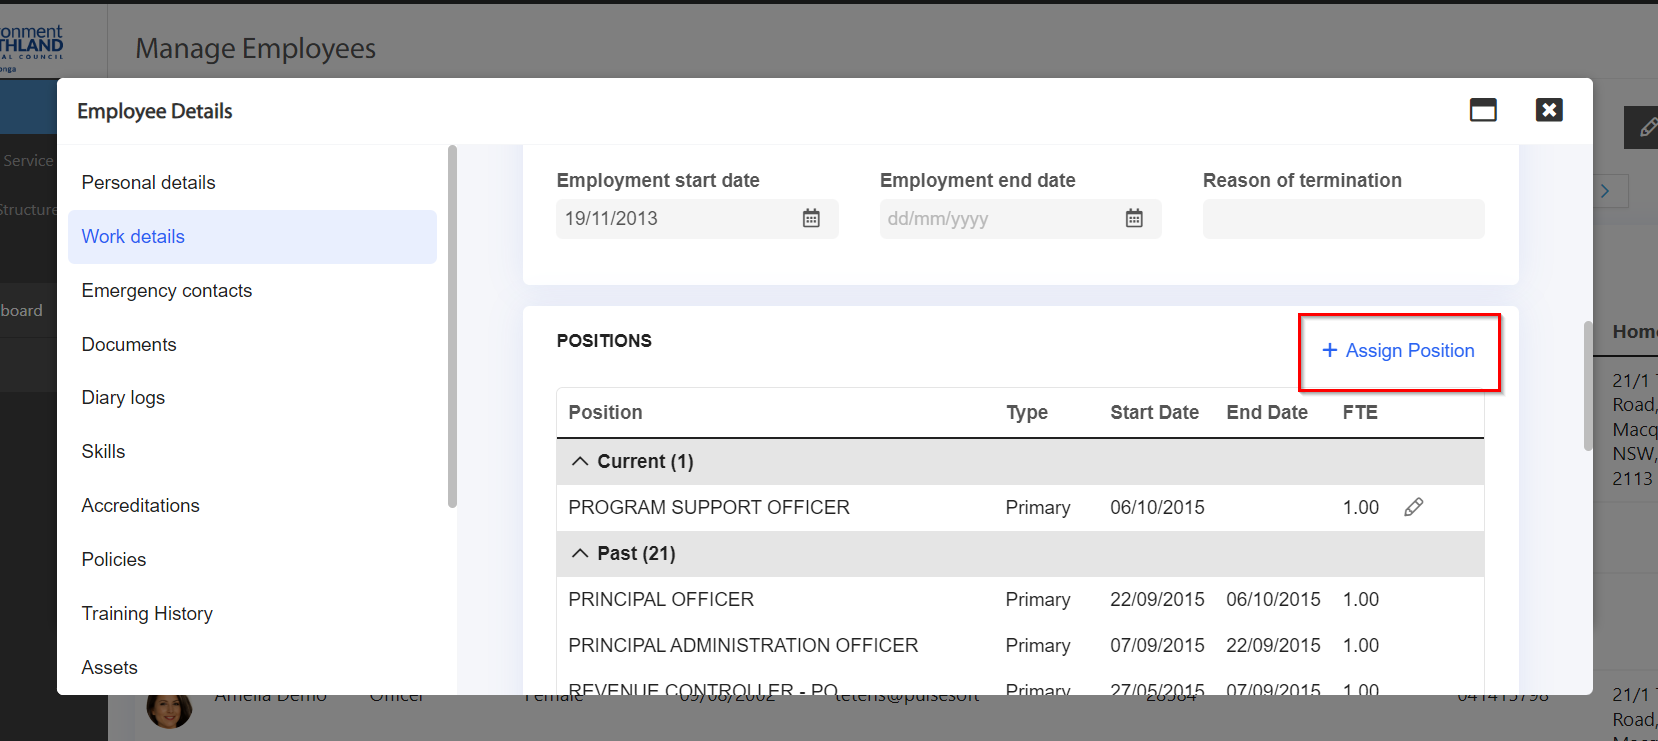
A pop-up will open up where the admins can assign positions to the employees by filling in all the required fields.
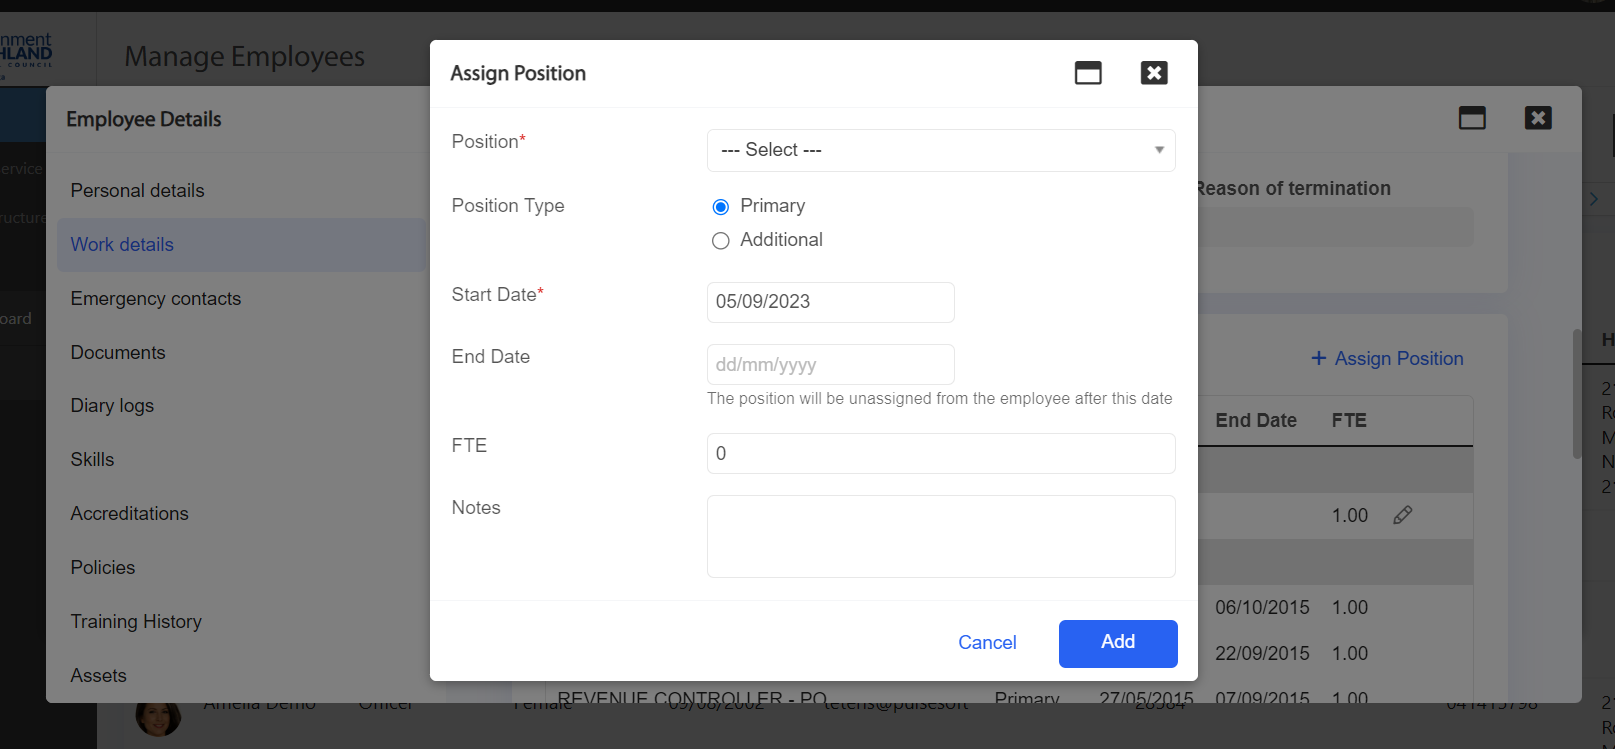
Click on Add button to add the position against the employee, otherwise, click on the cancel button to discard any changes.
2. eLearning Module
2.1 Ability for supervisors to verify an accreditationSupervisors in the eLearning Module now have the ability to verify an accreditation using the Position Accreditation Checklist Report.
Note: For a supervisor to be able to verify and add accreditation, a config key "Allow supervisor to add and verify training history" should be turned on. This config key is located in the Admin page > System Settings > Manage system settings.
Once the config key is turned on, login to Pulse as a Supervisor and go to the eLearning Module
Once the Accreditation is added, go to Supervisor Dashboard > Reports > Staff Position Accreditation List.
On this page, supervisors will be able to verify the accreditation by clicking on the RED TICK MARK.
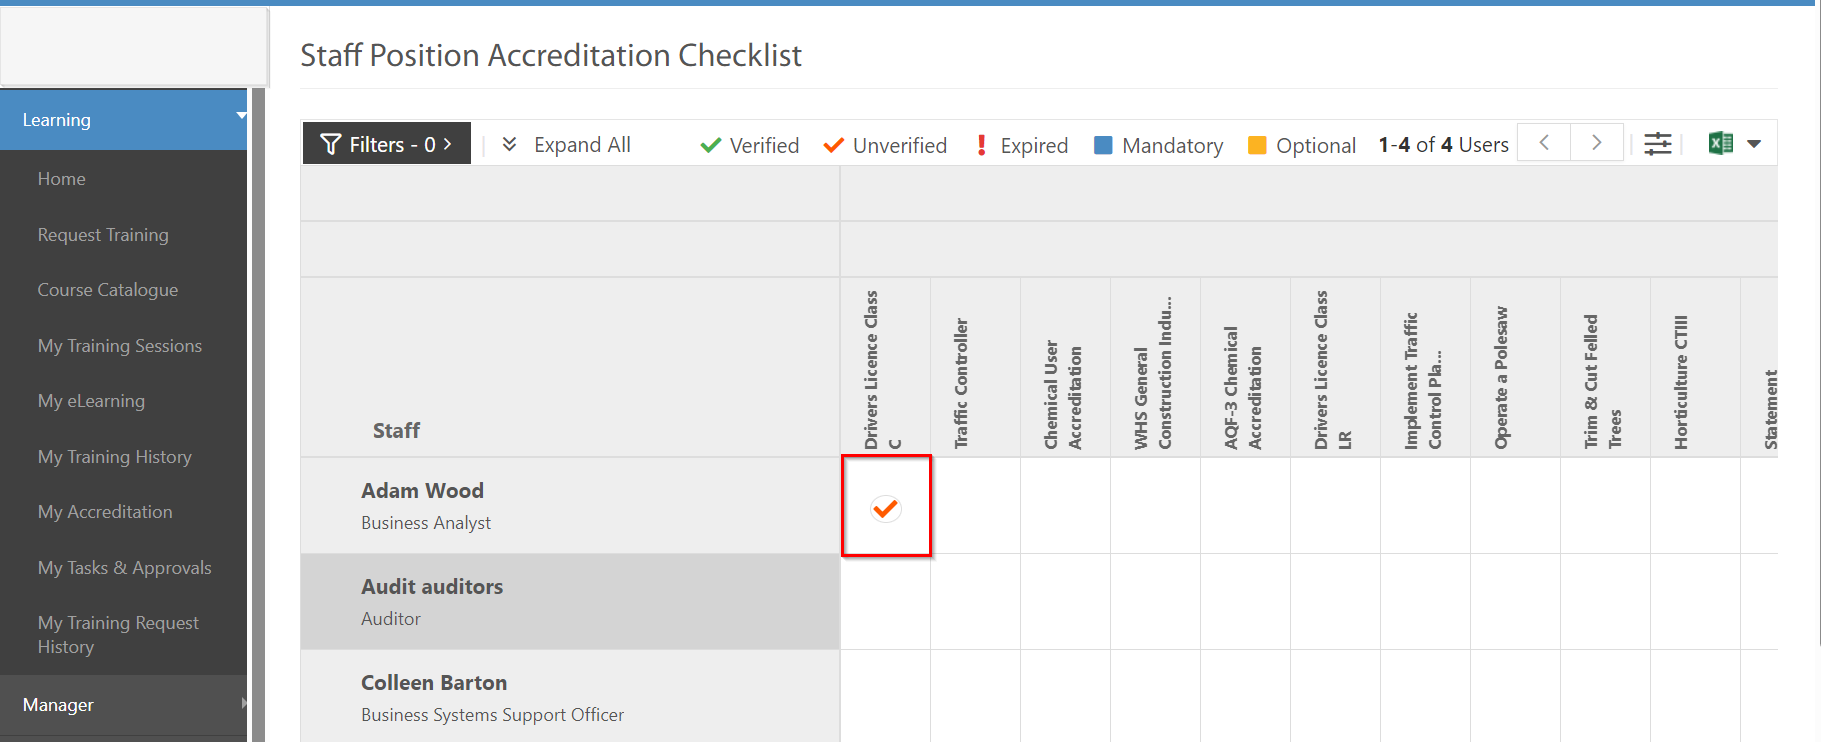
By clicking on the red tick, it will give the supervisors an option to verify the accreditation against the user.
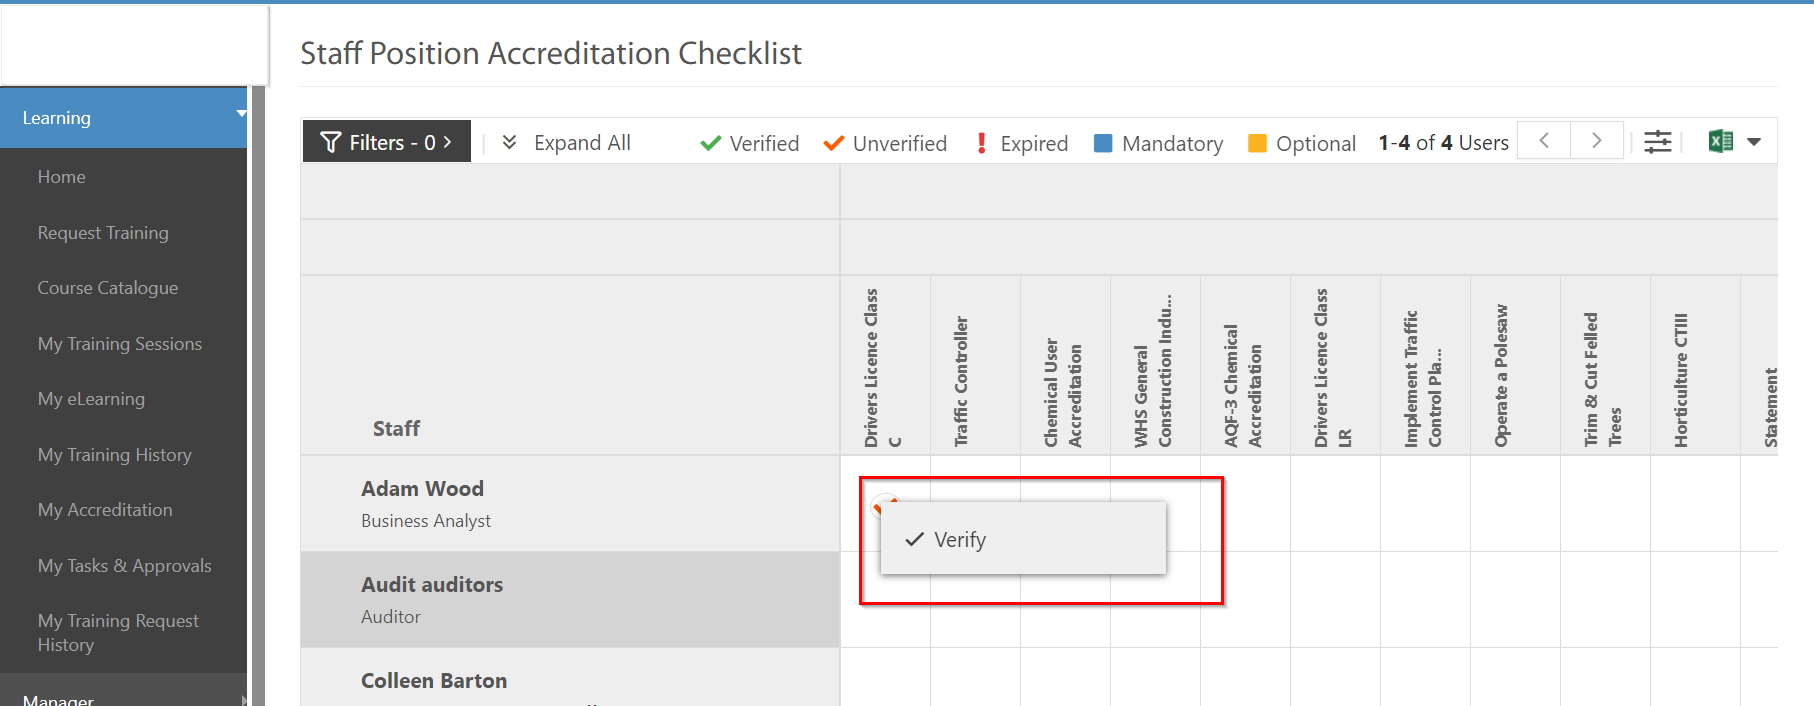
After clicking on the Verify button, the supervisors will get a confirmation pop-up to verify the Accreditation. To verify the accreditation, click on OK, otherwise click on CANCEL button to discard the changes.
3. eRecruitment Module
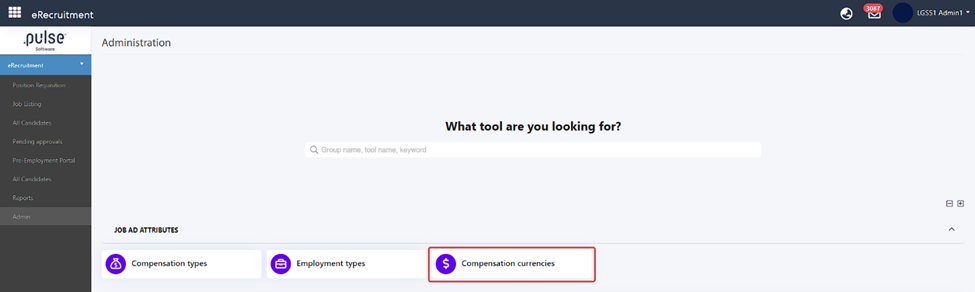
3.1 Support multiple currencies for job adseRecruiment module administrators can now configure multiple currencies to be used in jobs posted on Pulse and other integrated job boards. Admins can set a default currency which is auto populated in new jobs but still be able to change to any other available currency. Currencies can be archived when no longer will be in use.
To add a new currency:
Step 1: Login to Pulse, and go to the eRecruitment.
Step 2: To configure currencies, go to Admin page > Job Ad Attributes > Compensation currencies.
Step 3: Click on "+ Add compensation currency" to add a new compensation currency.
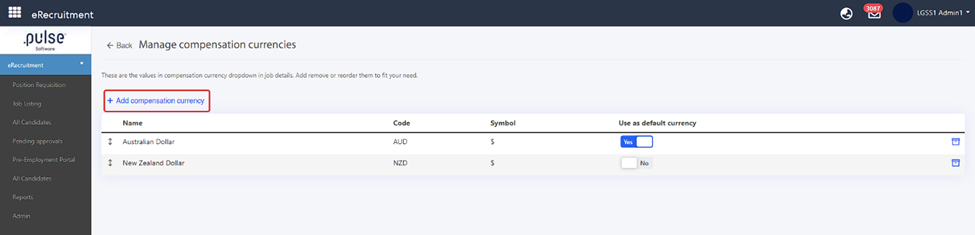
Step 4: Enter the currency details and choose whether to turn as default currency for all new jobs in future.
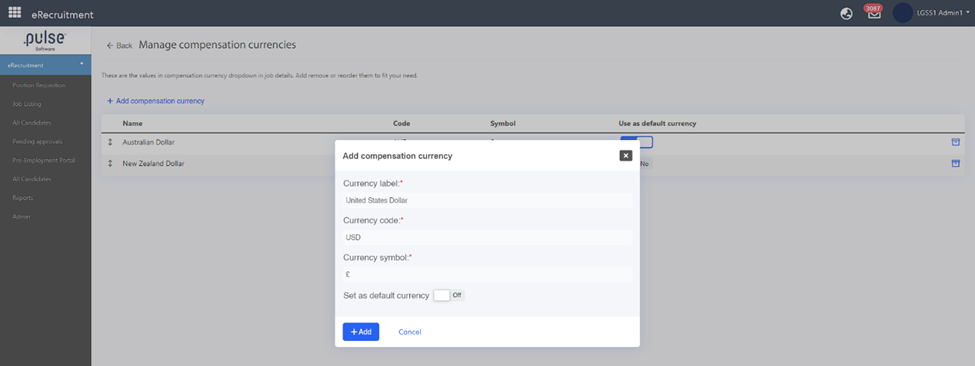
Click on Add button to add the currency details, otherwise click on the Cancel button to discard the changes.
3.2 Ability to send email to candidates when moved to the "Not Suitable" stageAdmins & Hiring managers in the eRecruitment module now have the option to decide if they want to send an email to the candidate when moving them to the Not Suitable stage in the Hiring process.
Step 1: Login to Pulse and go to the eRecruitment module.
Step 2: Go to the Job Listing page and click on any job to view it.
Step 3: Go to the Candidate's tab and try moving any candidate to the "Not Suitable" stage.
When moving to the Not suitable stage, admins and hiring managers will get a pop-up where they will have the option to send an email to the candidate for not selecting them or not.
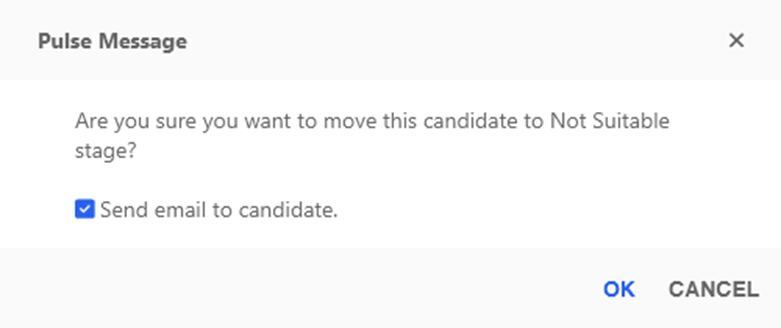
Click on OK to send the notification, otherwise click on the CANCEL button to not send any notification.
3.3 New Offer Process and Candidate Acceptance PortalPulse Software has enhanced the offer process to transition from a manual process to systematic offer process management. This involves extending offers to candidates electronically, through a secure portal, and receiving their responses in the same way. The new process is designed to streamline hiring practices, using a technology-forward approach that enables you to secure top candidates quickly and efficiently. The benefits of the enhanced offer process include reduced time to hire and a more user-friendly experience for both employers and candidates.
Recruitment Admins and Hiring Managers
A) Make offer
Clicking on the Make Offer button would open up a pop-up where admins and hiring managers can Add an item by clicking on the "Add item" button.
Note: This pop-up will only be accessible by hiring managers and admins of the erecruitment admins.
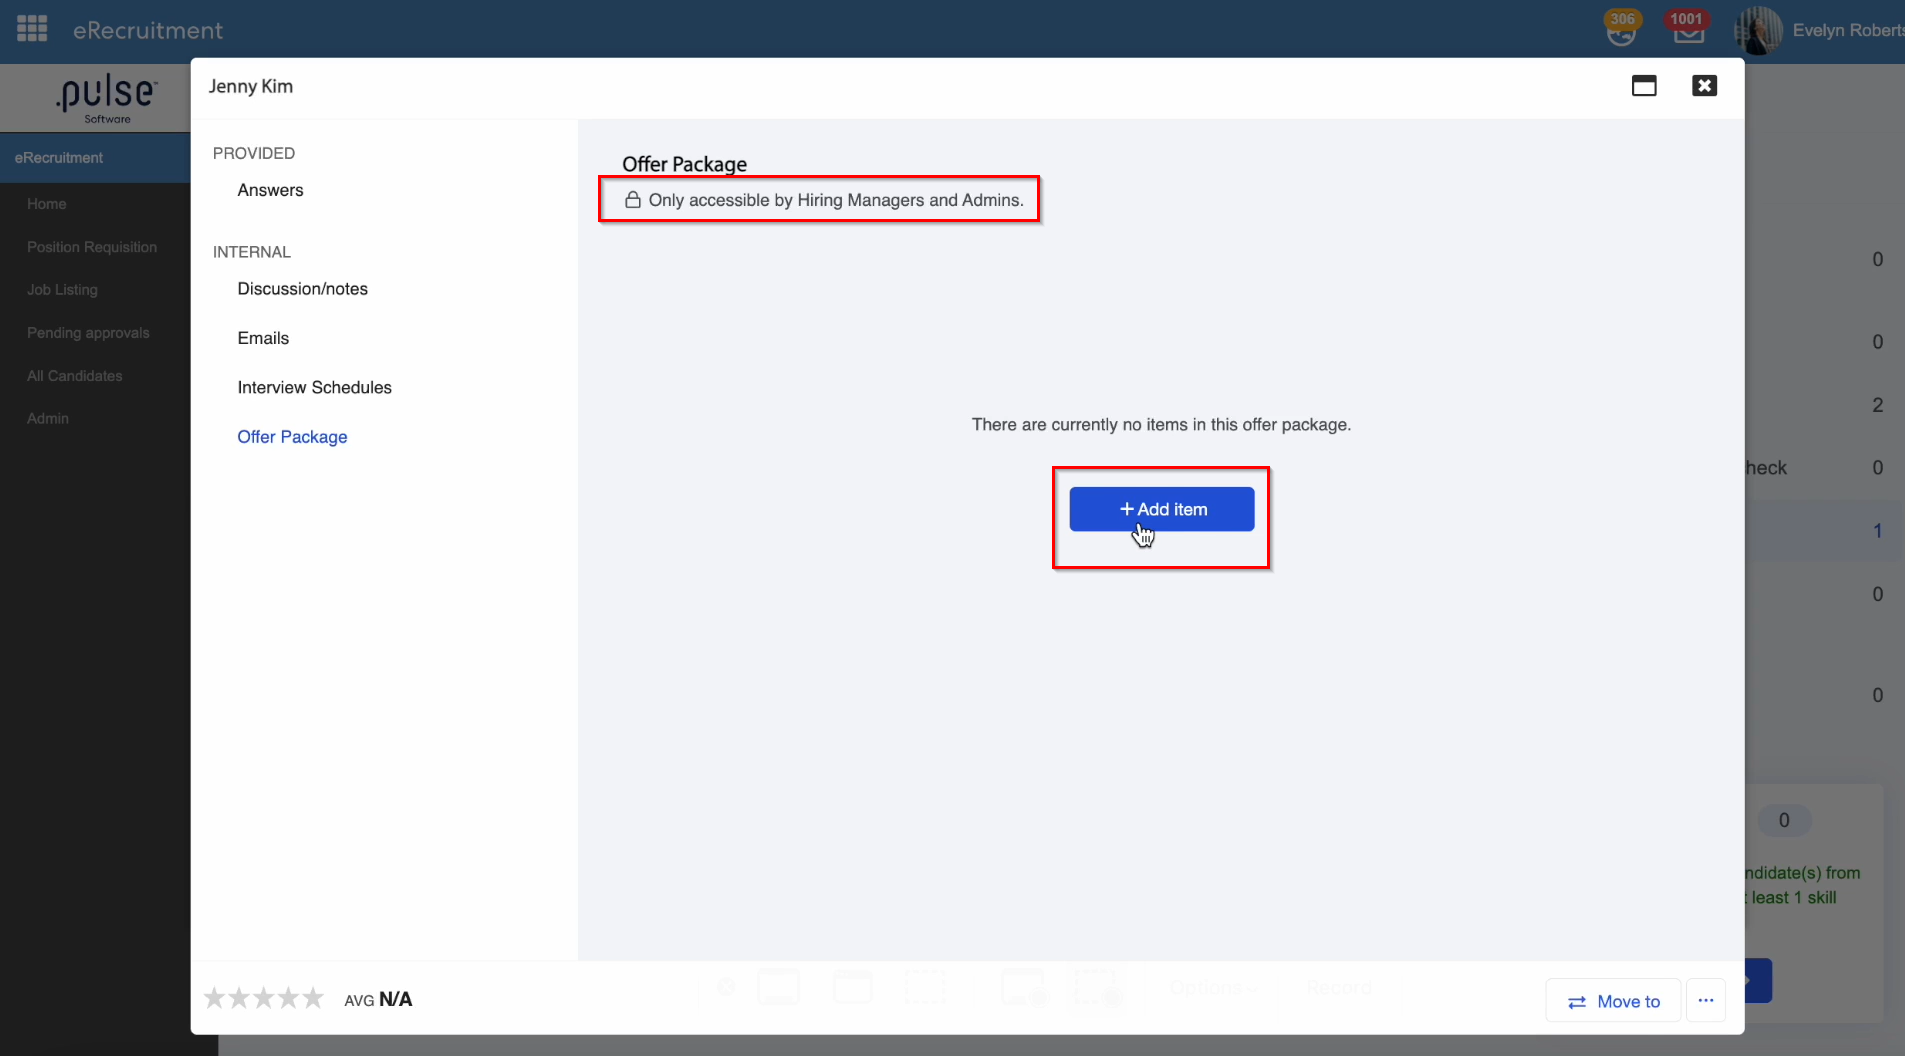
B) Adding an item
Clicking on "Add Item" would give admins and hiring managers the ability to create an offer letter, add documents to it and also choose the response they require from the candidate.
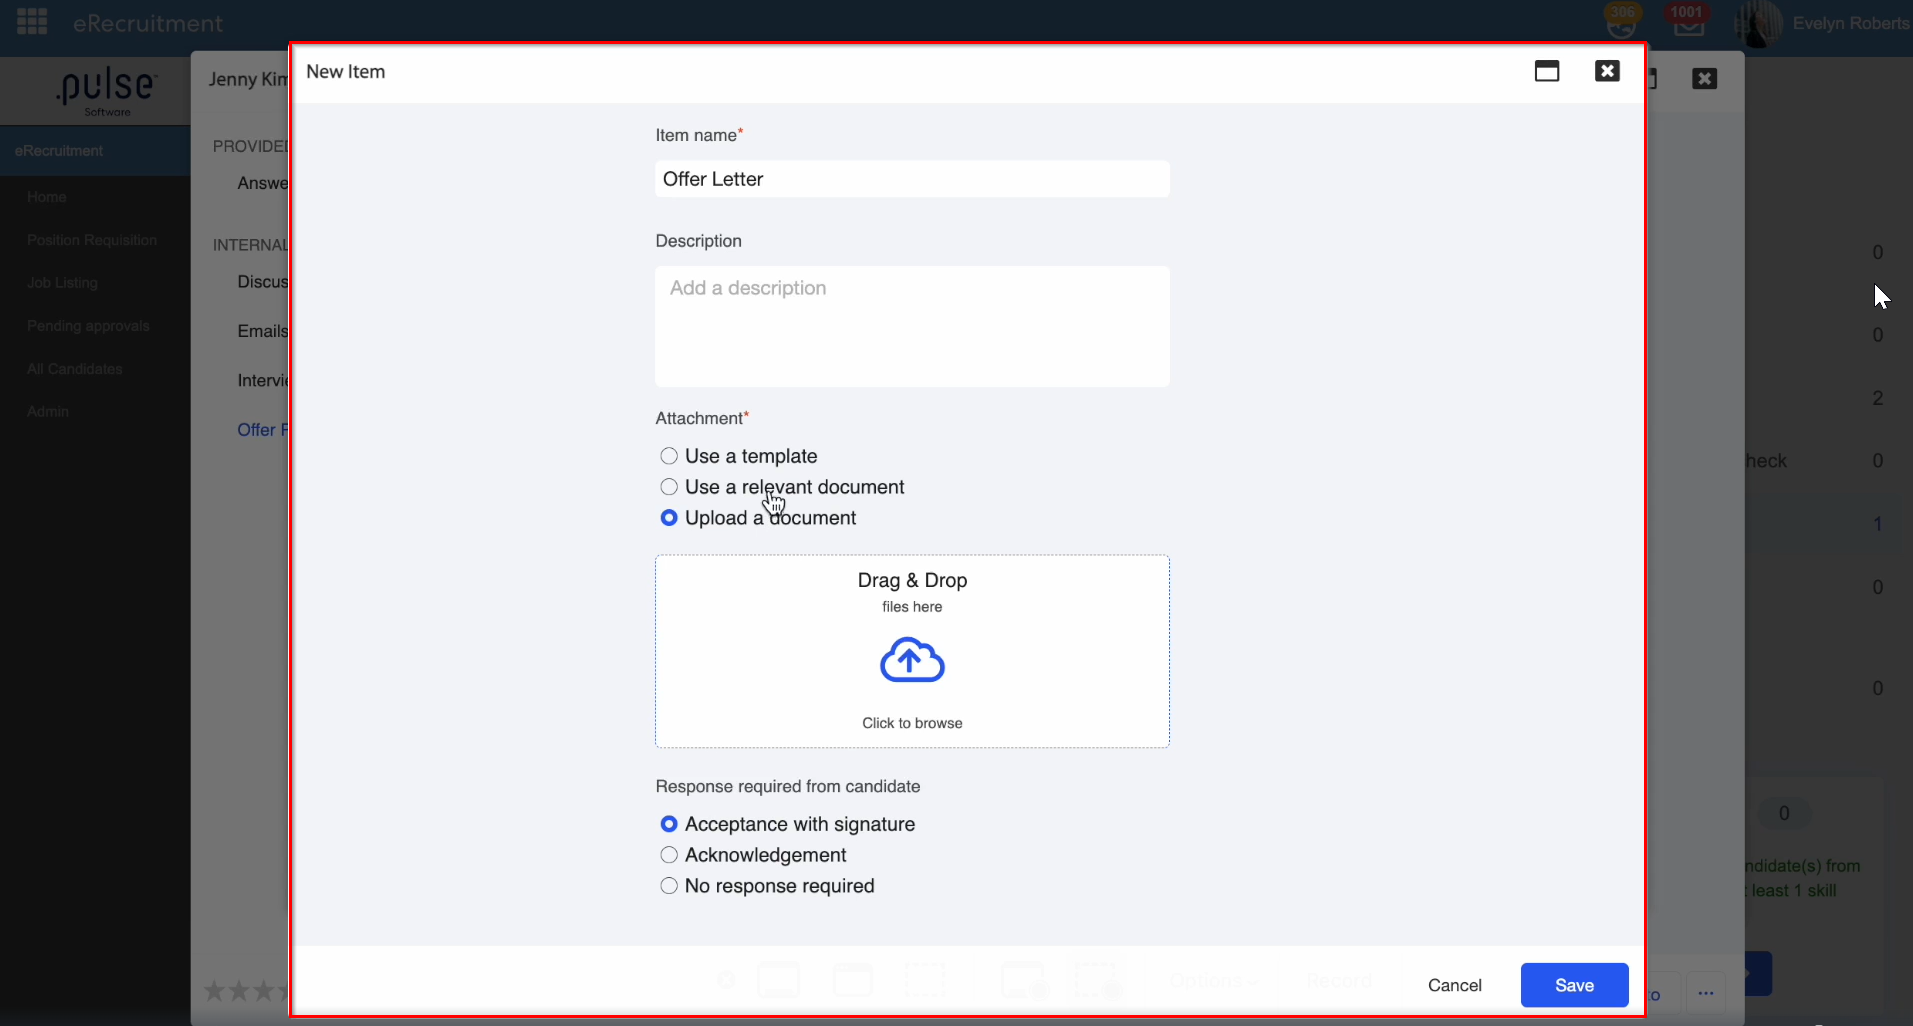
Once all the required fields are filled, admins and hiring managers can click on Save to save the created offer.
C) Add multiple items and view Activity log to audit/track the offer process.
Admins & hiring managers also have the flexibility to add multiple items to an offer. They can also edit, delete the items as and when required, also add Due dates against offers.
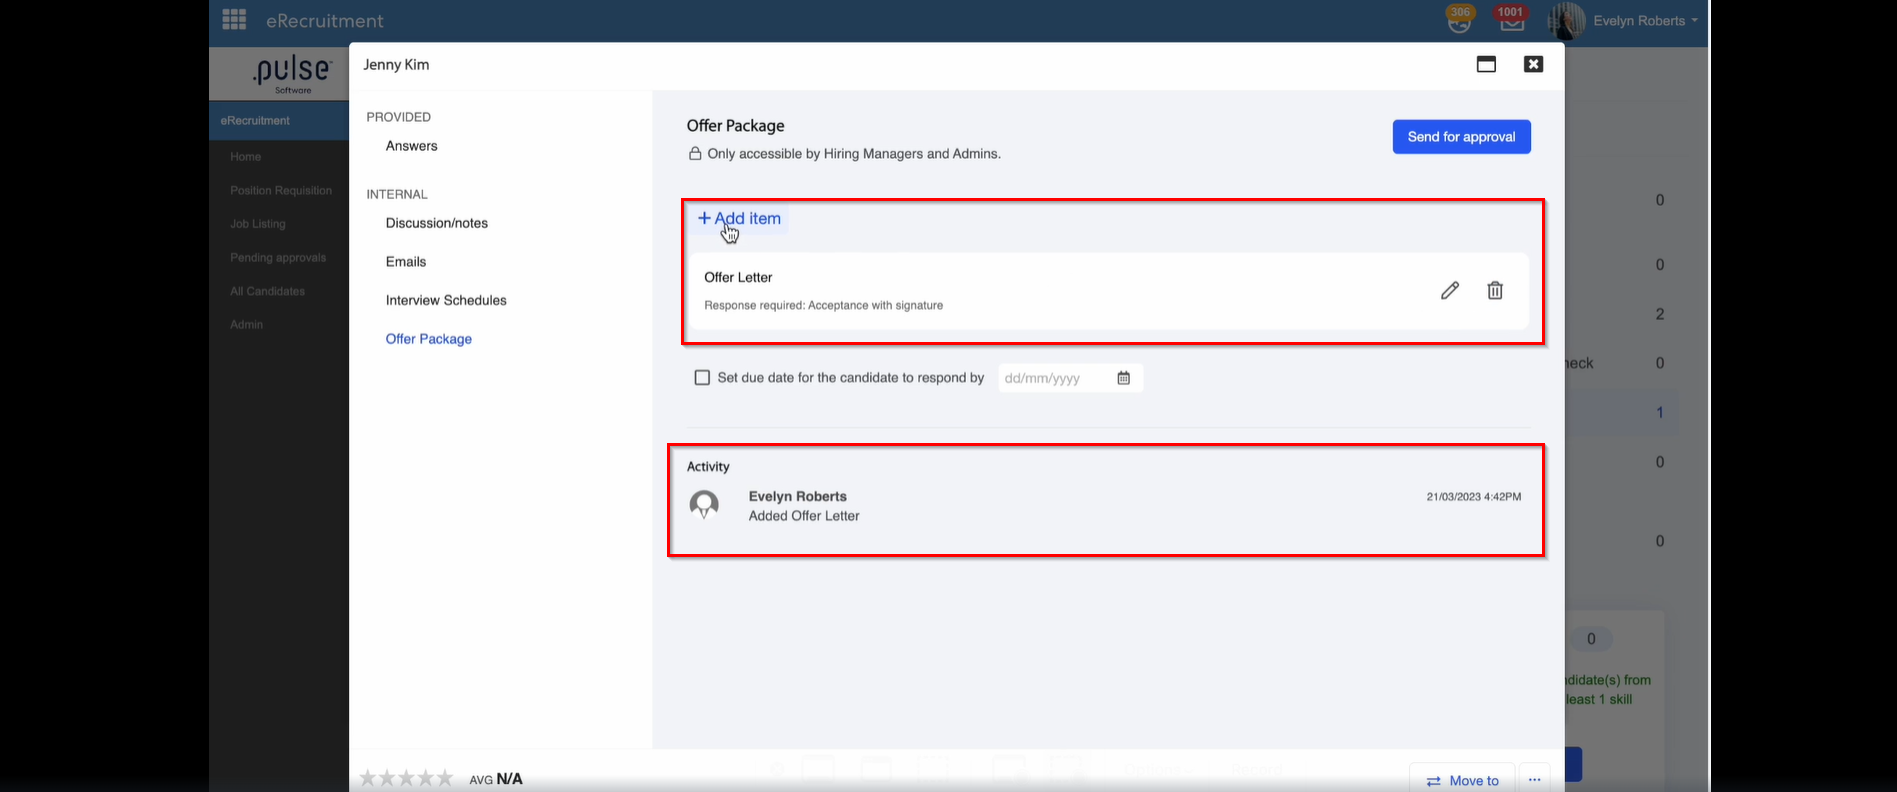
They can also track activities from the activity log.
D) Send for Approval
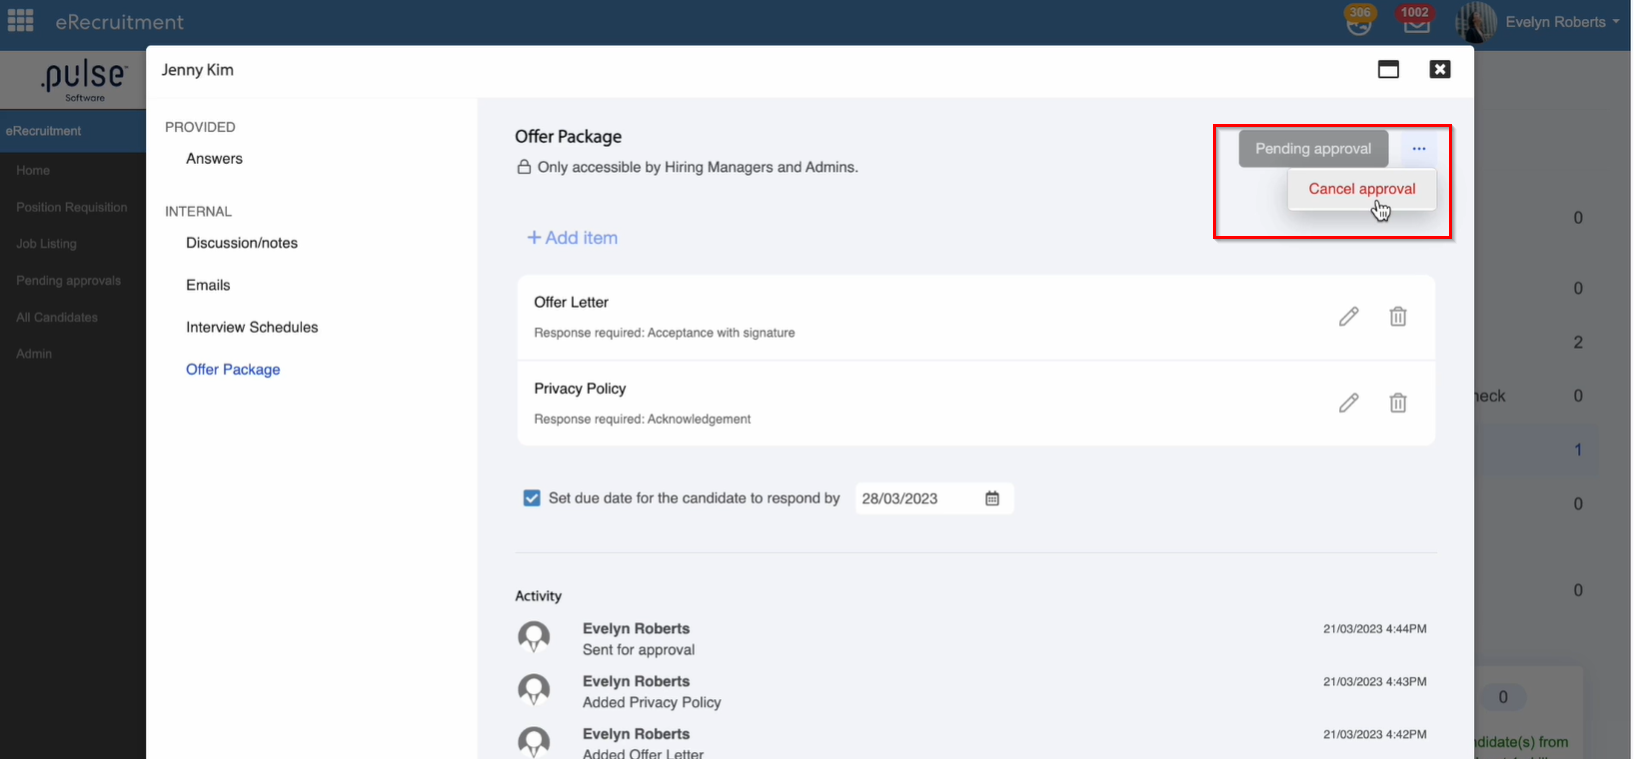
Hiring managers can then click on the "Send for approval" button. An approval workflow can be set up for the approval of the process.
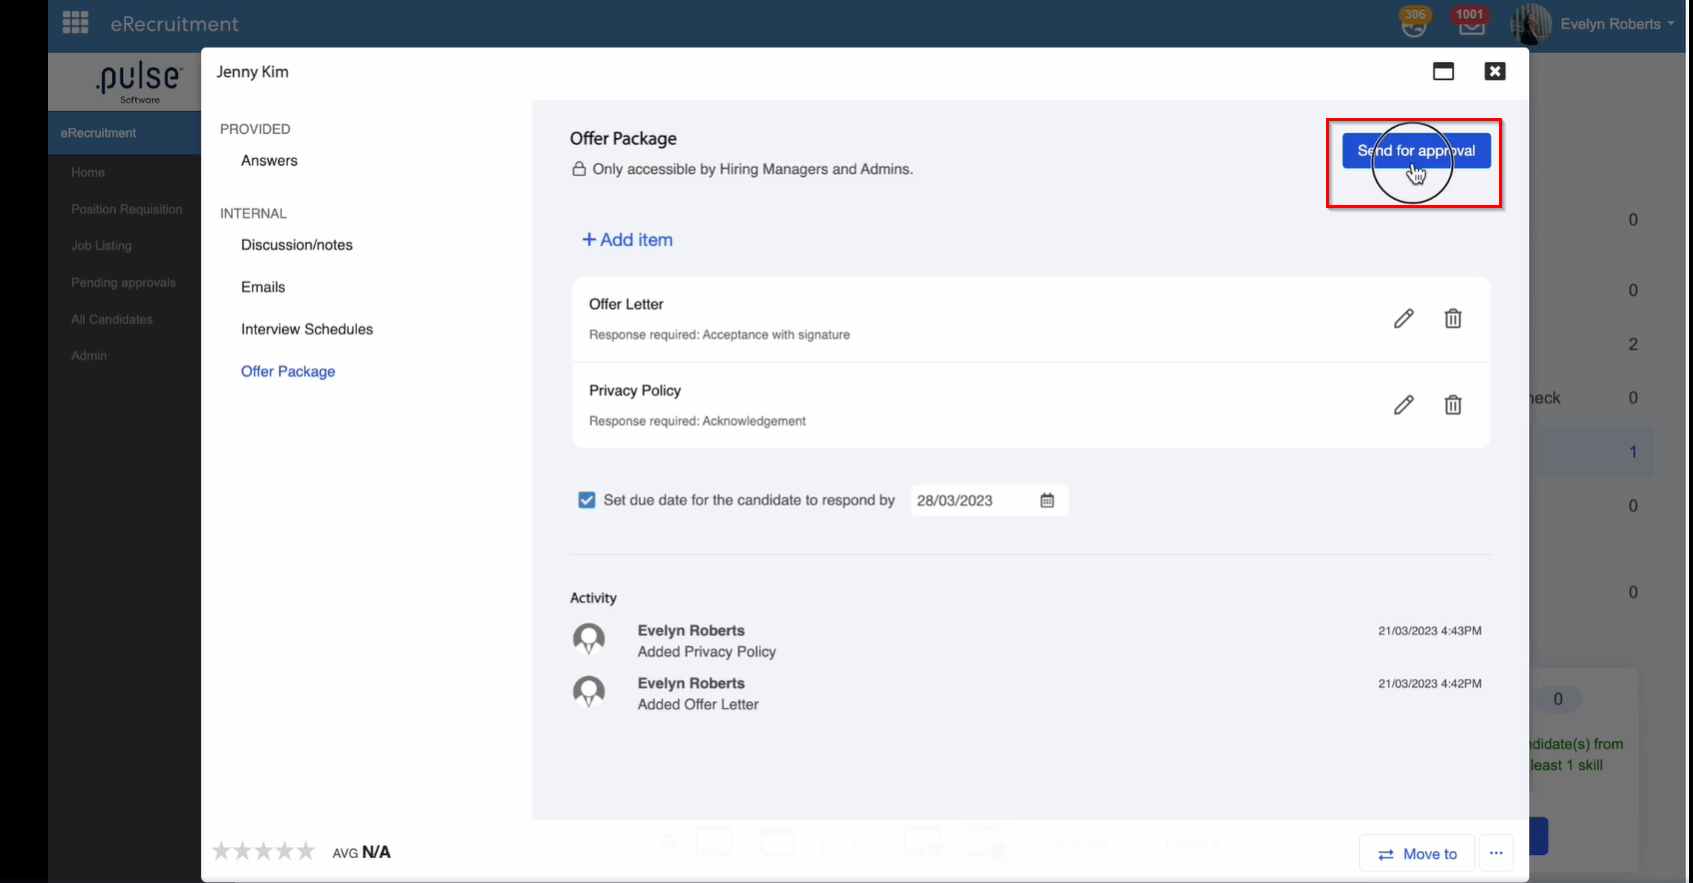
Hiring Managers also get the ability to Cancel the approval, if there has no action taken against it.
To cancel the approval, hiring managers can simply click on the ellipses (3-dot) button to cancel the approval and make any further changes to the offer process.
E) Approval Stage
Once the approval has been sent to the admins, they will get a notified through an email.
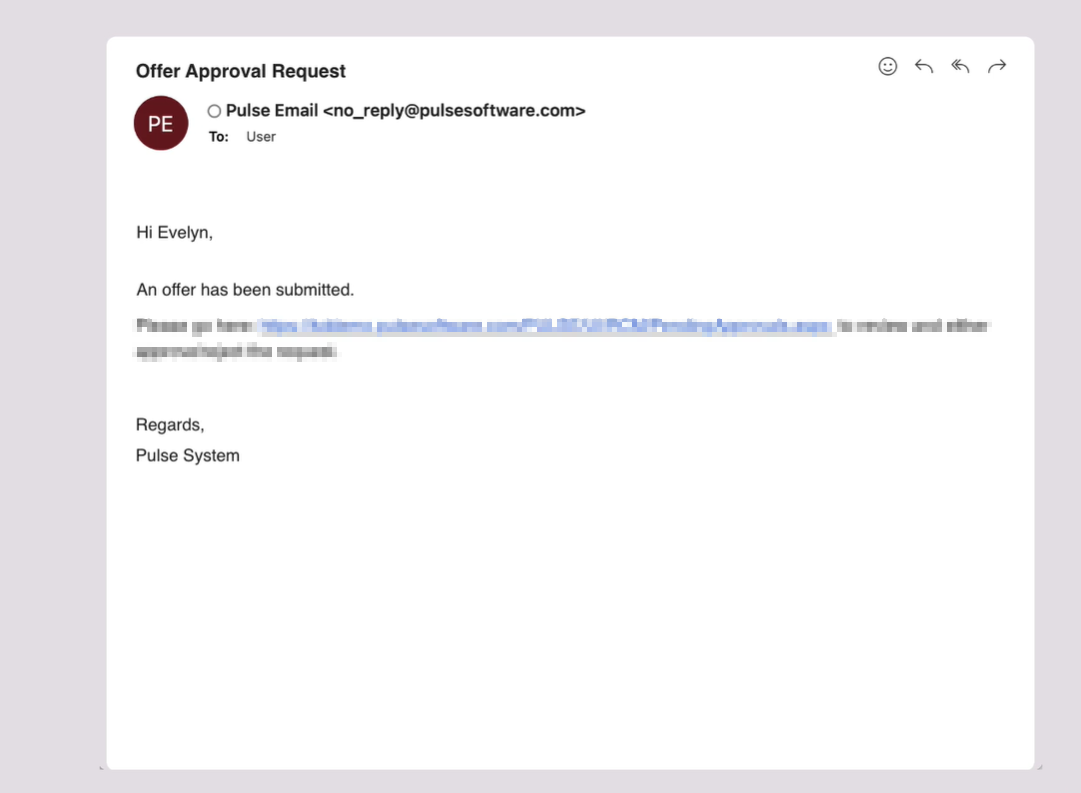
By clicking on the link provided in the email, they will be redirected to the "My Tasks & approvals" page, where they will be able to Accept or Reject the offer.
To Accept or reject the request, click on the "Make Decision" button.
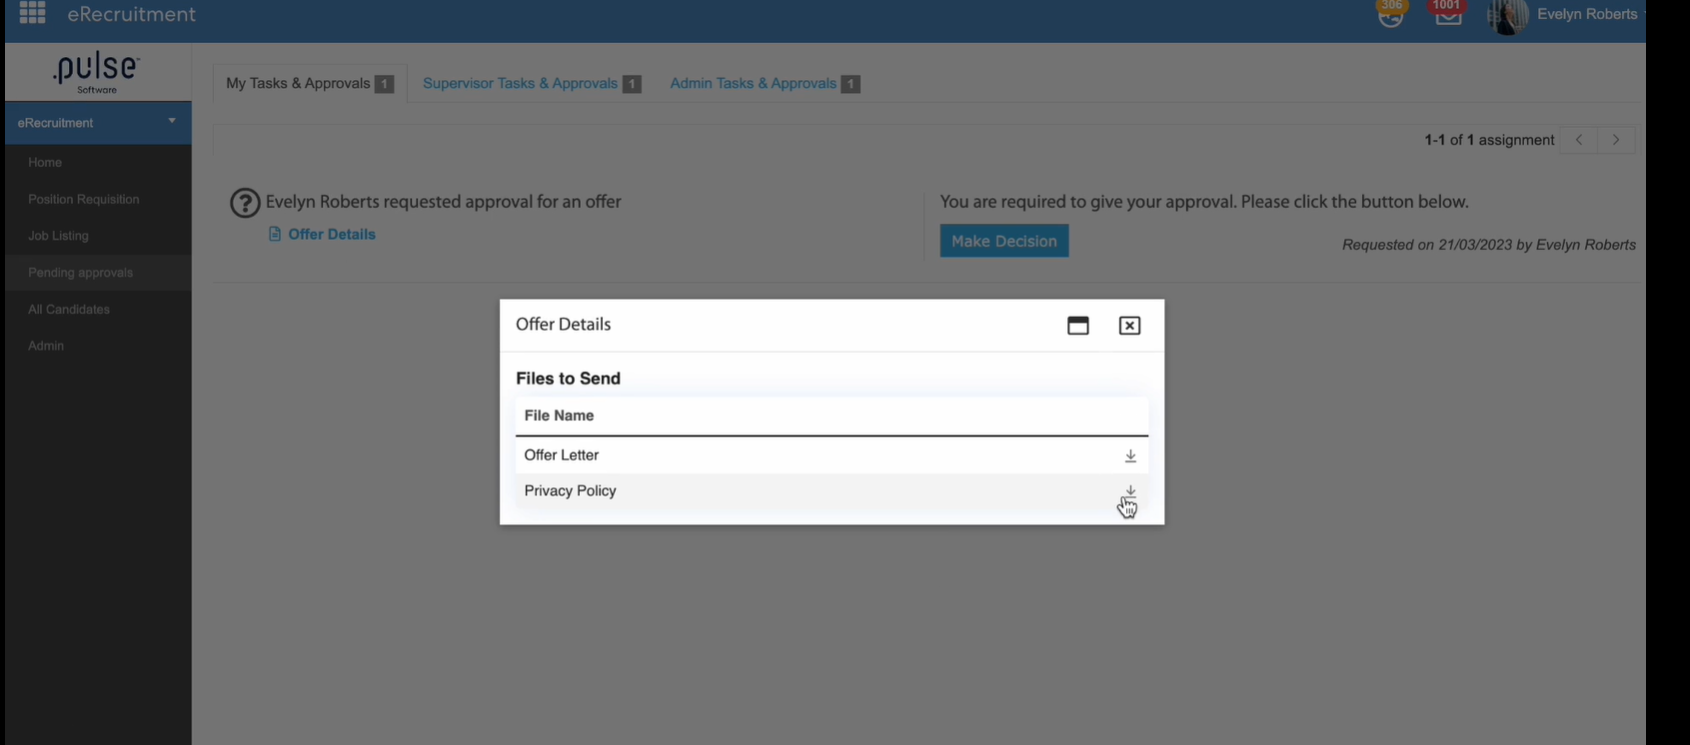
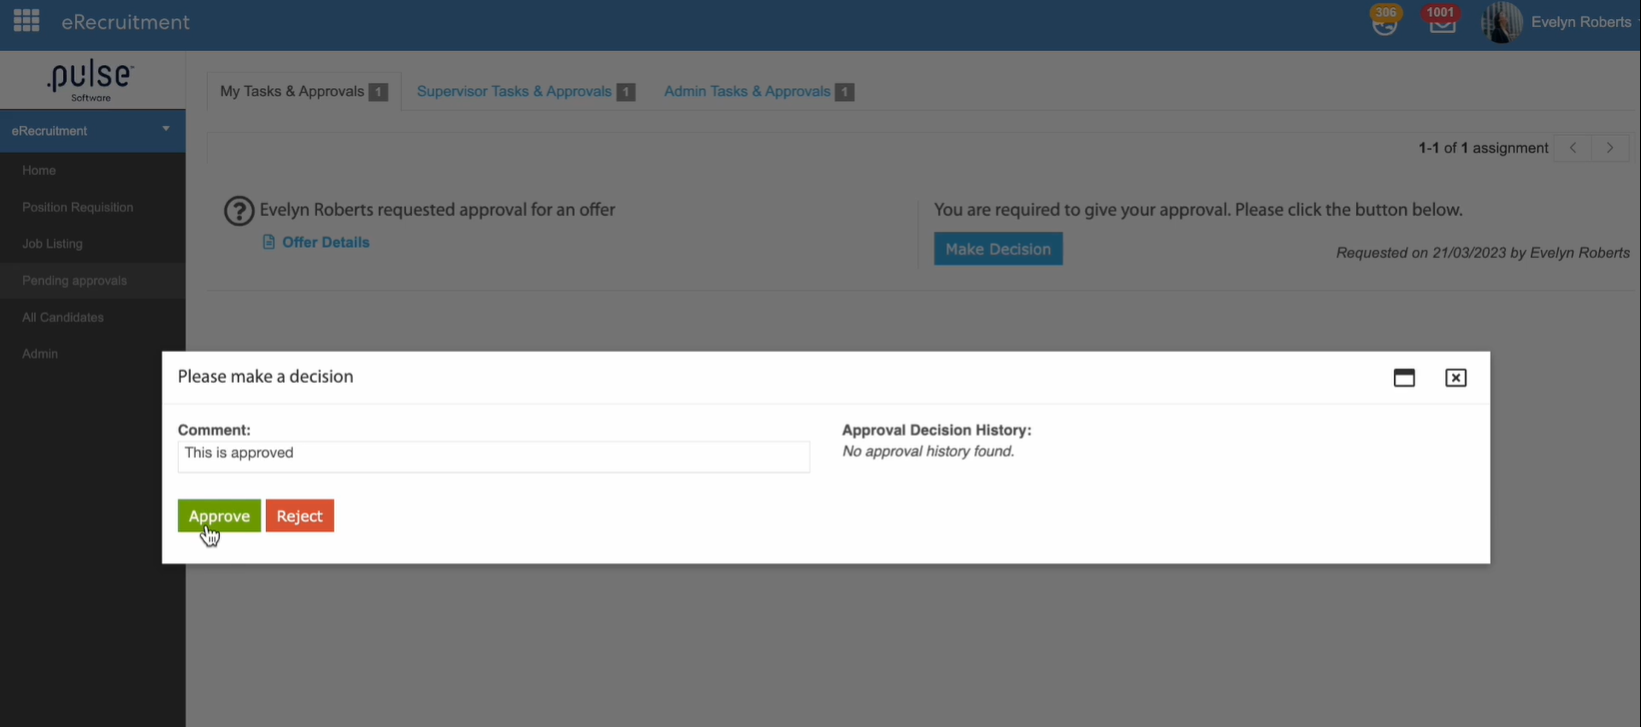
Note: If there are more than one approver in the Approval workflow, then the request must be accepted by all the approvers before it can be sent to the candidates.
All the responses from the approvers will be captured in the activity log.
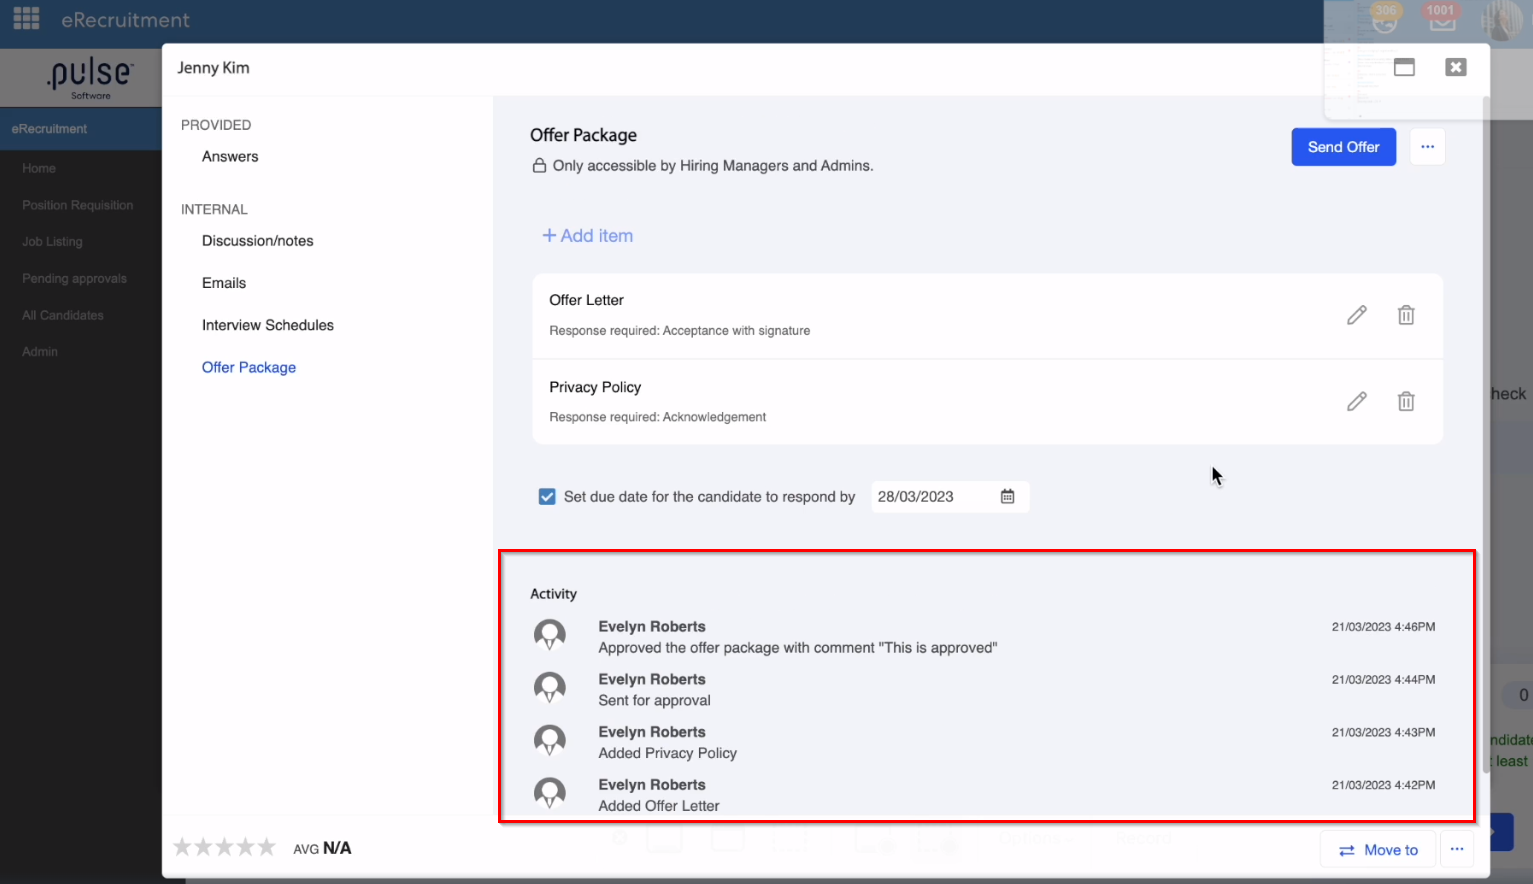
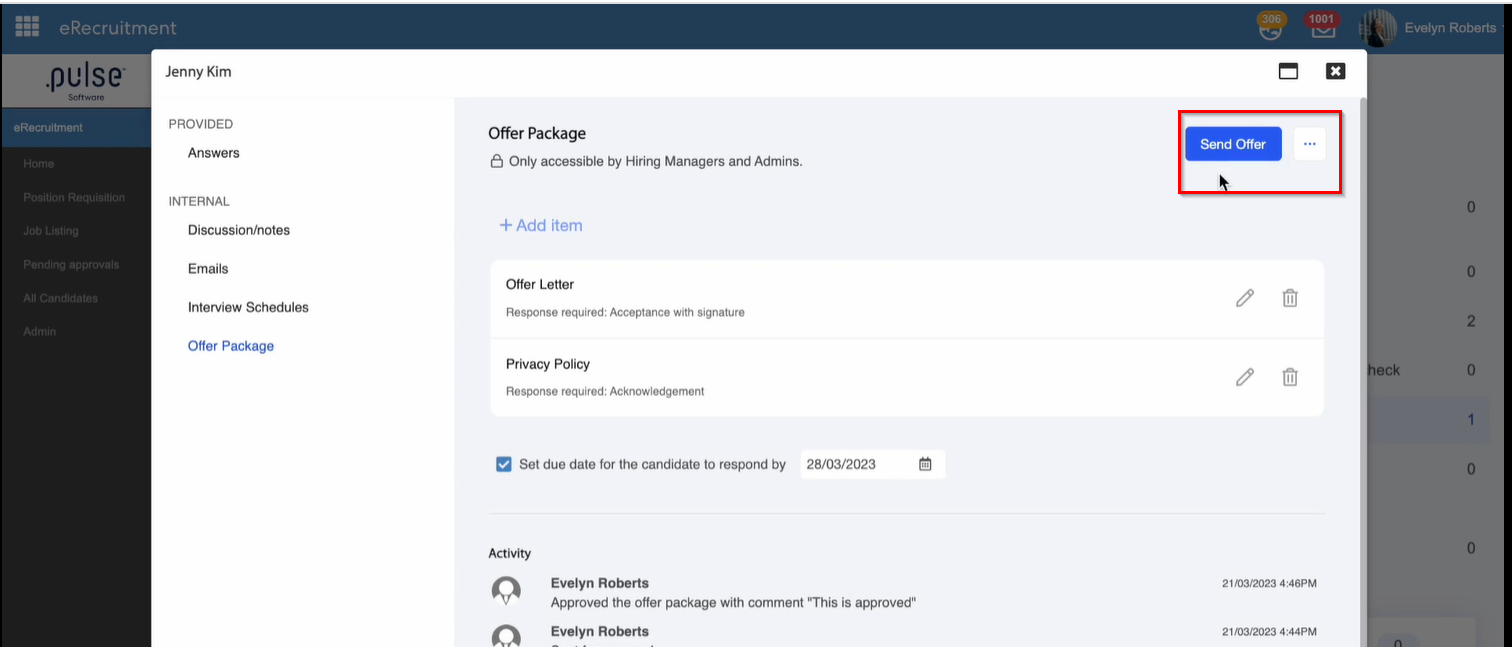
F) Send Offer
Once the request is approved, admins and hiring managers will be able to see a "Send Offer" button. The Send Offer button will open up a pop-up where admins and hiring managers can send an email with the offer package link attached.
Admins and hiring managers can also choose a pre-existing email template from the "Email Template" dropdown or else, they can write an email to the candidate along with the link to the offer package.
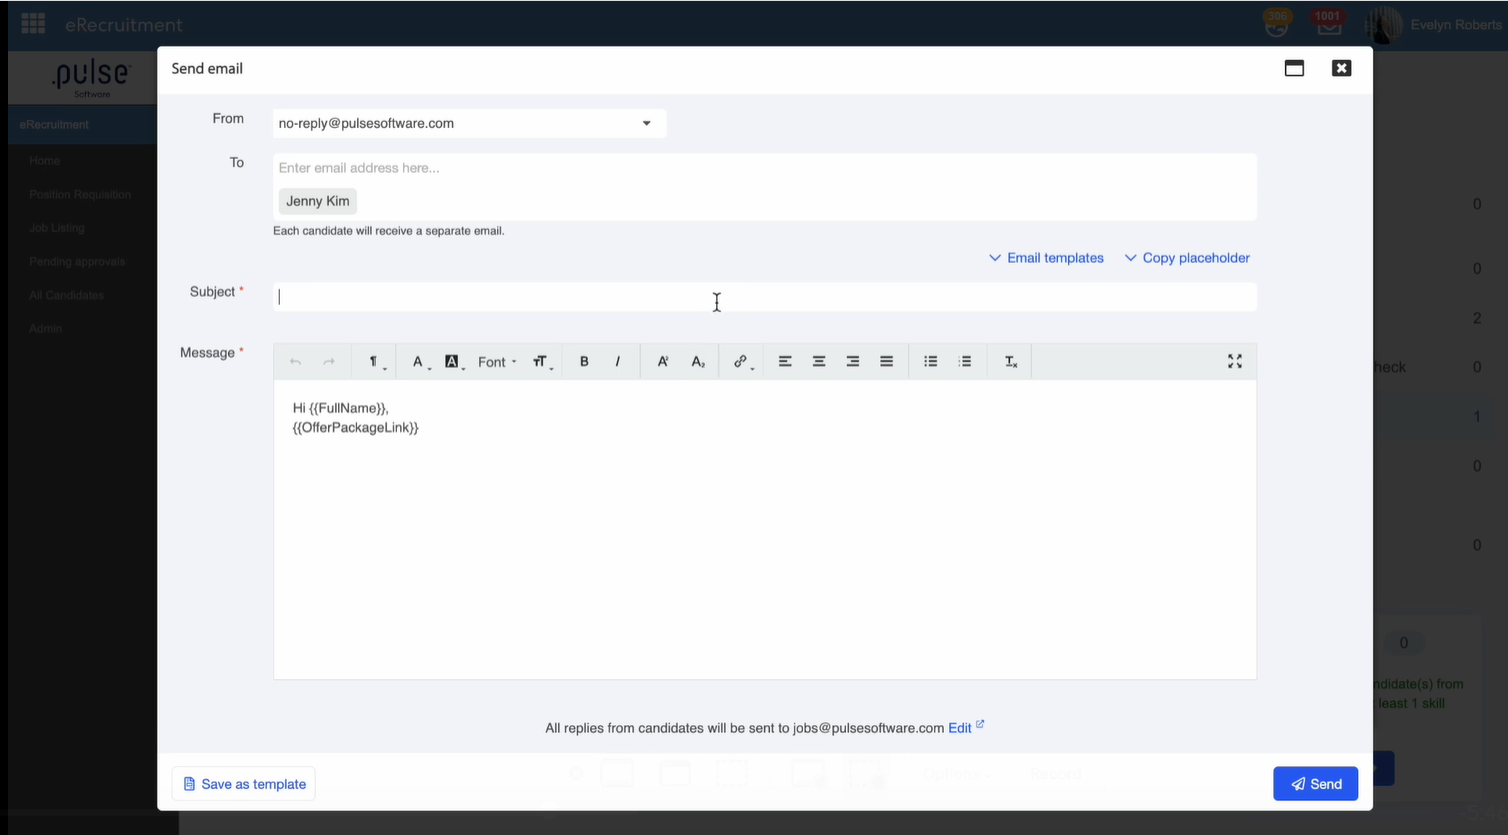
Click on "Send" to send the offer package to the Candidate.
Once the offer package has been sent out to the candidate, it will appear in the Activity log to admins and hiring managers.
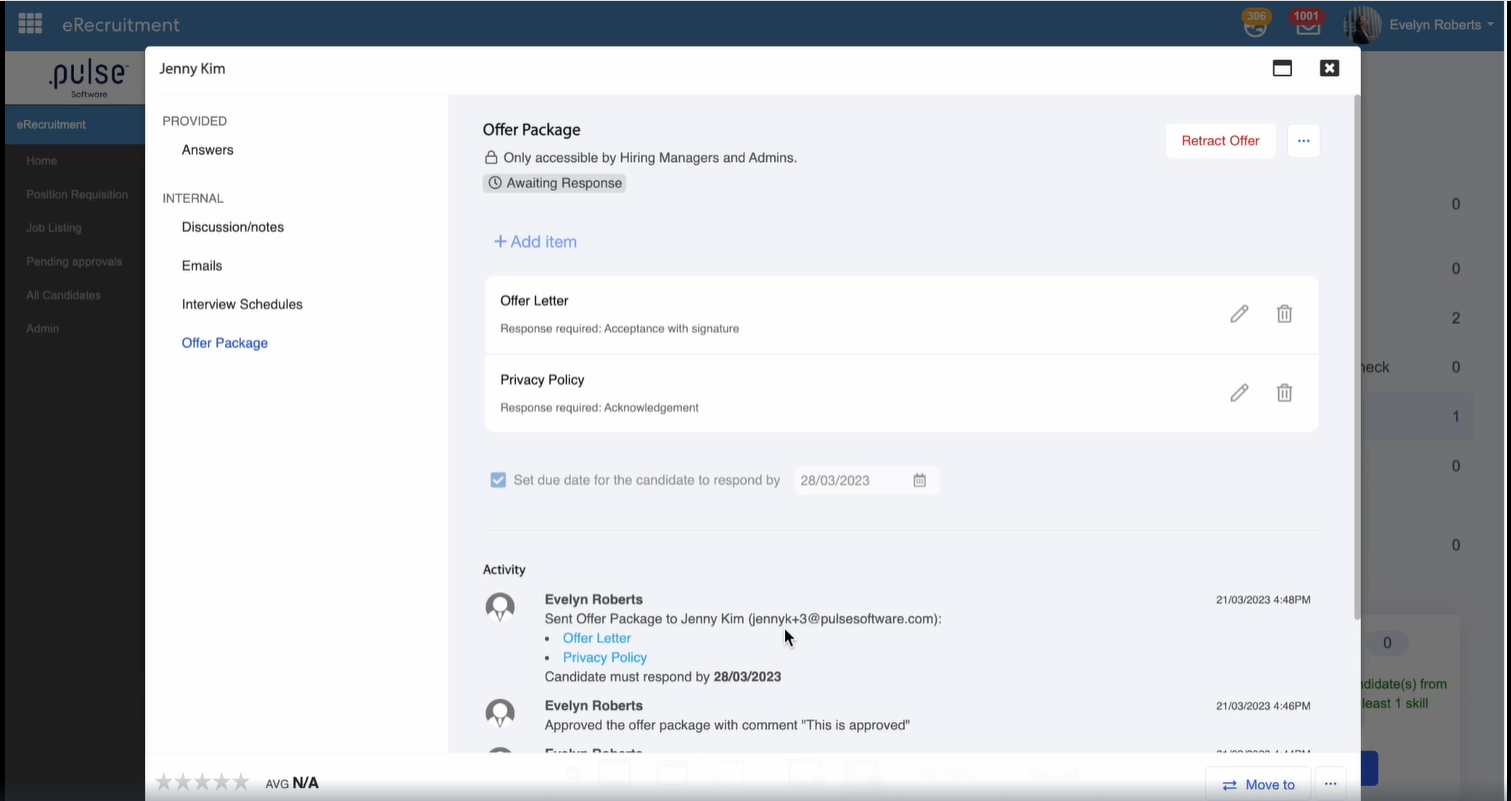
G) Retract Offer
If at any stage, admins or hiring managers wants to withdraw the offer they can do so by clicking on the Retract Offer button.
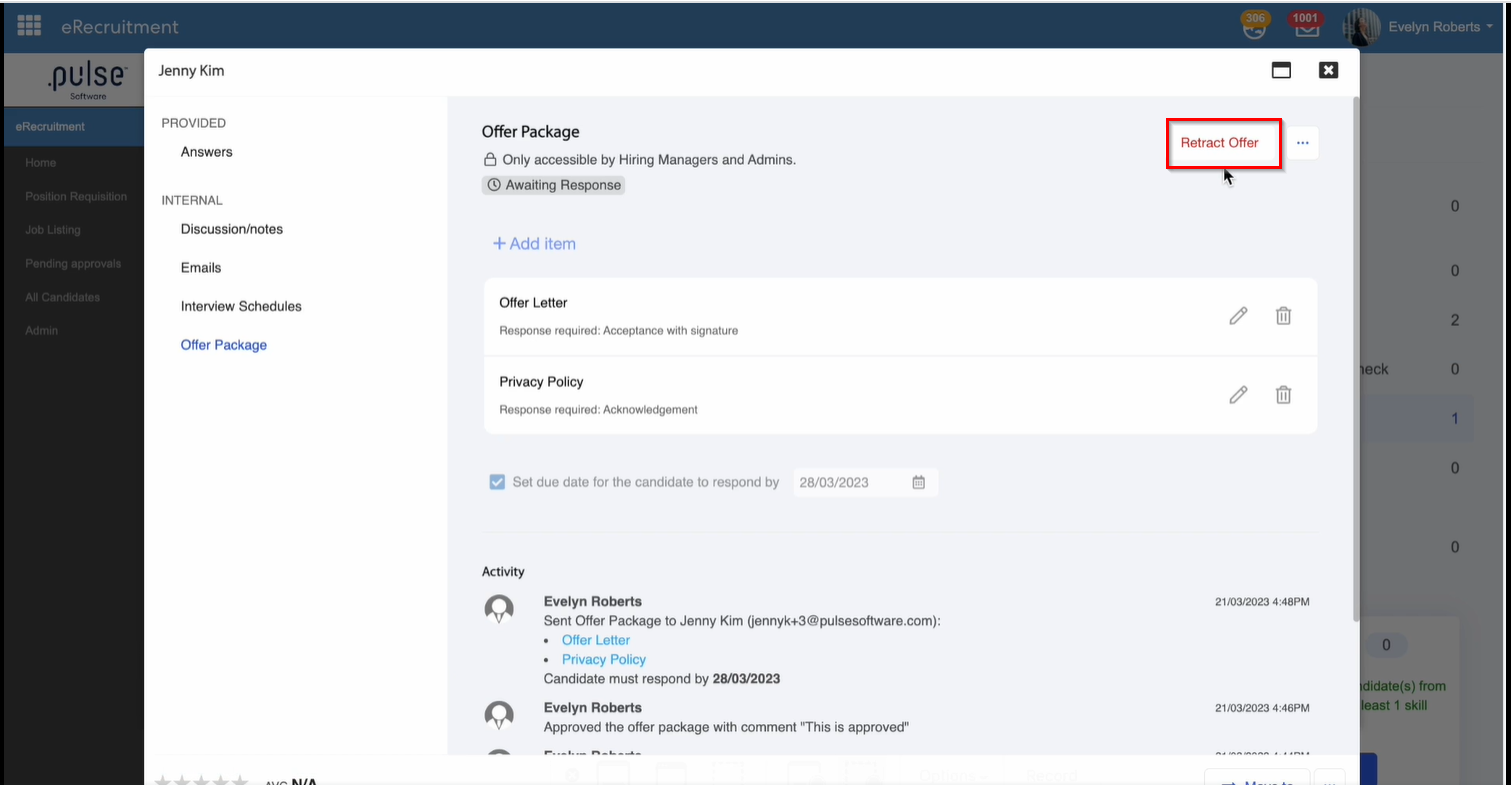
This will open up a pop-up where admins or hiring managers will have to provide a reason for withdrawing the offer.
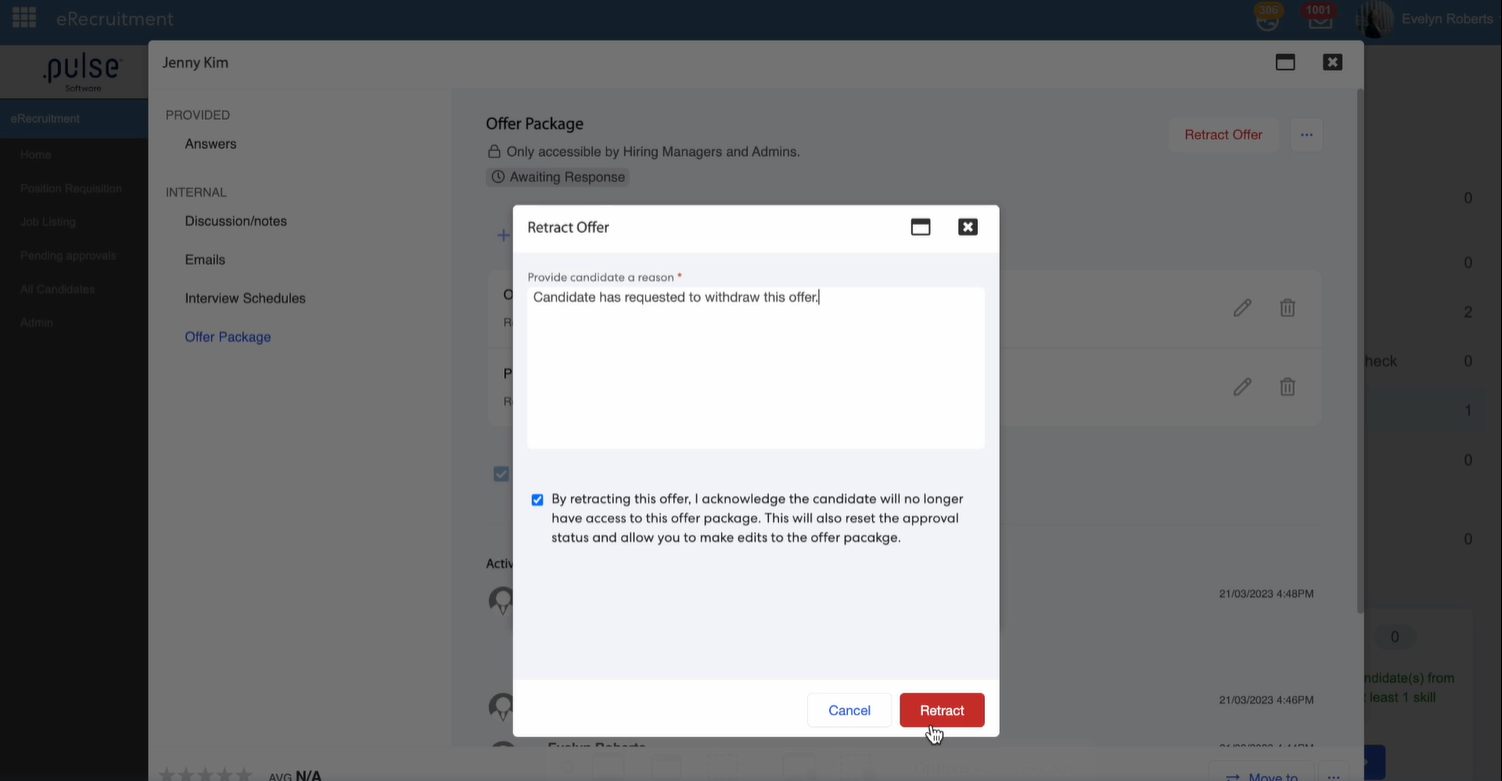
Note: Candidate will no longer have access to the offer package once it has been retracted/withdrawed.
Candidate's Portal
When the offer has been sent to the candidate, they will receive an email with the link of the offer package.
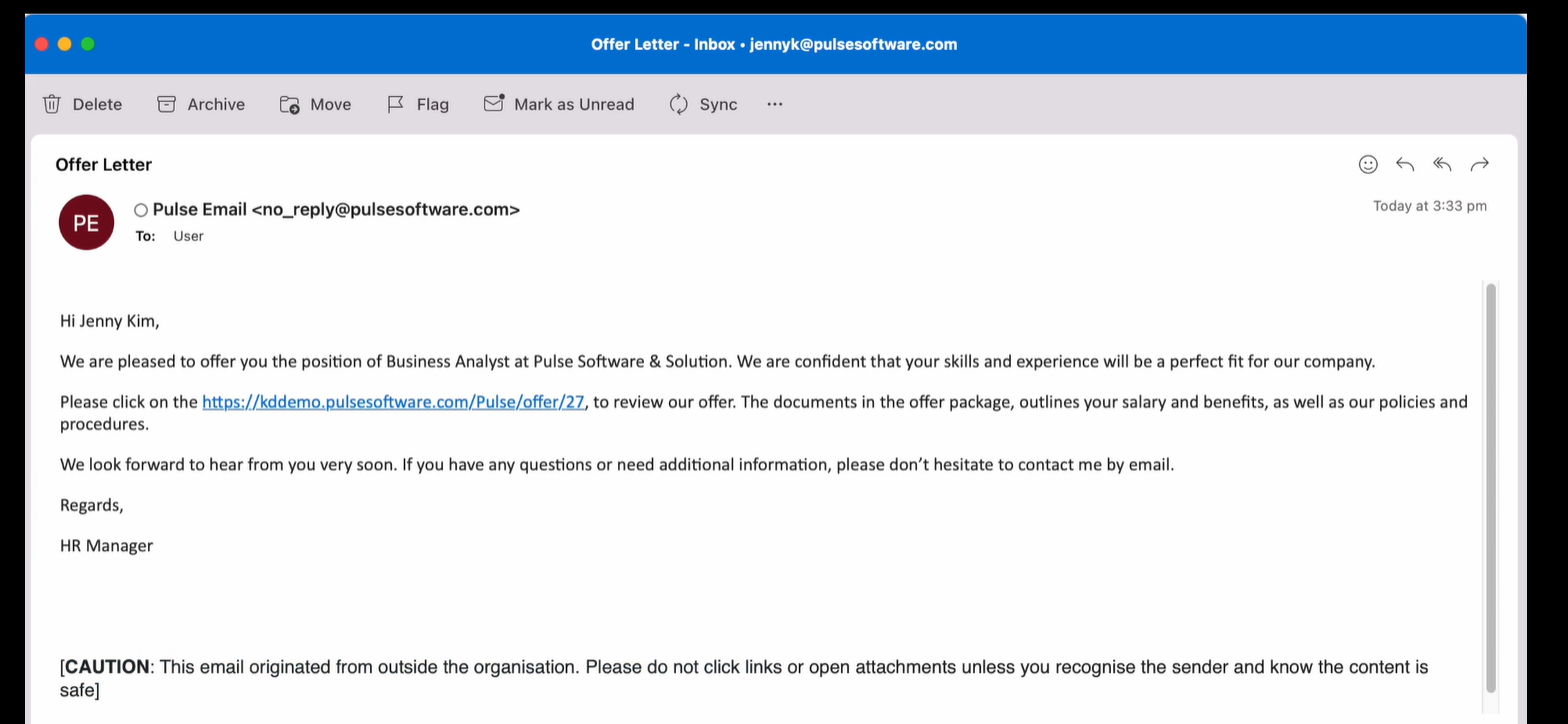
The link will redirect take them to the Login Portal where the candidates will have to login with the same credentials they used while applying for the job.
Once Logged in, the candidates will see the Offer package with the due date.
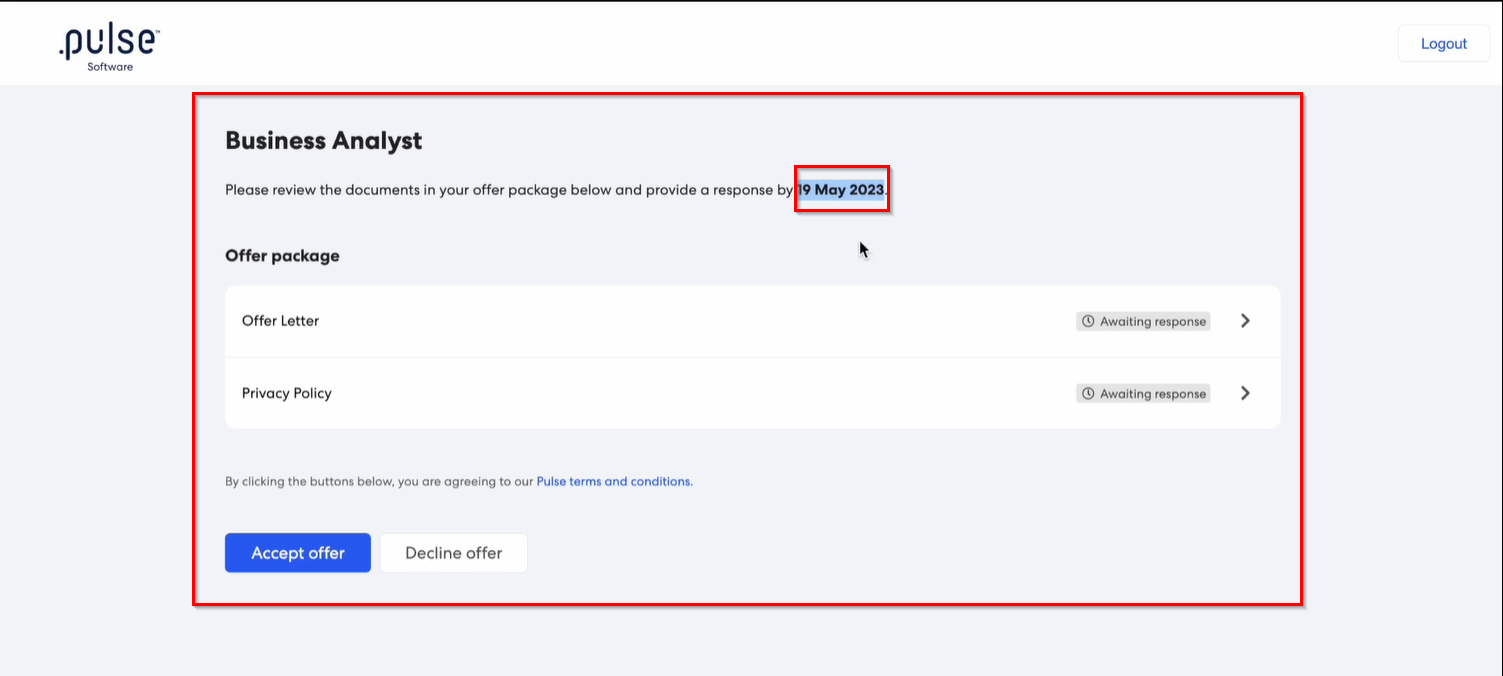
To accept the offer, the candidates must click on the files to open them. They also have the ability to download the files from the download button, located on the top of the page.

To accept the document, the candidate must click on the "Accept" button to accept the offer. Once, they click on the accept button, they will have to provide their signatures to accept the offer.
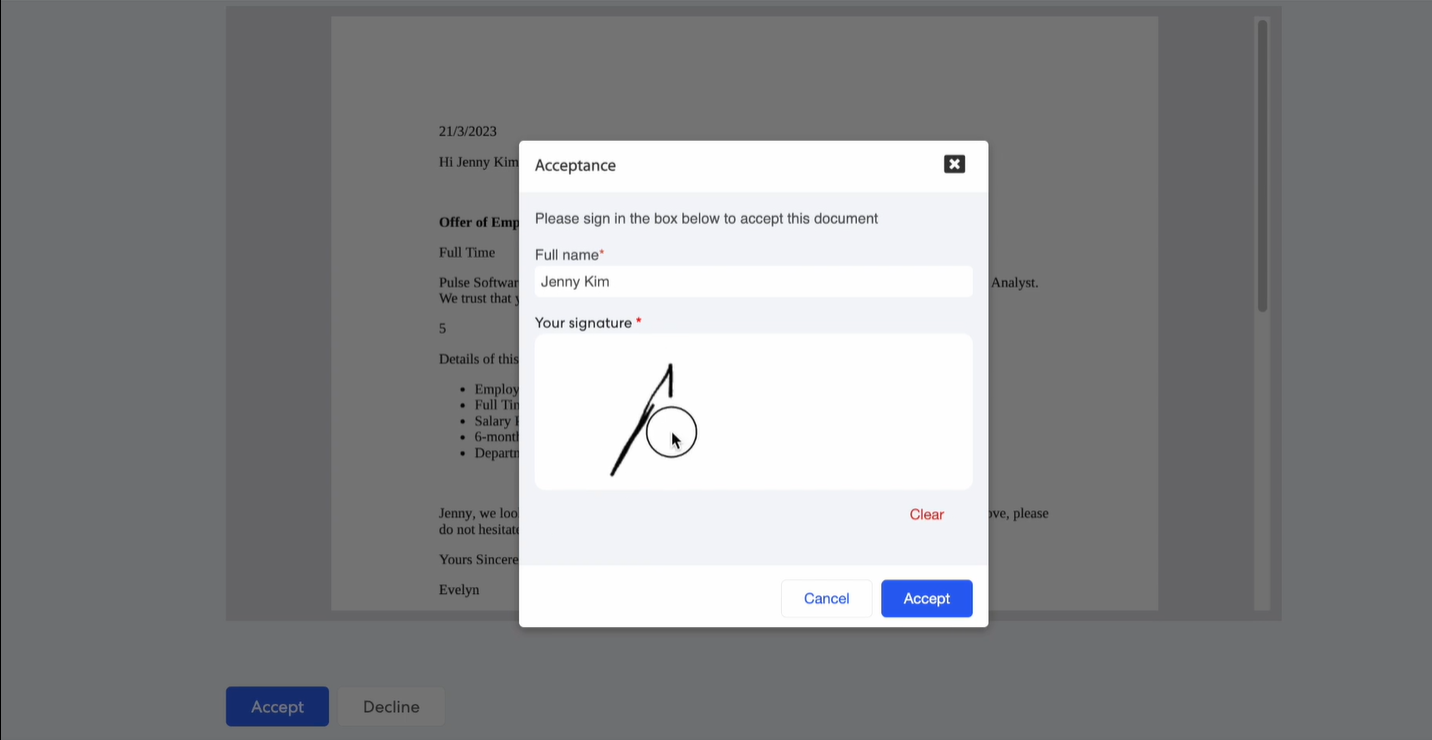
The candidates can also download the signed document into their device.
The candidates also have the ability to change their response after accepting the offer. To change their responses, they would just need to open the document again and click on "Change response" button.
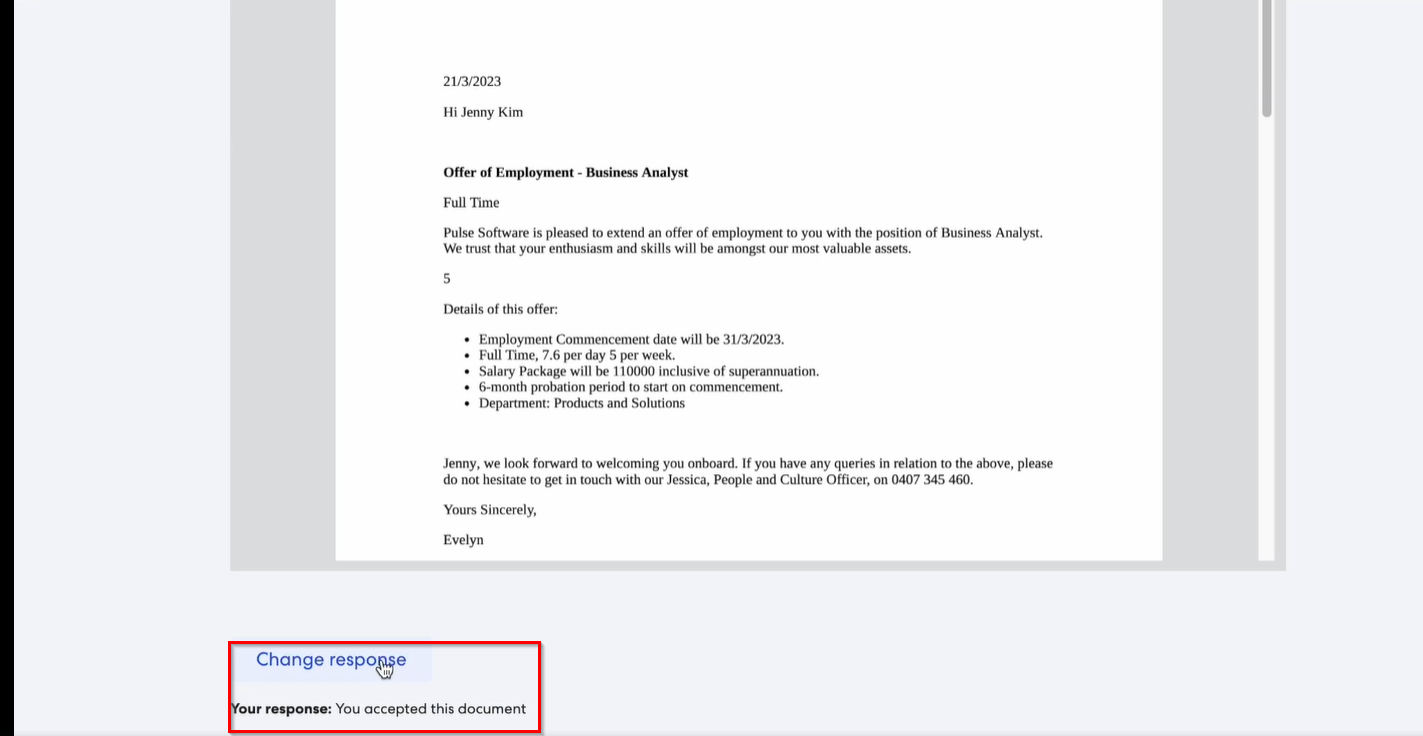
Note: The status of the document will change. If the package is accepted, the status will turn into green, if rejected, the status will turn to red.
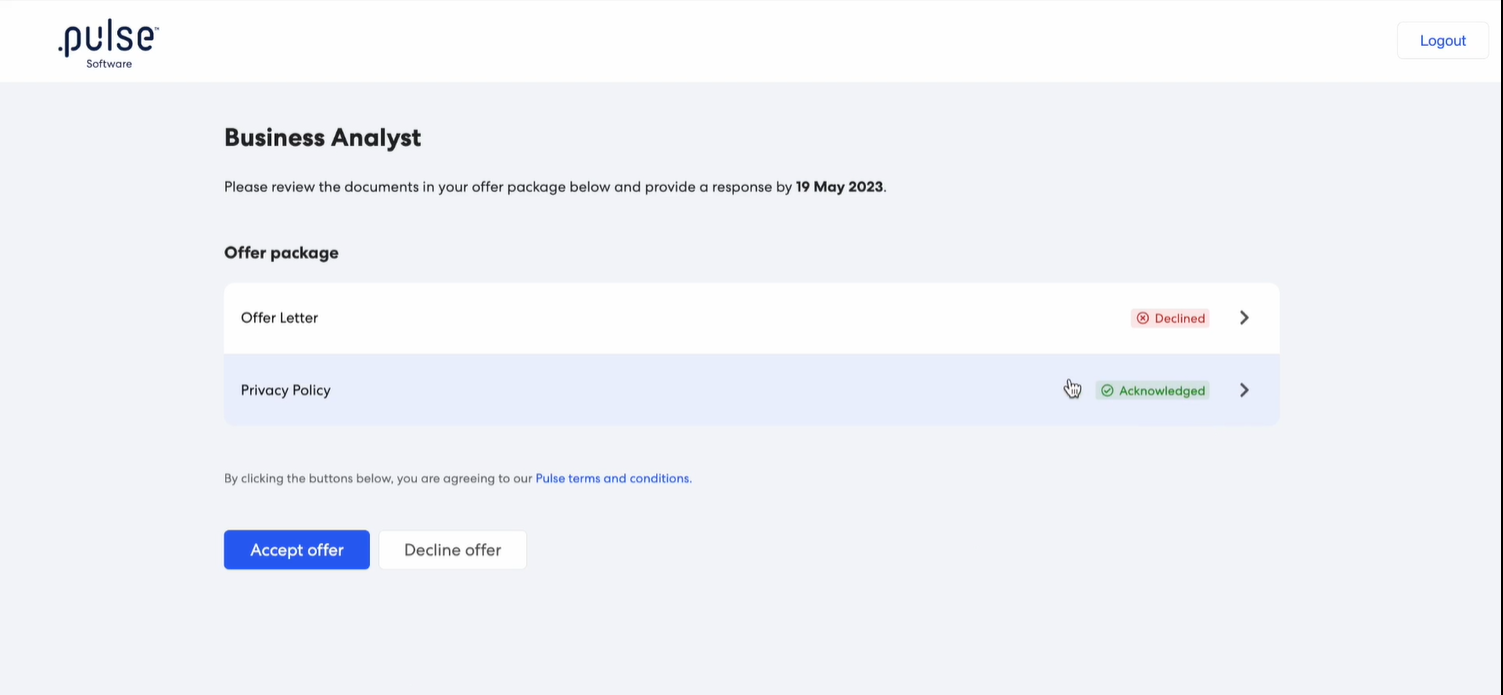
Documents which do not have a status against them, means that they do not require a signature or an acknowledgement.
To accept the whole offer, the candidate needs to click on "Accept offer" button on the main screen. The candidate will be able to accept the offer only when all the items are marked as Accepted (green). If any item's statuses is in red, it will give a banner message, not allowing candidates to accept the offer.
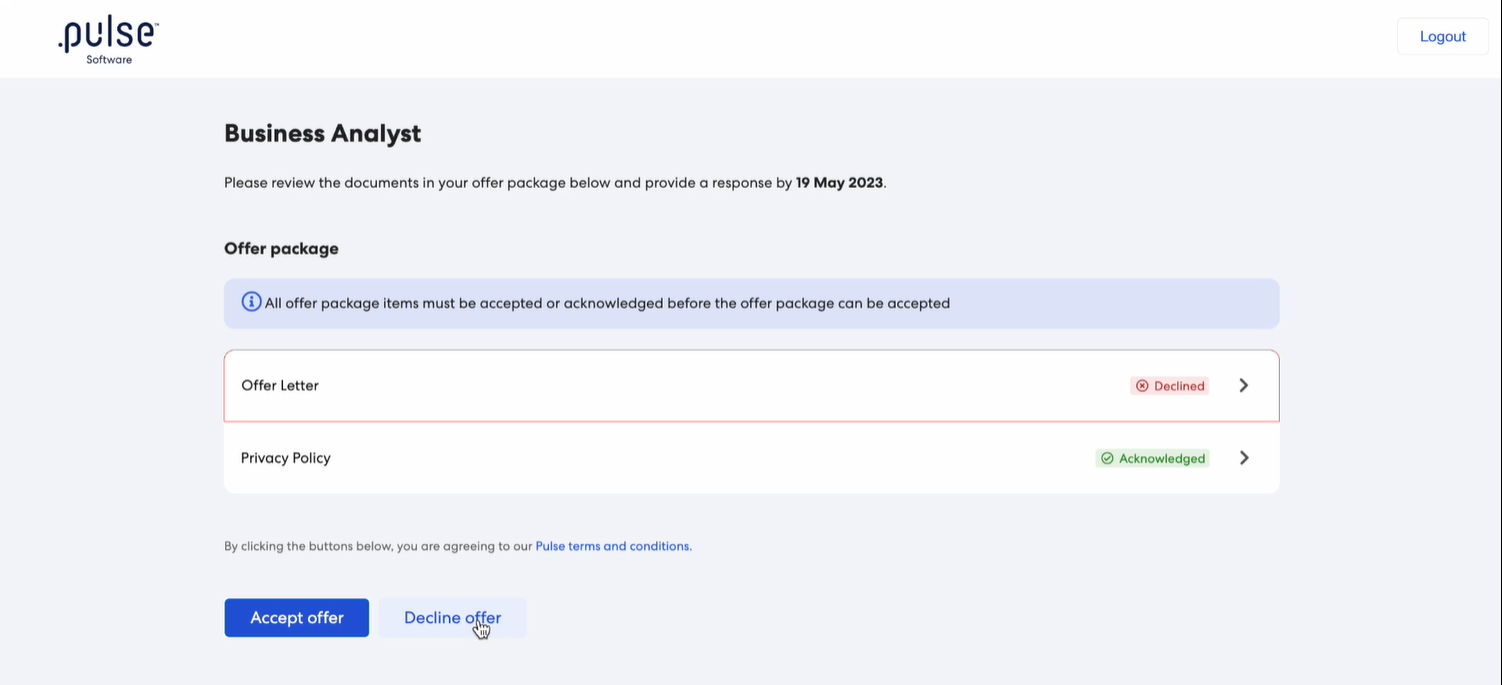
However, if the candidate wishes to decline the offer, they can simply click on the "Decline offer" button and specify the reason for declining the offer.
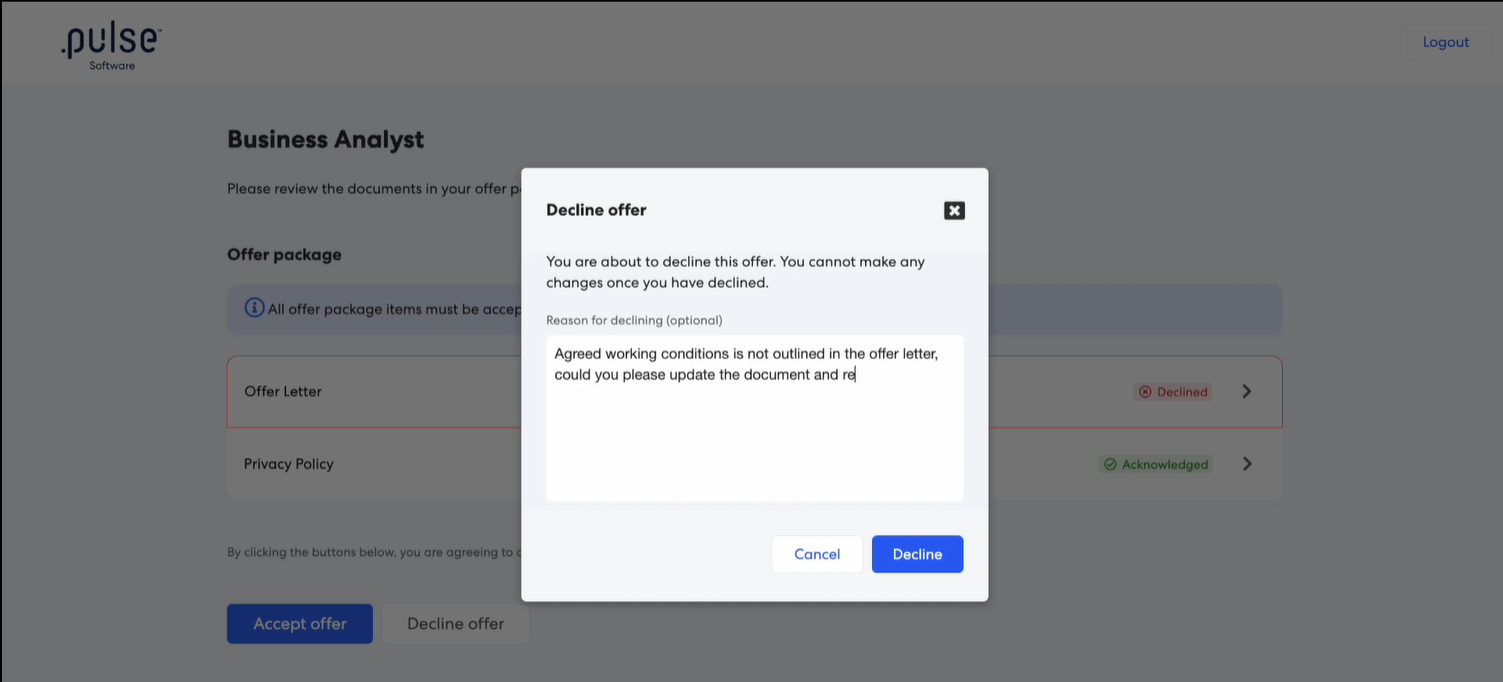
Note: The reason for declining the offer will only be visible to admins and hiring managers.
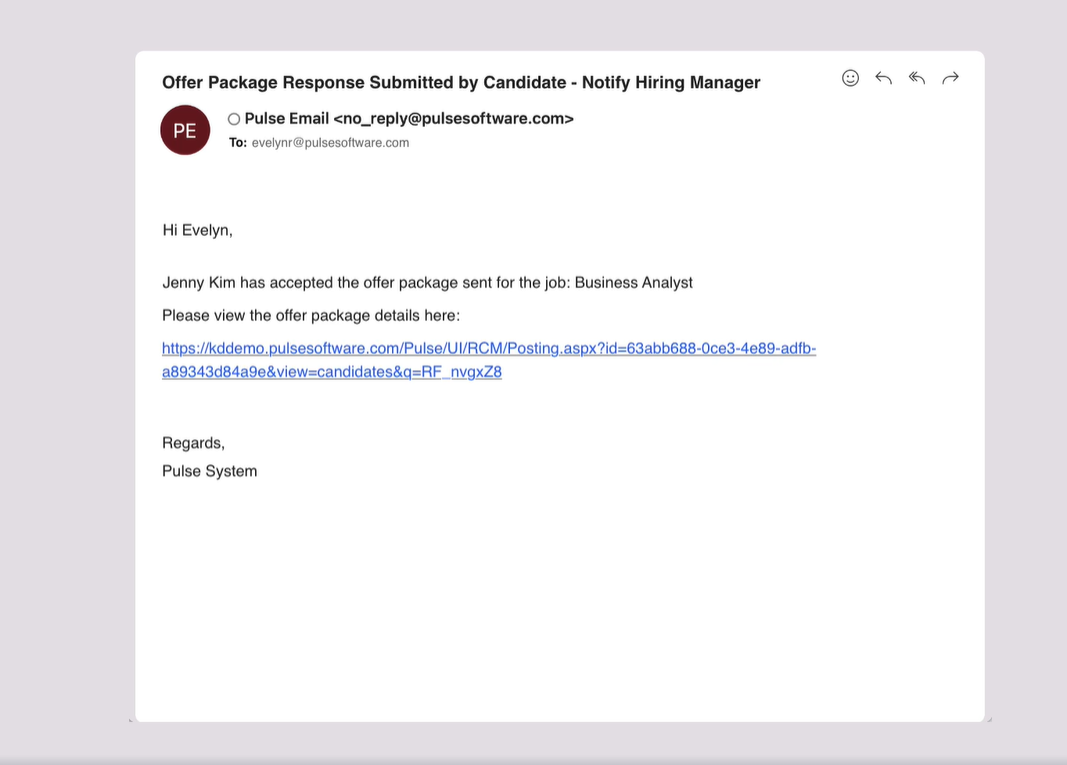
Once the offer package has been accepted by the candidate, admins and hiring managers will get notified with a link to offer package details.
Note: At this stage, candidate can no longer change their response.
When the candidate accepts or decline the offer. it appears on the candidate card under candidate's Tab.
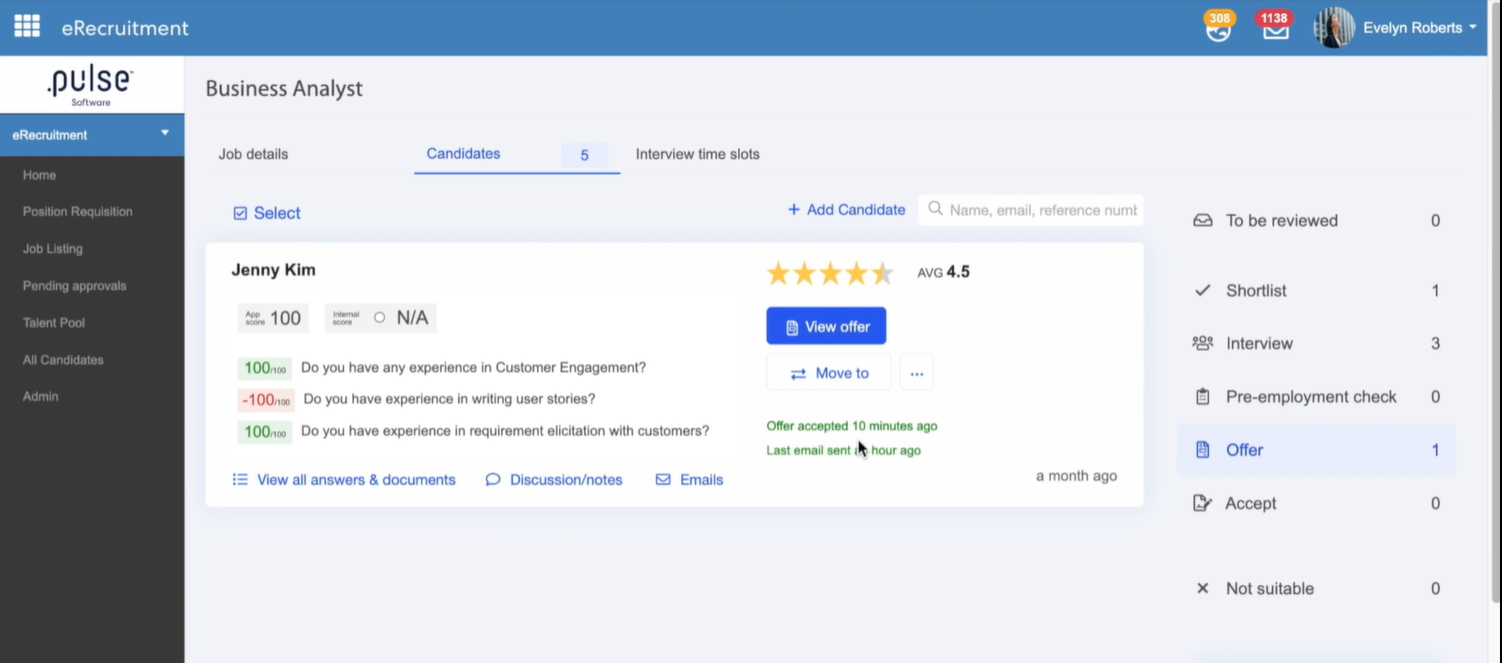
Click on the "View offer" button to view the details of the offer package.
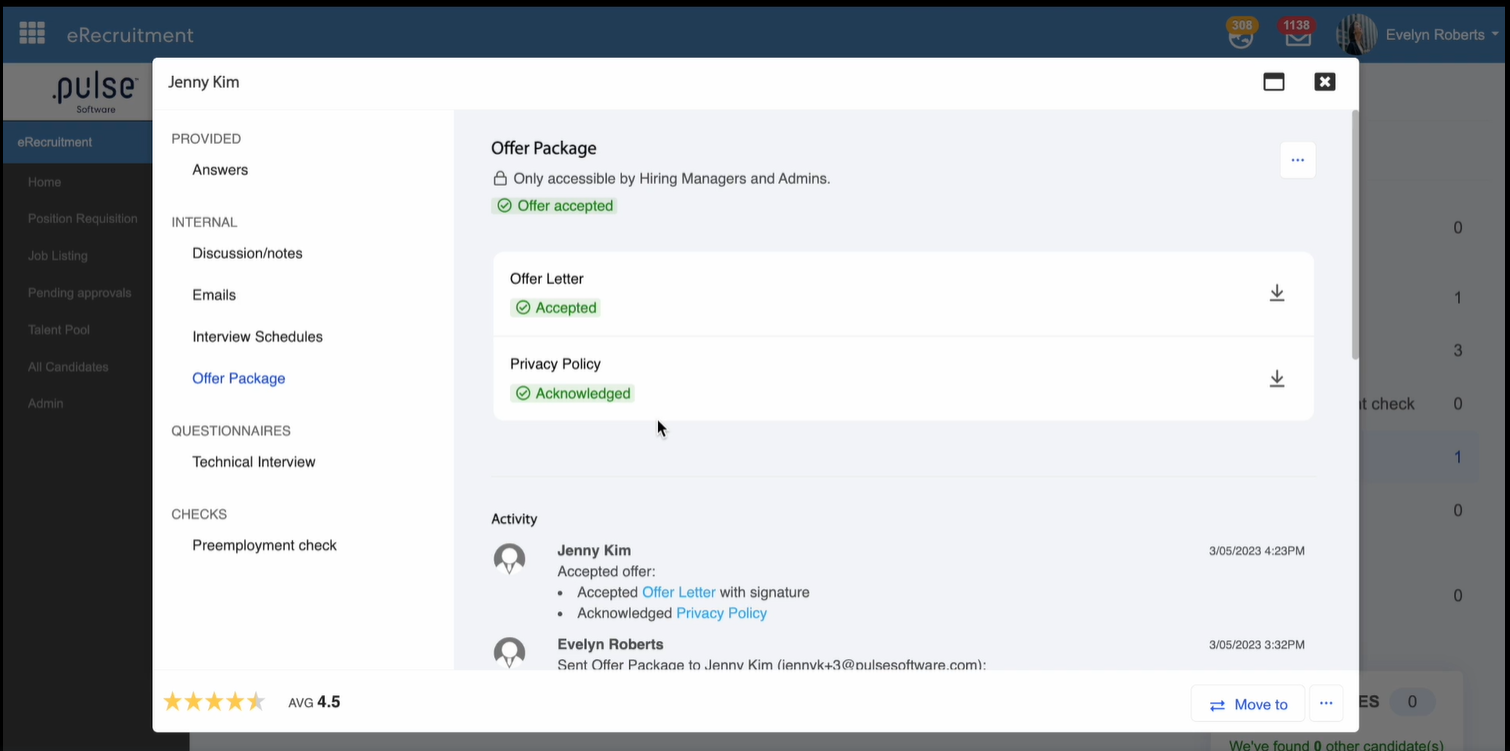
In the View offer tab, hiring manager will also have the ability to download the original document or the signed document.

In cases where admins or hiring manager chooses to update the offer, they have the ability to do so by clicking on the ellipses button, and click on "Update offer".
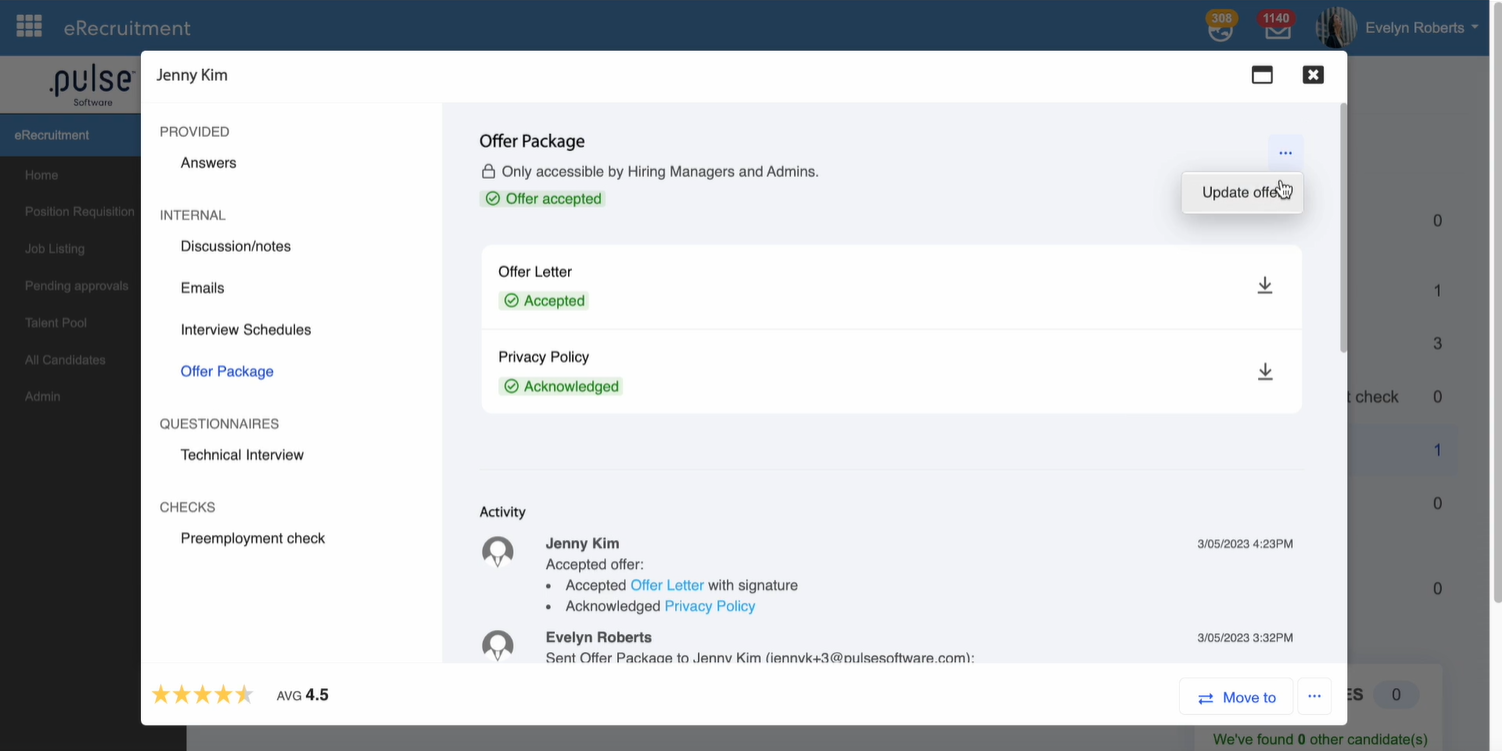
By clicking on the update offer, documents that were signed or acknowledged will revert back to the original state.
Known Issue: Currently, Hiring Managers are unable to cancel an approval during the review of an offer package. However, we have provided a workaround for this issue. In case a cancellation is needed, Hiring Managers can now reach out to the module administrator who has the ability to cancel an approval on their behalf.
Please click on the link to watch the video of the offer process.
4. Project Management & Control Module
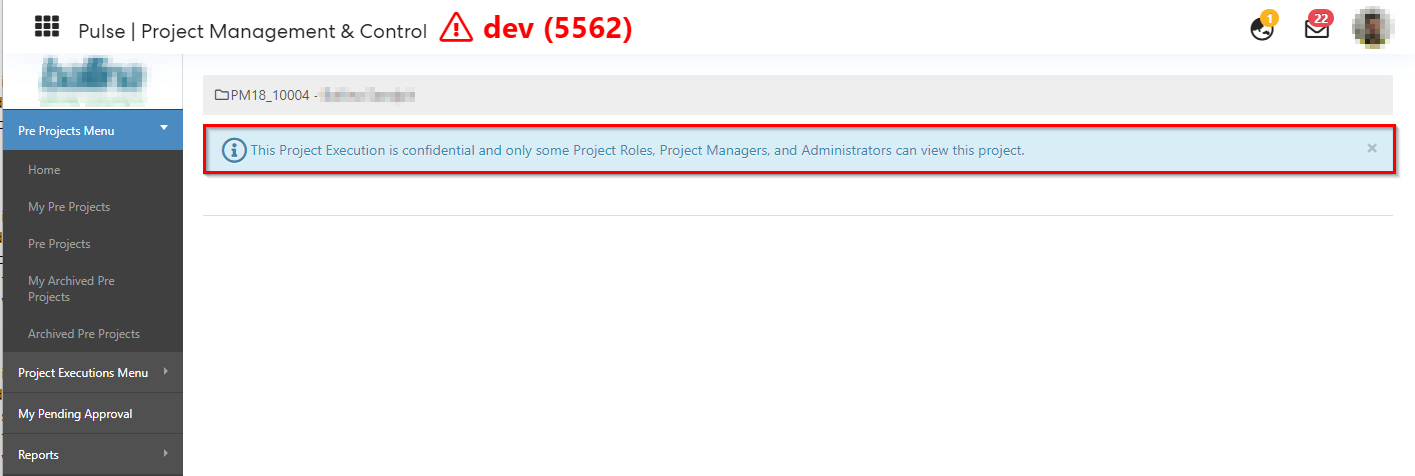
4.1 Ability to mark pre-projects/project executions as "Confidential"Admins of the PMC module can now mark a Pre-project or Project execution as "Confidential" from the users. This enhancement would help admins to restrict access from users who are not a part of the project.
Step 1: Login to Pulse --> Click on the Project Management & Control Module. Once logged in, go to the Admin tab --> click on Manage Pre Project/Project execution.
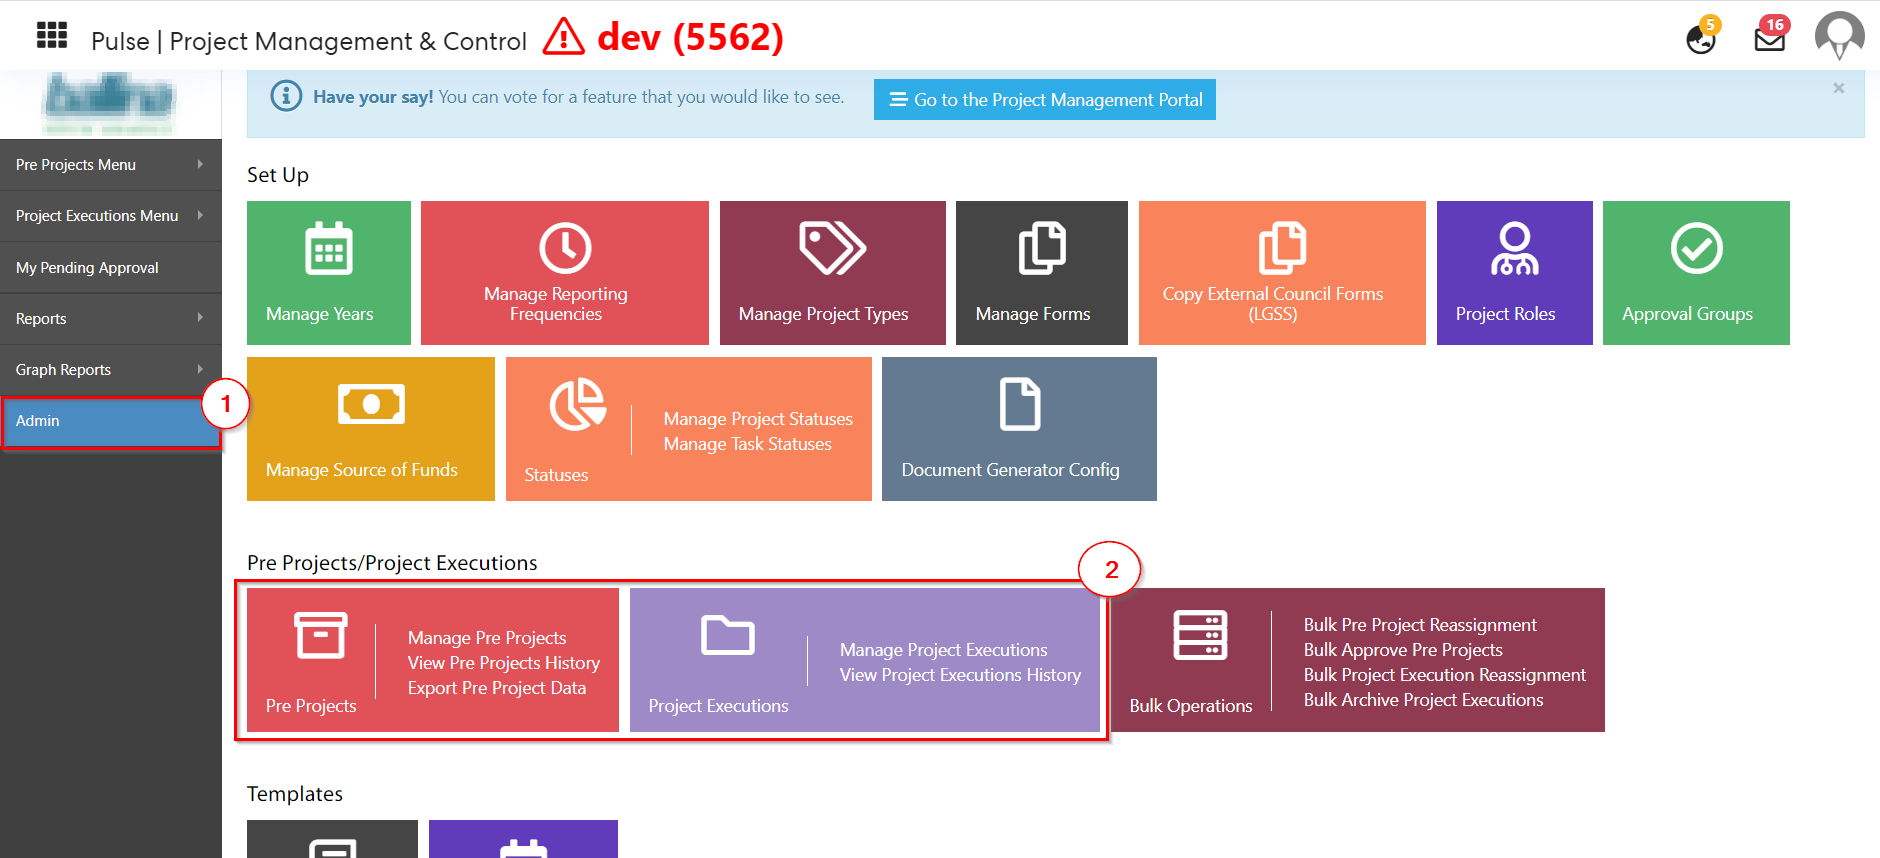
In the Manage Pre-project/Project execution, admins will now be able to change the confidentiality of the project. A new column has been introduced as "Confidential Project Execution/Confidential Pre-project".
Step 2: Admins can click on the eye button to change the confidentiality of the project and once the project is made confidential, then it will be hidden from other users who are not a part of the project.
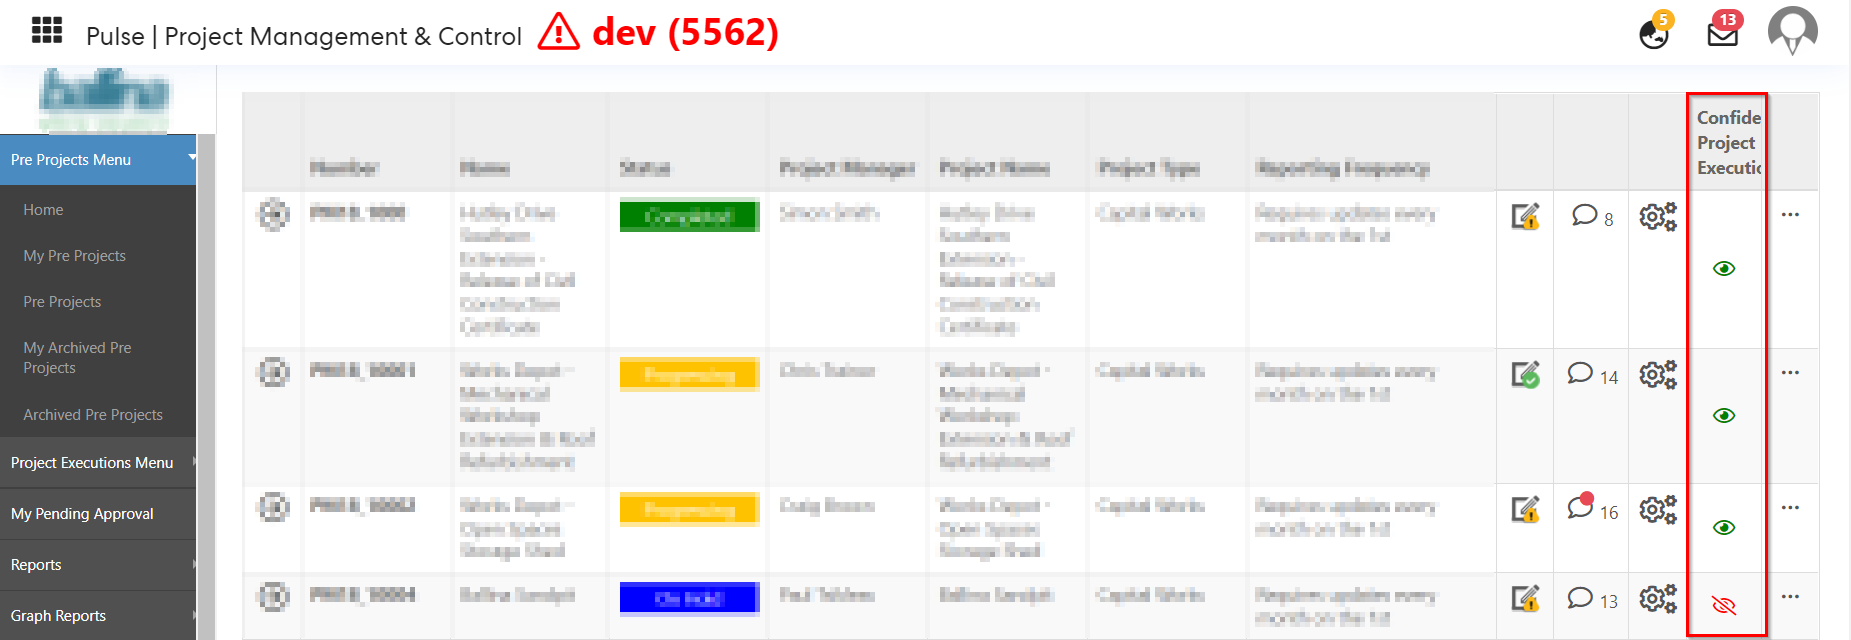
An eye icon will be visible to admins on the view button which will help them to differentiate between the confidential projects and the non-confidential projects.

Only the Project Team and the approval team will be able to view or edit the confidential project.
For instance, if a normal user is assigned a task in a confidential project then they will be able to view the task only, but if they try to access the project, then they will get a banner restriction.
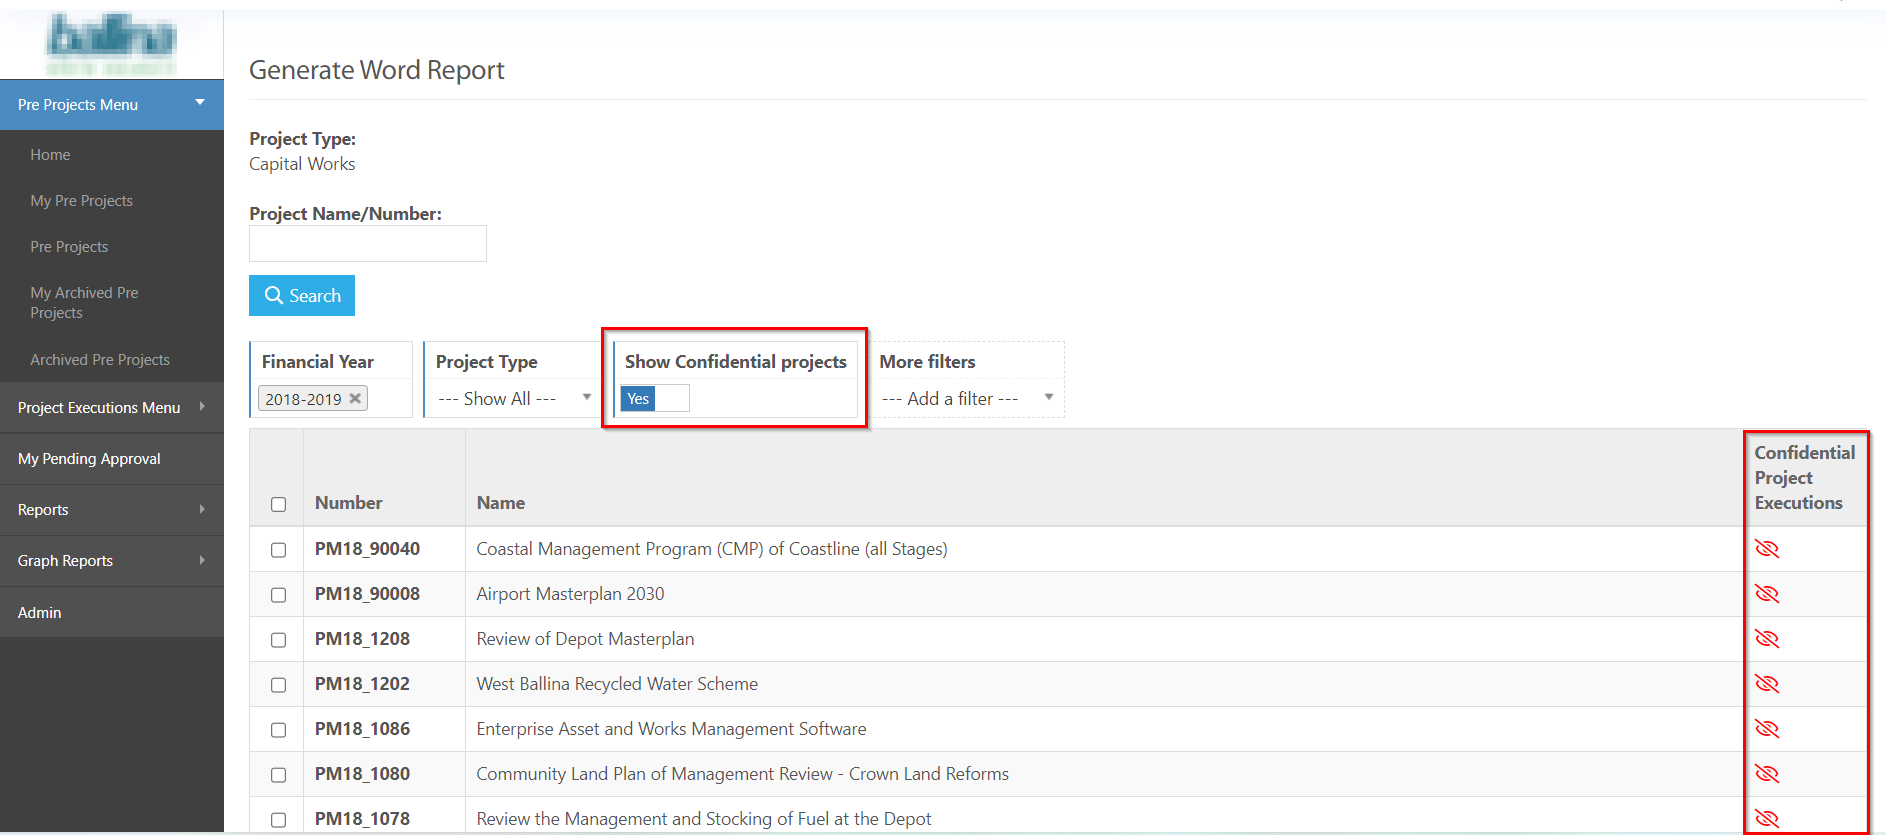
Step 3: Pulse has also introduced this feature in the Document Generator of PMC module. Go to Admin Tab --> click on Document Generator --> Click on any report/Create a new report.
Here, a toggle button has been added to the filters which will allow the admins to view or hide the confidential projects.
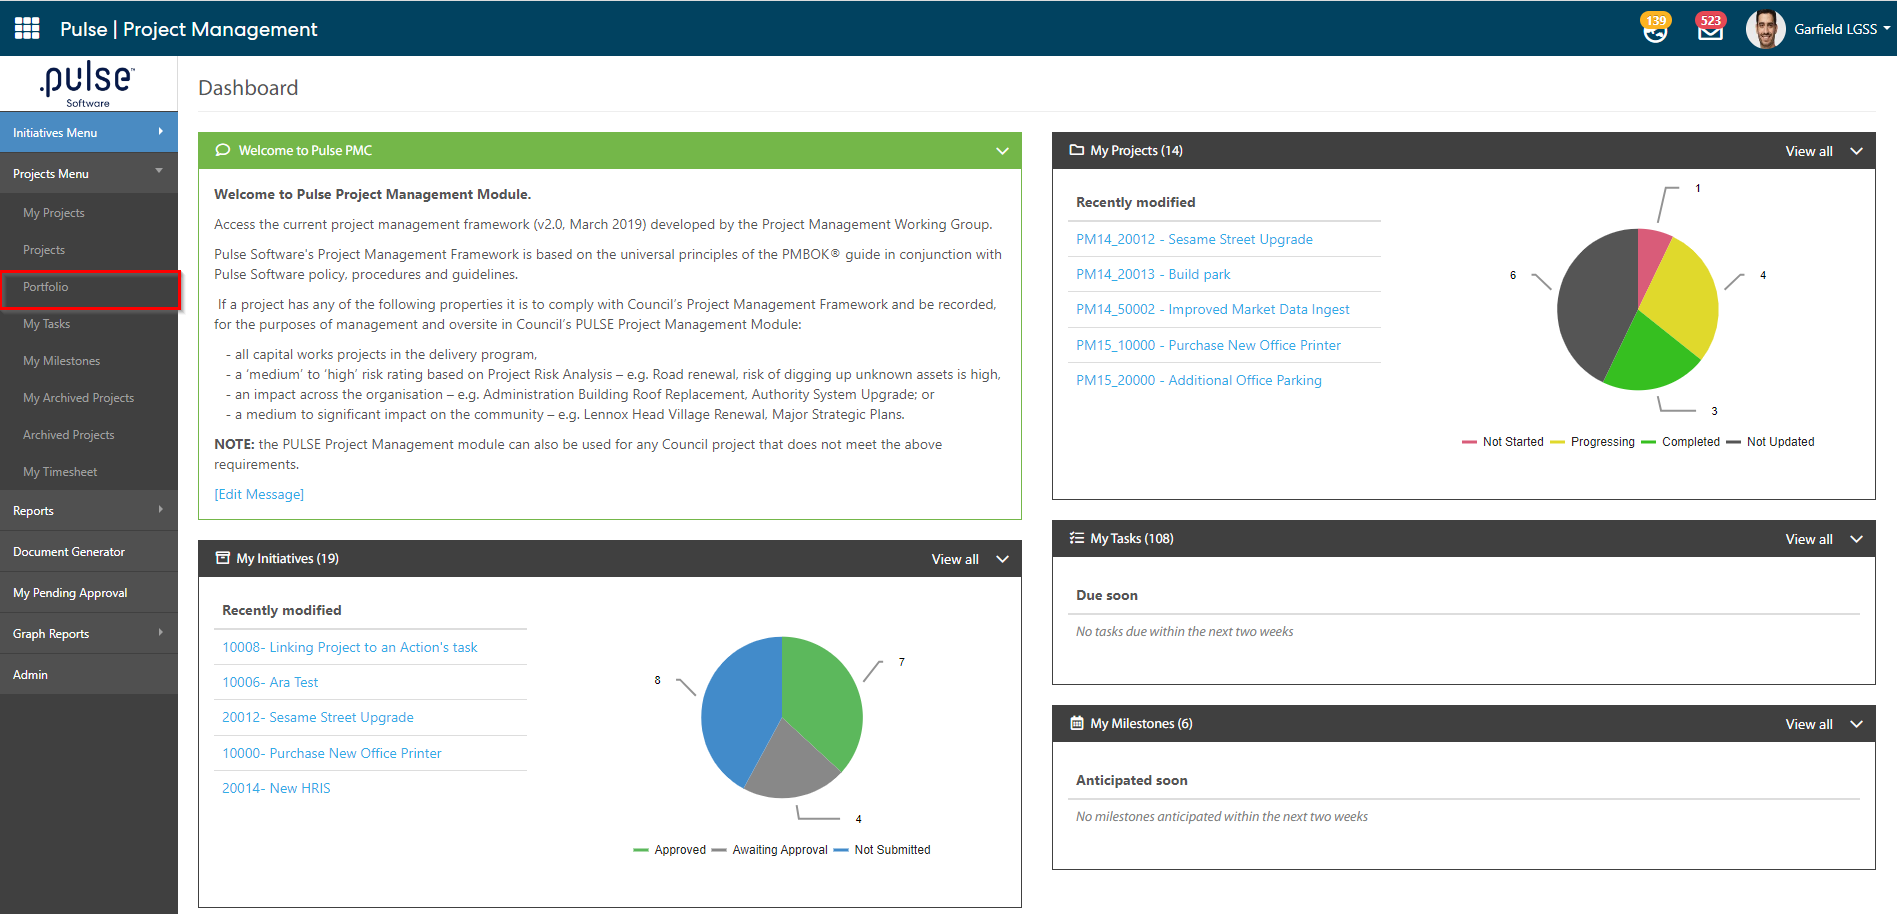
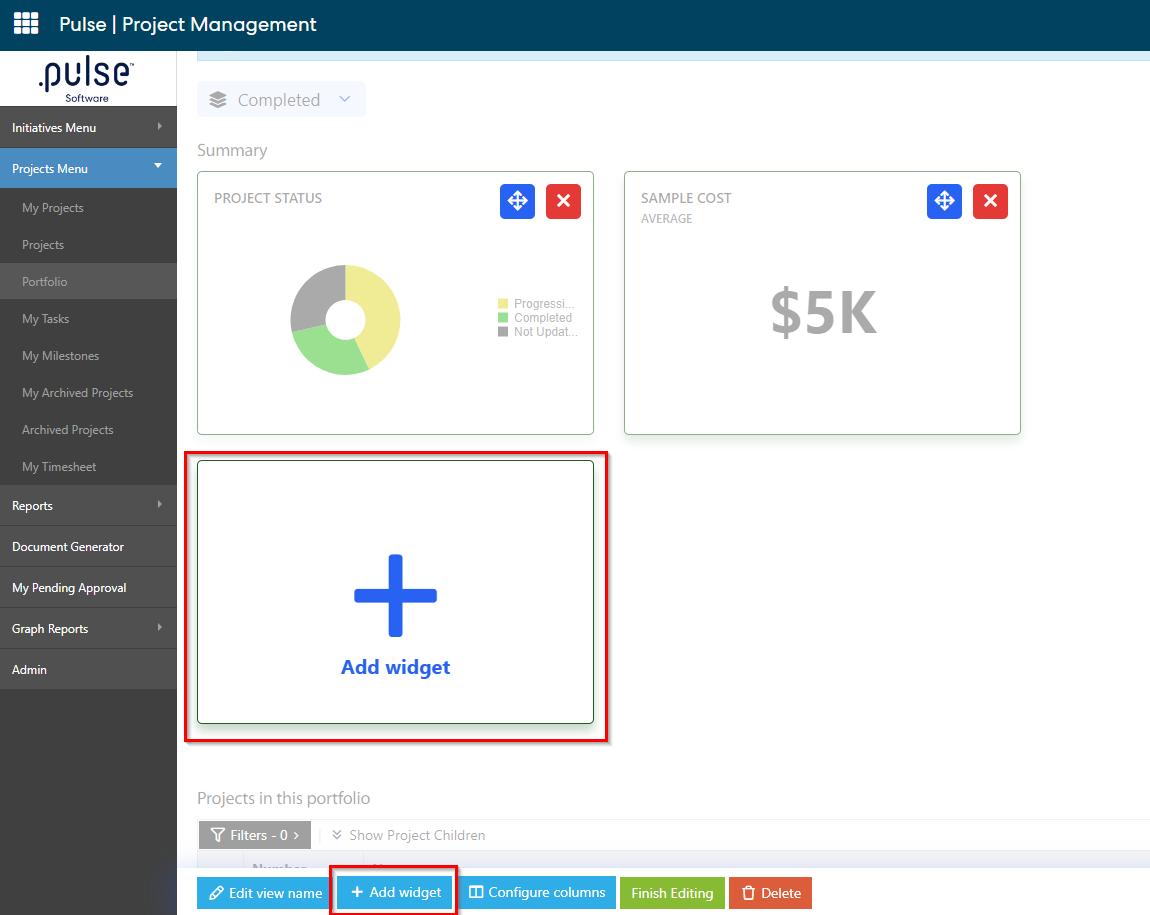
A new chart - "Portfolio Gantt Chart" has been added to the Portfolio page in the Project Management & Control module. This chart will give users the ability to track the project's status from this chart.
Step 1: Login to Pulse and go to the Project Management & Control Module.
Step 2: Go to Project Executions Menu > Portfolio page
In the Portfolio page, users can add Portfolio Gantt Chart by clicking on the "Edit View" button.
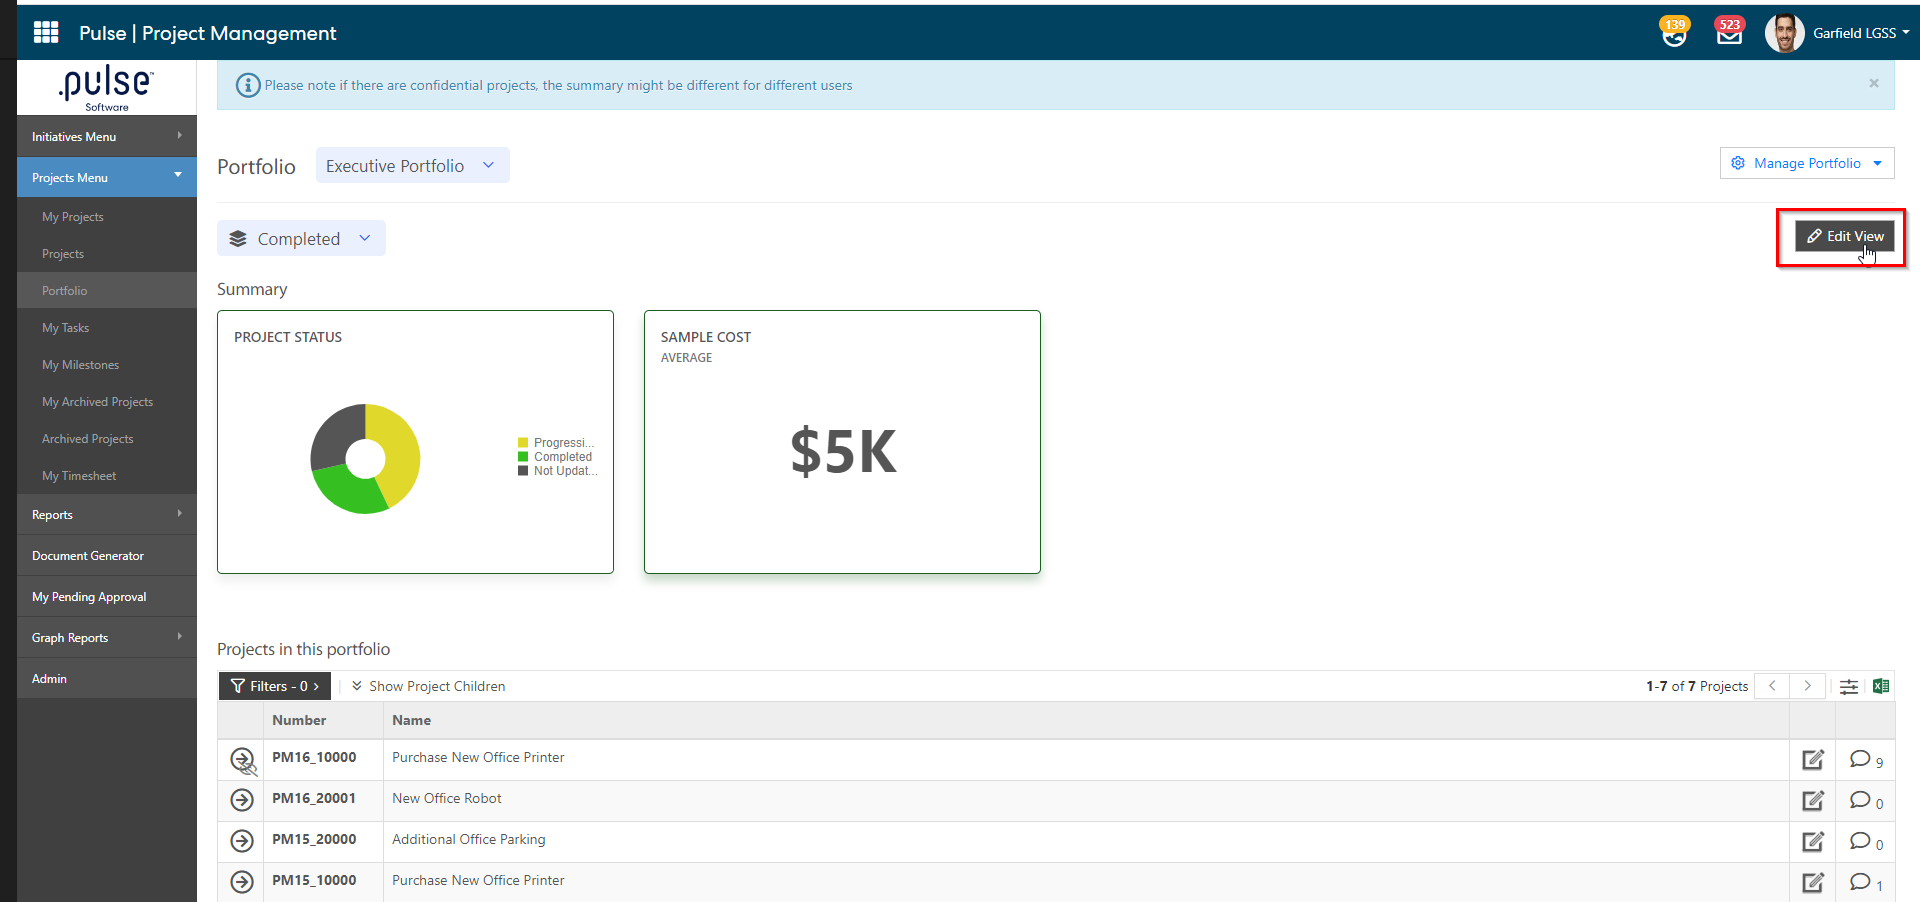
Click on the Edit View button to Add/Delete any chart from the current view.
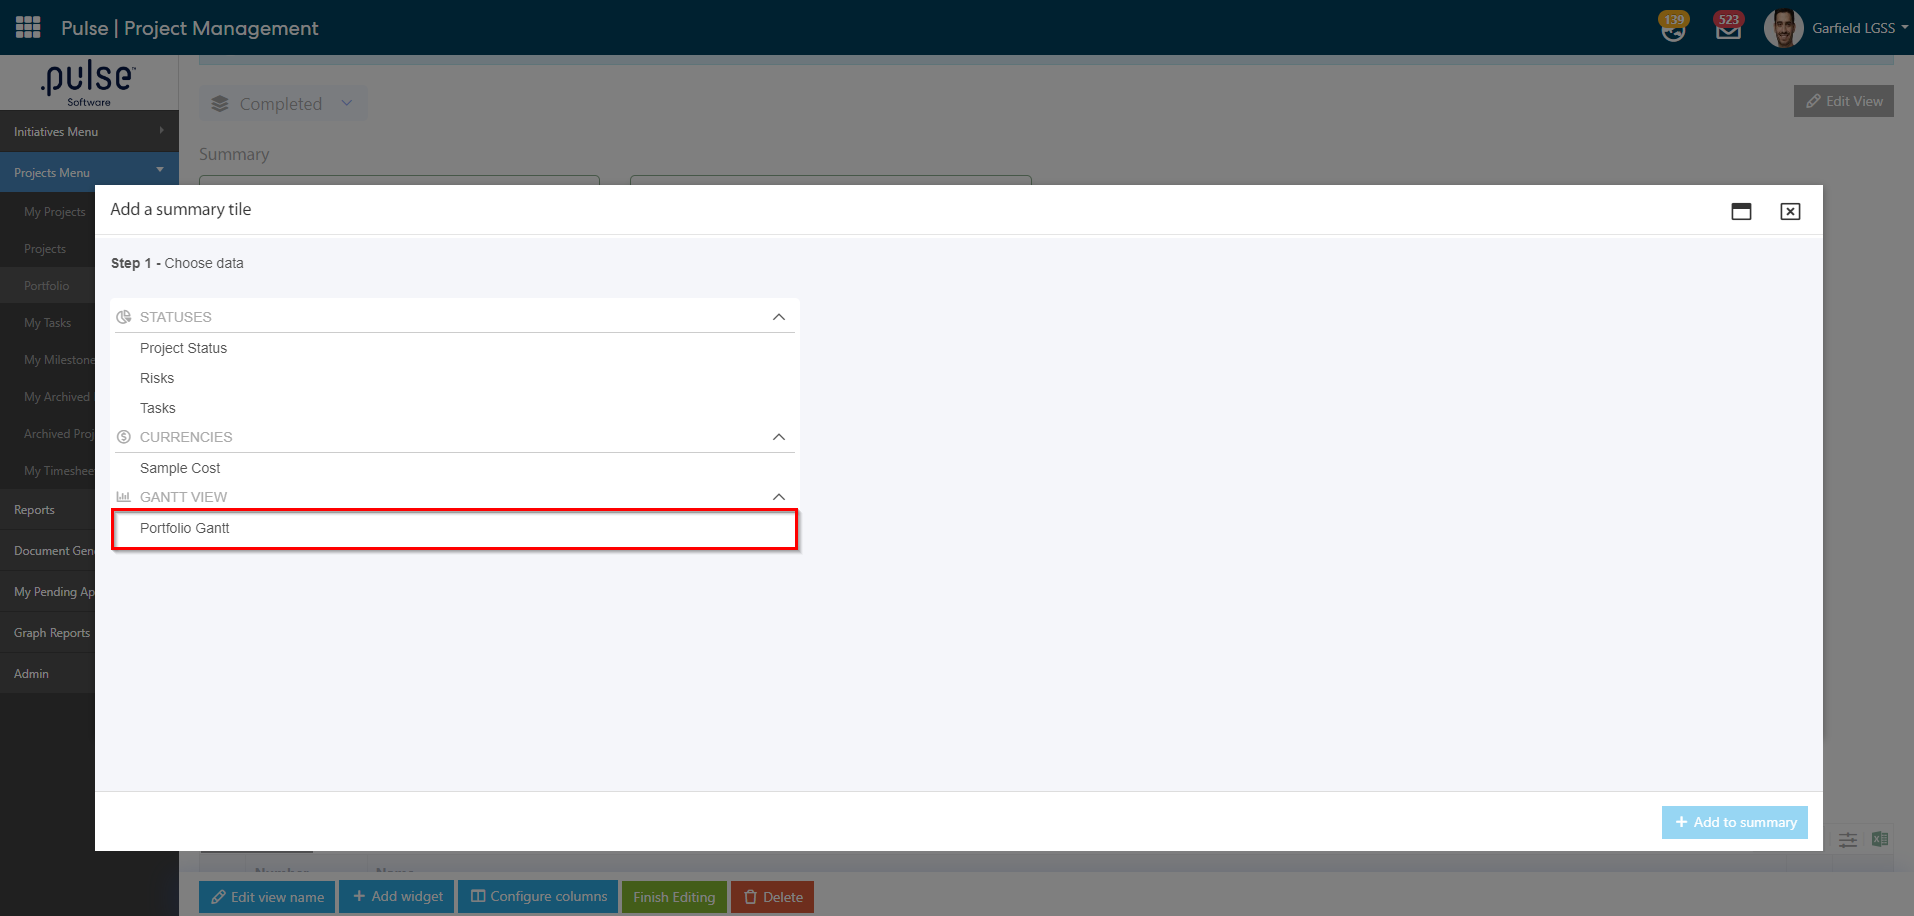
Step 3: Click on + Add Widget button to Add Portfolio Gantt Chart.
Select "Portfolio Gantt" from the list and follow the steps. Once completed, click on "Add to summary" button.
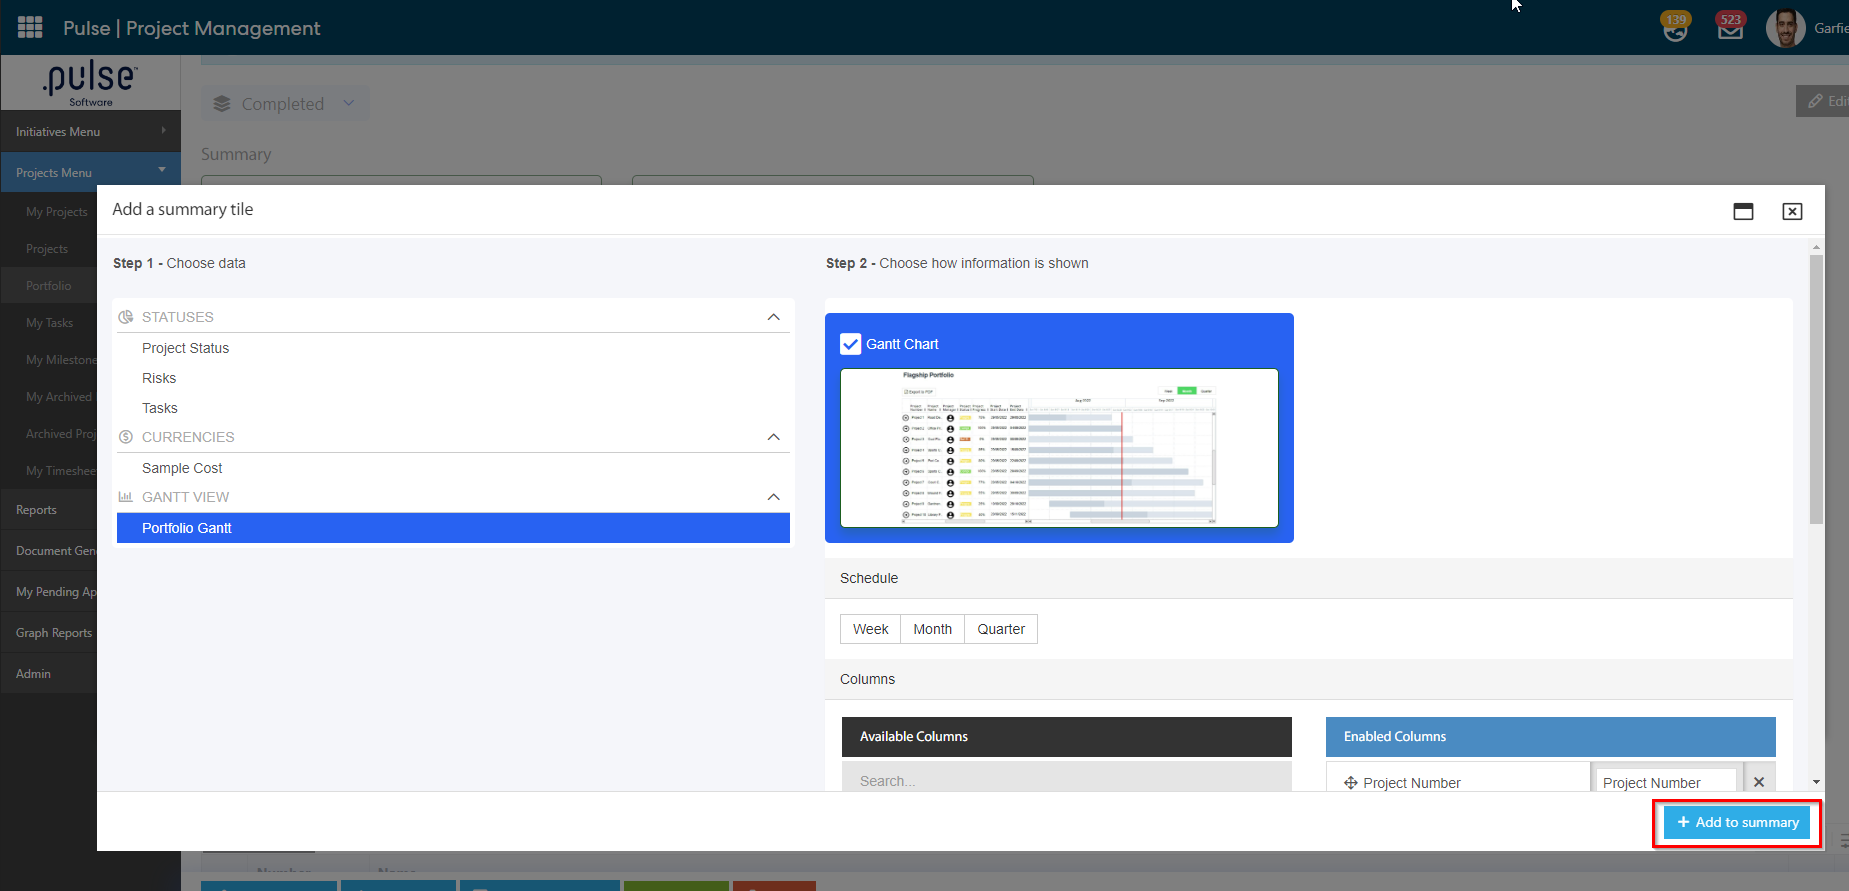
Step 4: Click on Finish Editing to save the Portfolio Gantt chart in the view.
Admins should be able to view the Gantt chart on the view screen which will help them to keep track of their teams progress.
5. Employee Performance Management
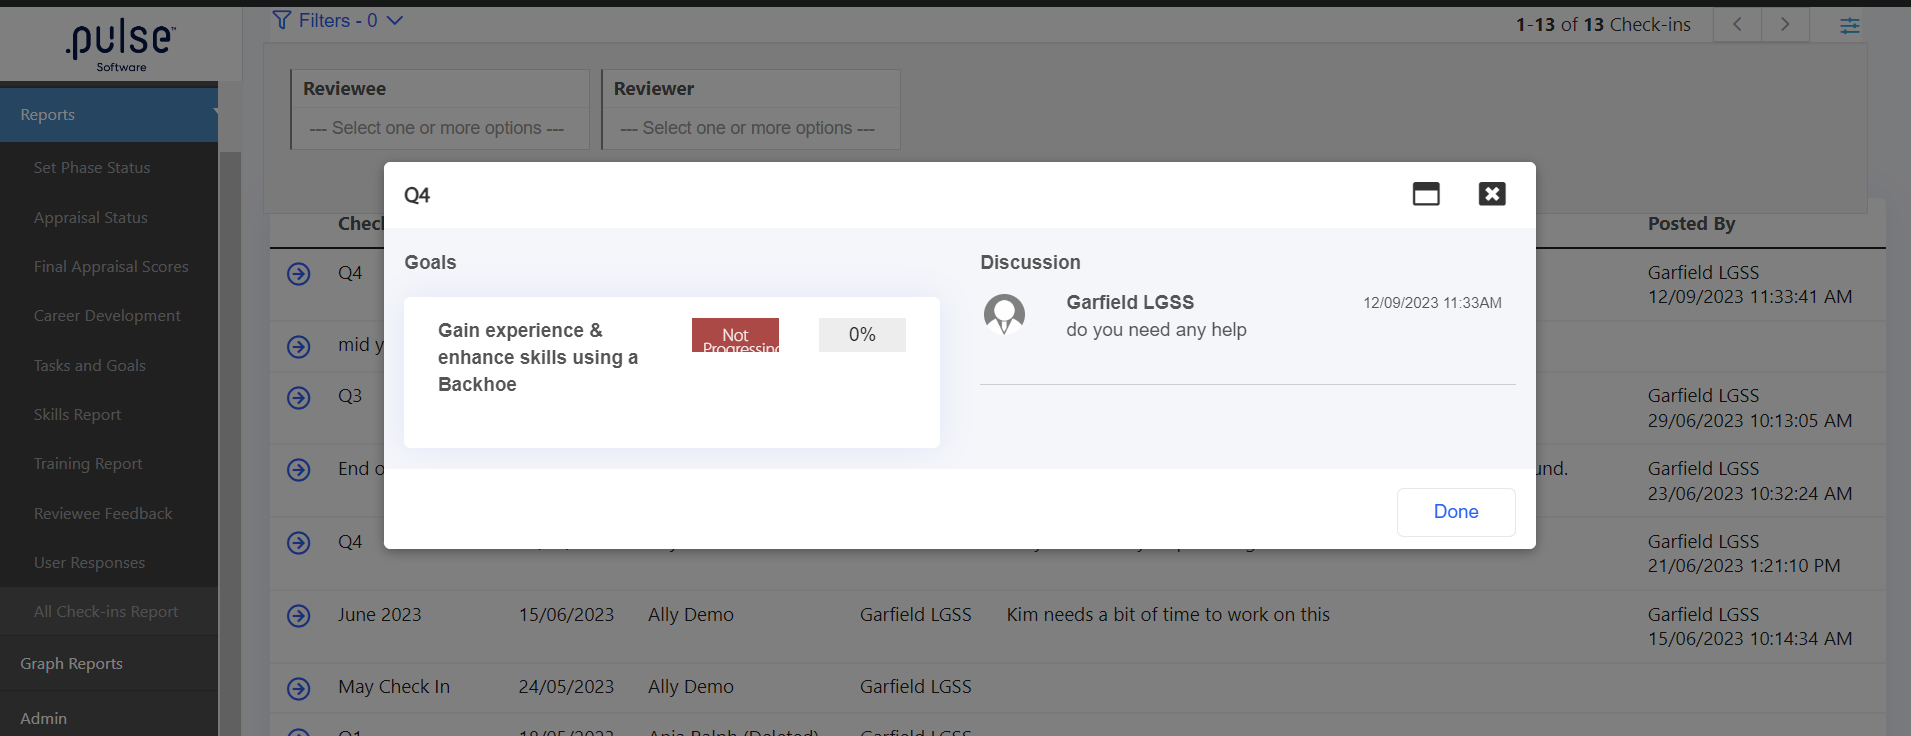
5.1 The new "All Check-ins Report" pageA new All Check-ins Report page has been added to the Employee performance Management module. This page will give ability to admin to see all the check-ins in the system.
Step 1: Log in to Pulse and go to the Employee Performance Management module
Step 2: Go to Reports > All Check-ins Report
Step 3: Admins can filter the page with Reviewee and Reviewer
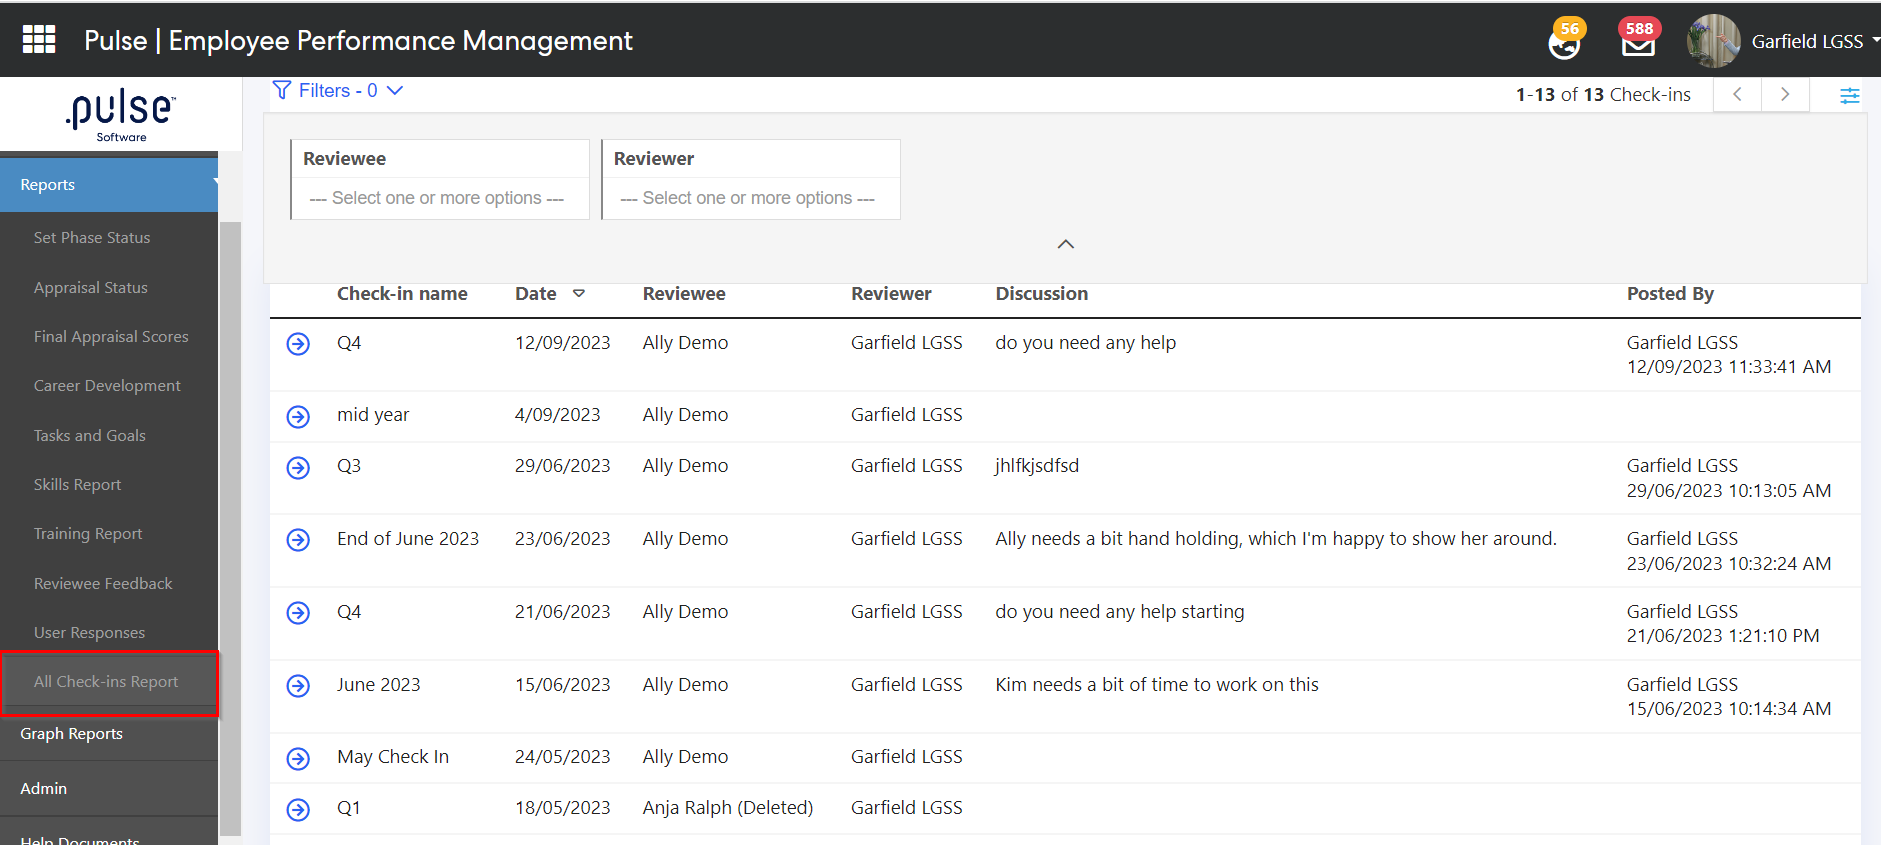
Admins can also view the check-ins and look at the goals and discussions, however, they do not have the ability to make any amendments to the check-ins.
Issues resolved
- Fixed an issue where SCORM courses were not accessible on a Fullscreen.
- Fixed an issue where the users were still able to request a training even when they are already enrolled for that training by the admin.
- Fixed an issue where admins were not allowed to Edit the forms submitted by a user in the "Record listing" and "Admin Tasks & Approvals" page.
Performance Reporting Framework
- Fixed an issue where KPI skills were not listed in order in the "Position Skills" page.
- Fixed an issue where the recurring notifications were only triggered once. Now, they will be triggered unless they have been removed from the recurring state.
Project Management & Control Module
- Fixed an issue where the project progress percentage was not rolled up with the progress update of the child task.
- Fixed an issue where the scheduled dates were not populating in columns.
- Fixed an issue where the Admins of Additional Hierarchy modules were not able to use the approval workflow.
Delegations & Policies Register
- Fixed an issue where the Law Firm Importer was not importing all legislation information.