Contents
1. Corporate Planning & Reporting Module
1.1 Enhancements to Actions, Tasks, and Service Area PageThe CPR, CPR (AH), Compliance, and Audit modules now include improvements to the Actions, Tasks, and Service Area pages.
a) New filters on the ‘My Actions’ page:
• Year
• Org Hierarchy
• Strat Hierarchy
• Reporting Period
• Responsible Officer
• Authorising Officer
• Exclude Not Reportable Actions
• Only Show Actions With No Updates
• Custom Flags
• Primary Hierarchy Legislations (‘Compliance’ module only)
• Action Additional Attributes (fields with ‘Lookup’ data type only)
To view:
Step 1: Log in to Pulse and navigate to the CPR/CPR (AH)/Compliance/Audit module.
Step 2: Go to Hierarchy-Left Menu > My Actions> Actions tab, then expand the filter section.
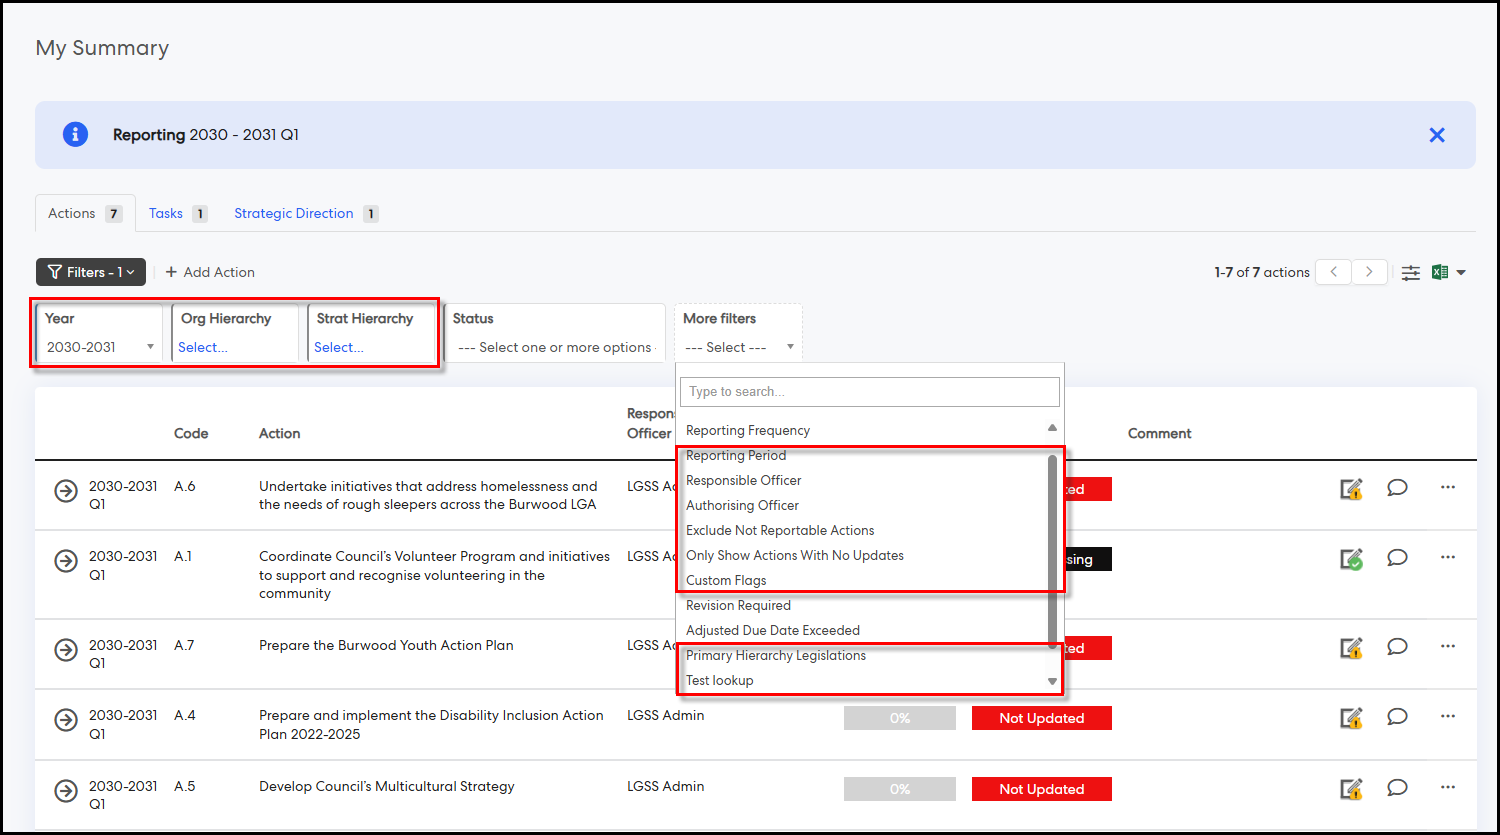
You will now see the above filter options in the main filter panel and under the ‘More Filters’ drop-down.
b) New filter on the ‘View All Actions’ page:
• Primary Hierarchy Legislations (‘Compliance’ module only)
To view:
Step 1: Go to Hierarchy-Left Menu > View All Actions, then expand the filter section.
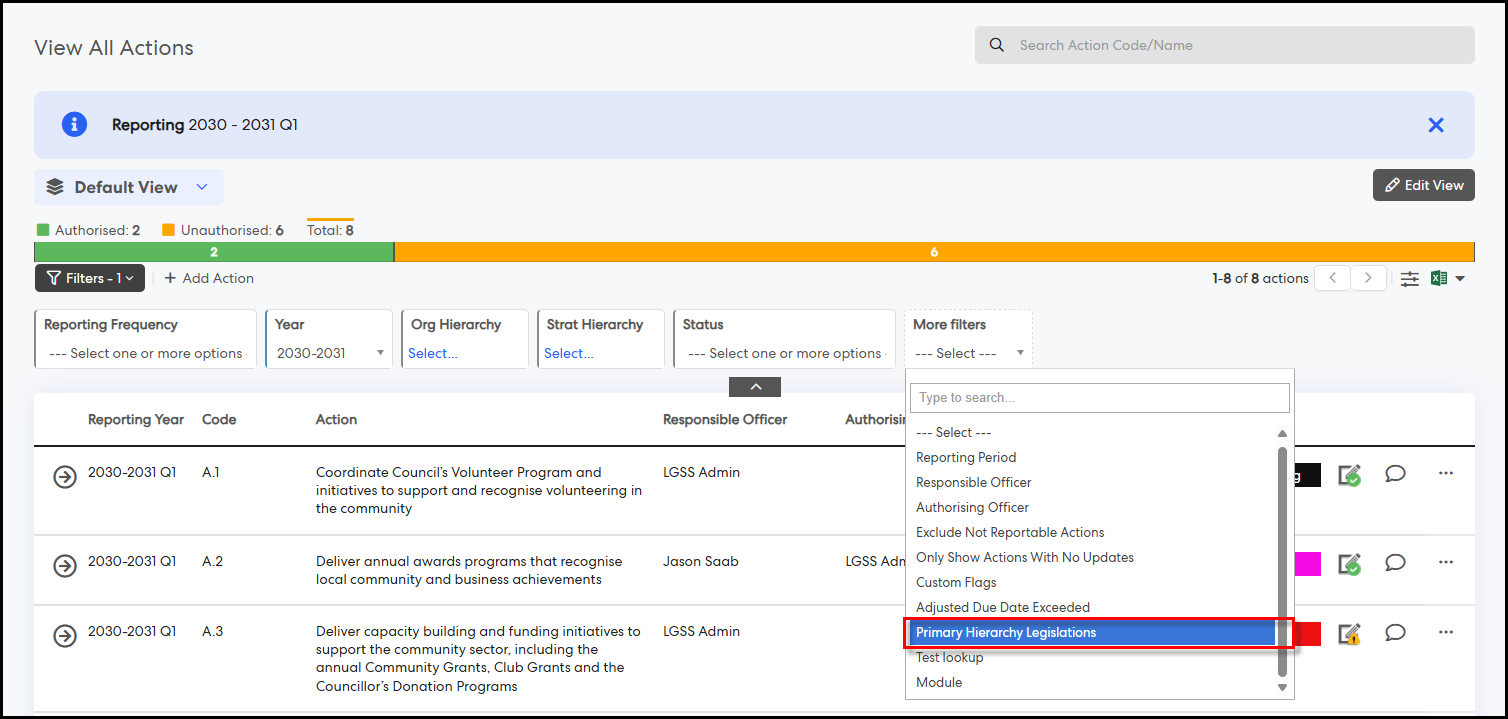
The new filter is available in the ‘More Filters’ dropdown.
c) New filters on the ‘Action Authorisation’ page (visible when action authorisation is enabled).
• Year
• Org Hierarchy
• Strat Hierarchy
• Reporting Frequency
• Reporting Period
• Authorising Officer
• Exclude Not Reportable Actions
• Only Show Actions With No Updates
• Custom Flags
• Primary Hierarchy Legislations (Compliance module only)
• Action Additional Attributes (fields with ‘Lookup’ data type only)
To view:
Step 1: Go to Hierarchy-Left Menu > Action Authorisation, then expand the filter section.
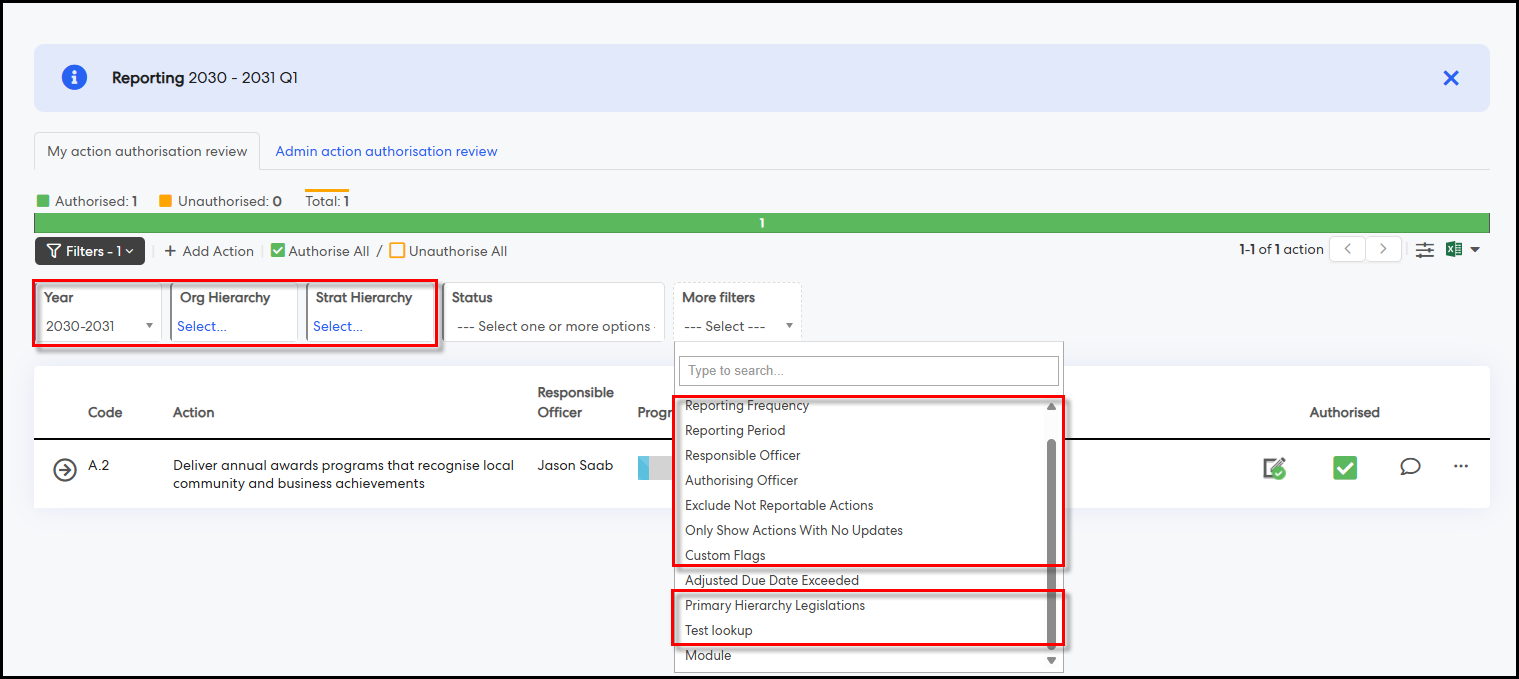
You will see the filters in the main panel and ‘More Filters’ dropdown for both ‘My Action Authorisation Review’ and ‘Admin Action Authorisation Review’ tabs.
d) New filters on the ‘Action Comments Approval’ page (visible when workflow approval is configured).
• Primary Hierarchy Legislations (‘Compliance’ module only)
• Action Additional Attributes (fields with ‘Lookup’ data type only)
To view:
Step 1: Go to Hierarchy-Left Menu > Action Comments Approval, then expand the filter section.
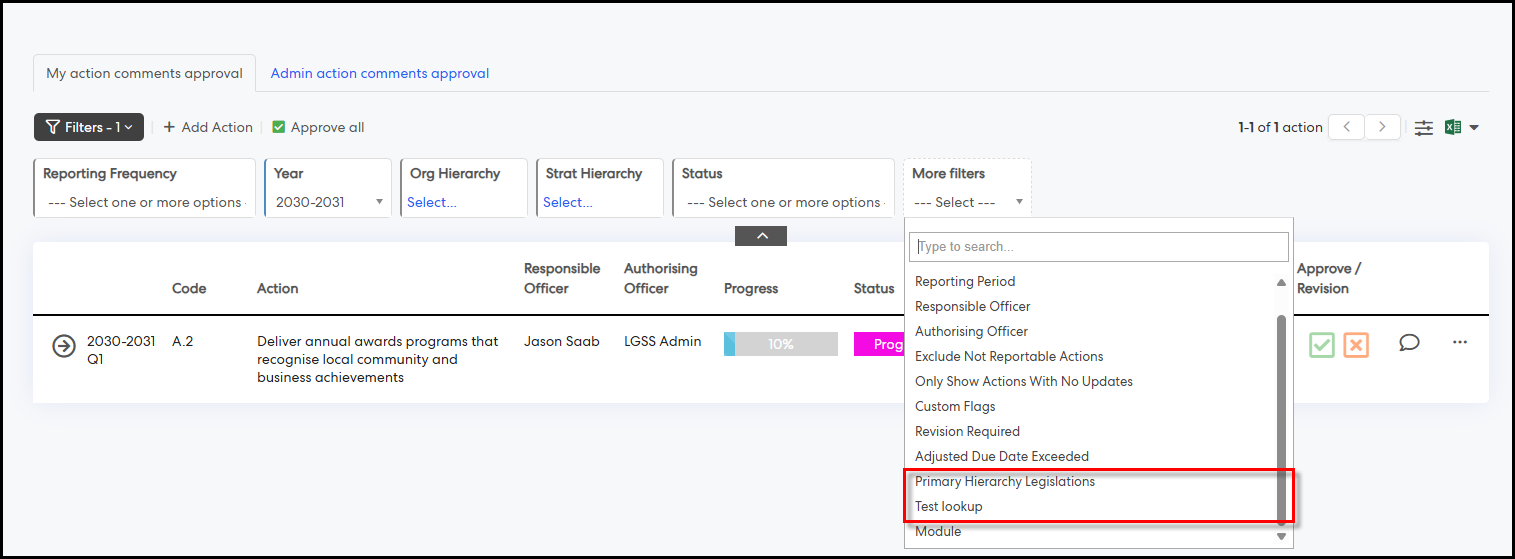
Filters appear in the main panel and ‘More Filters’ dropdown for ‘My Action Comments Approval’ and ‘Admin Action Comments Approval’ tabs.
e) New filters on ‘View All Tasks’ page (when configured):
• Year
• Org Hierarchy
• Strat Hierarchy
• Reporting Frequency
• Reporting Period
• Responsible Officer
Step 1: Go to Hierarchy-Left Menu > View All Tasks, then expand the filter section.
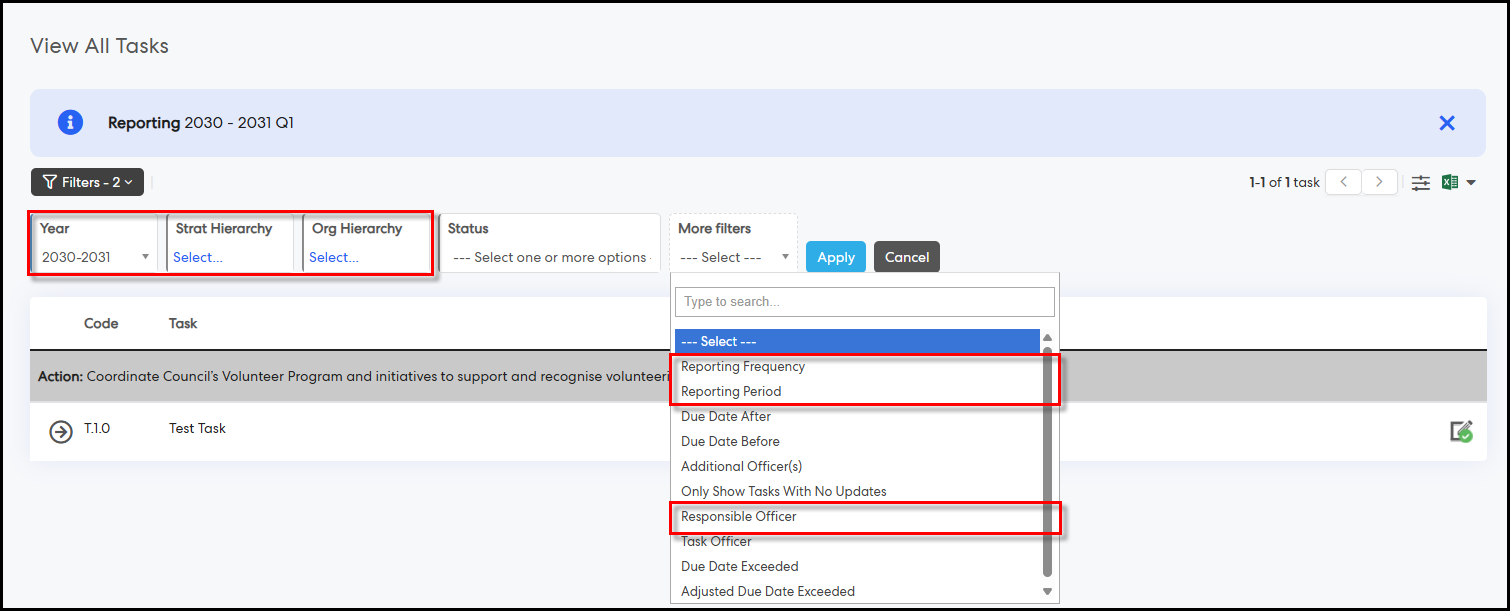
Filters are available in the main panel and ‘More Filters’ dropdown.
f) New filters on the ‘My Service Areas’ and ‘All Service Areas’ pages:
• Only Show Service Areas With No Updates
• Legislation (‘Compliance’ module only)
• Additional Attributes (fields with ‘Lookup’ data type only)
• Due Date Exceeded
• Adjusted Due Date Exceeded
To view:
Step 1: Go to Hierarchy-Left Menu > My/All Service Areas, then expand the filter section.

These filters are available in the ‘More Filters’ dropdown for all hierarchy-level tabs.
g) New ‘Enable column resize’ option on the ‘My Service Areas’ and ‘All Service Areas’ pages:
To use:
Step 1: Go to Hierarchy-Left Menu > My/All Service Areas > More options

You can now see the ‘Enable column resize’ option added to the context menu.
Step 2: Click ‘Enable column resize’
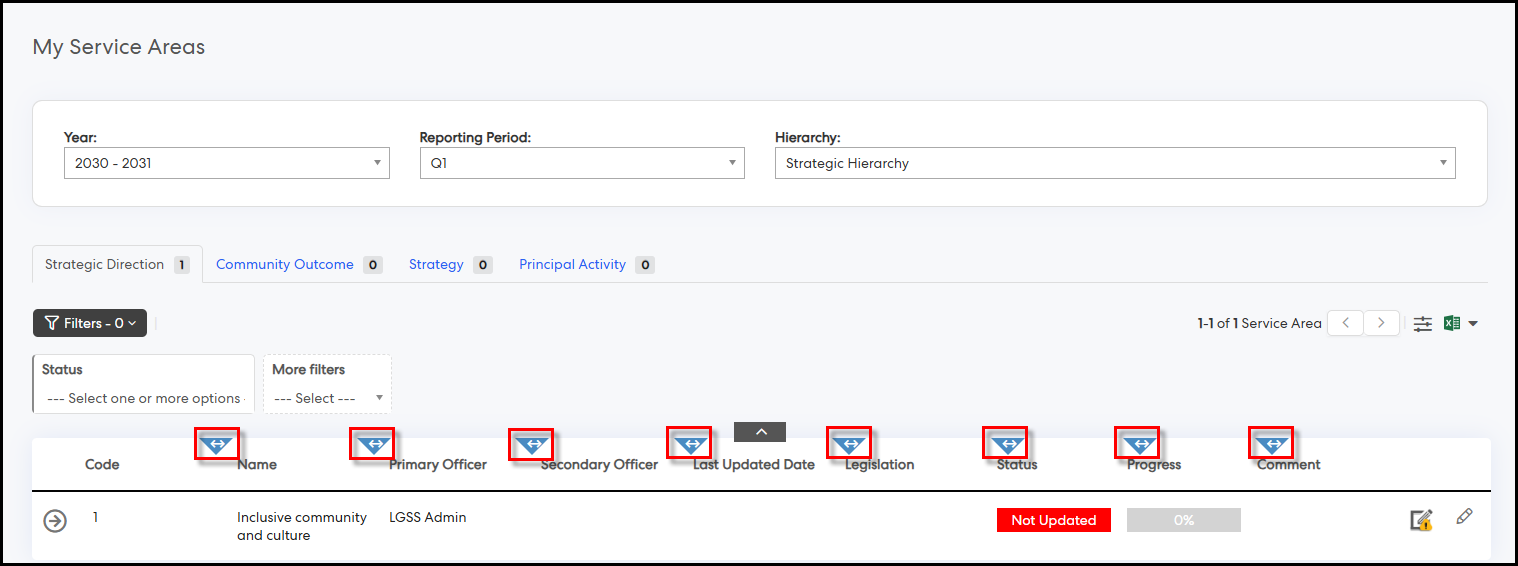
You can now adjust column widths by clicking and dragging the column borders.
1.2 Ability to remove action progress updatesThe administrators of CPR, CPR (AH), Compliance, and Audit modules now have the ability to delete action progress updates. This enhancement allows them to remove any erroneous updates—whether they were made manually or generated via carry-forward action comments—without the need to contact the Support team.
To use the ‘Remove Action Progress Updates’ feature:
Step 1: Log in as Admin user to the CPR/CPR (AH)/Compliance/Audit module and navigate to Admin > System
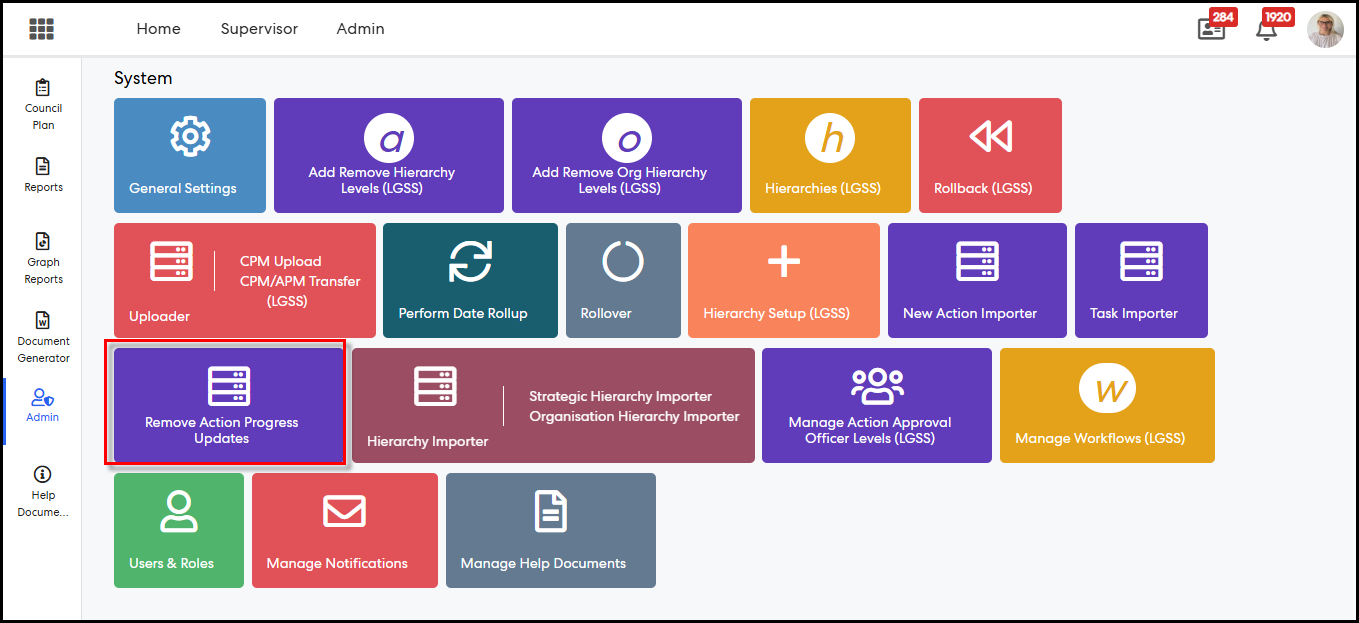
You will now see a new tile ‘Remove Action Progress Updates’ under the System section.
Step 2: Click ‘Remove Action Progress Updates’

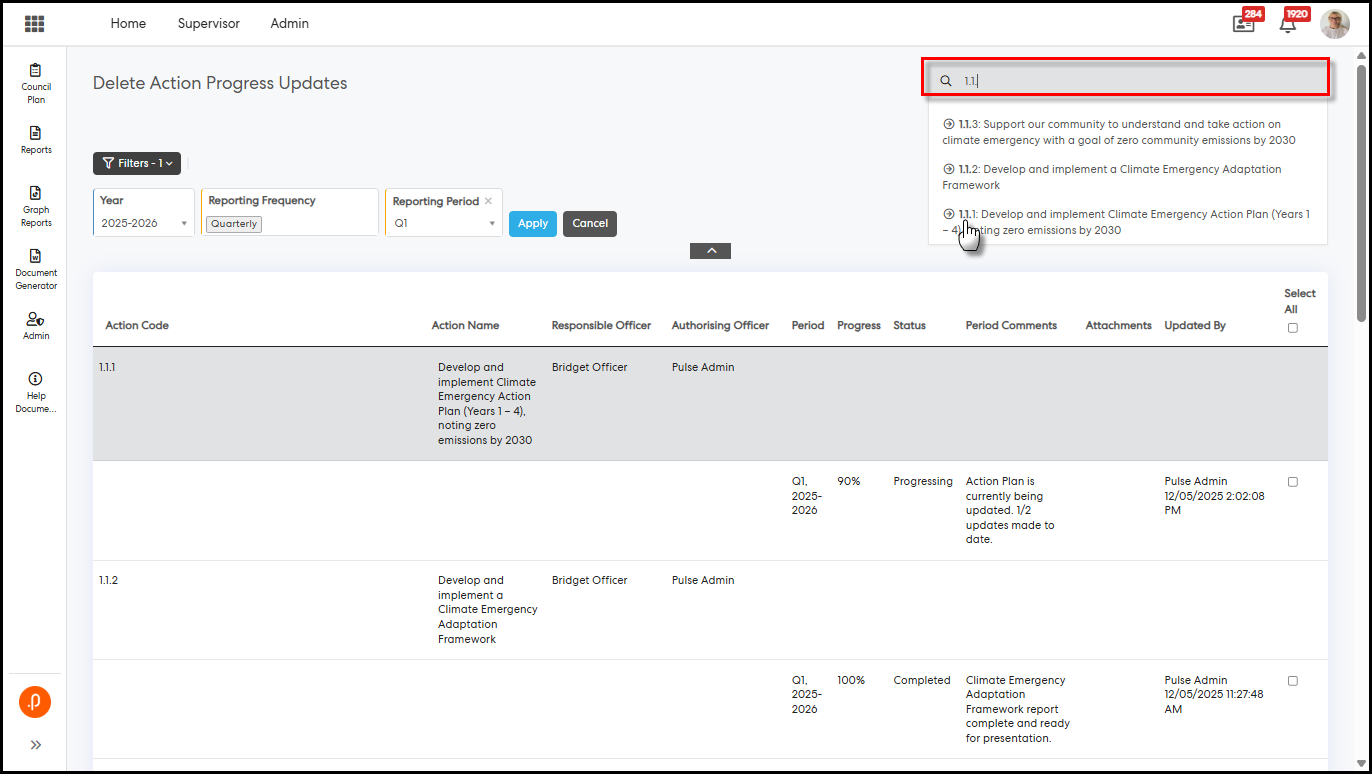
A new page titled ‘Delete Action Progress Updates’ will appear, preloaded with all progress updates made for the current reporting year, grouped by action.
Step 3: Select ‘Year’, ‘Reporting Frequency’, and ‘Reporting Period’, then click ‘Apply’ to filter specific periodic progress updates.
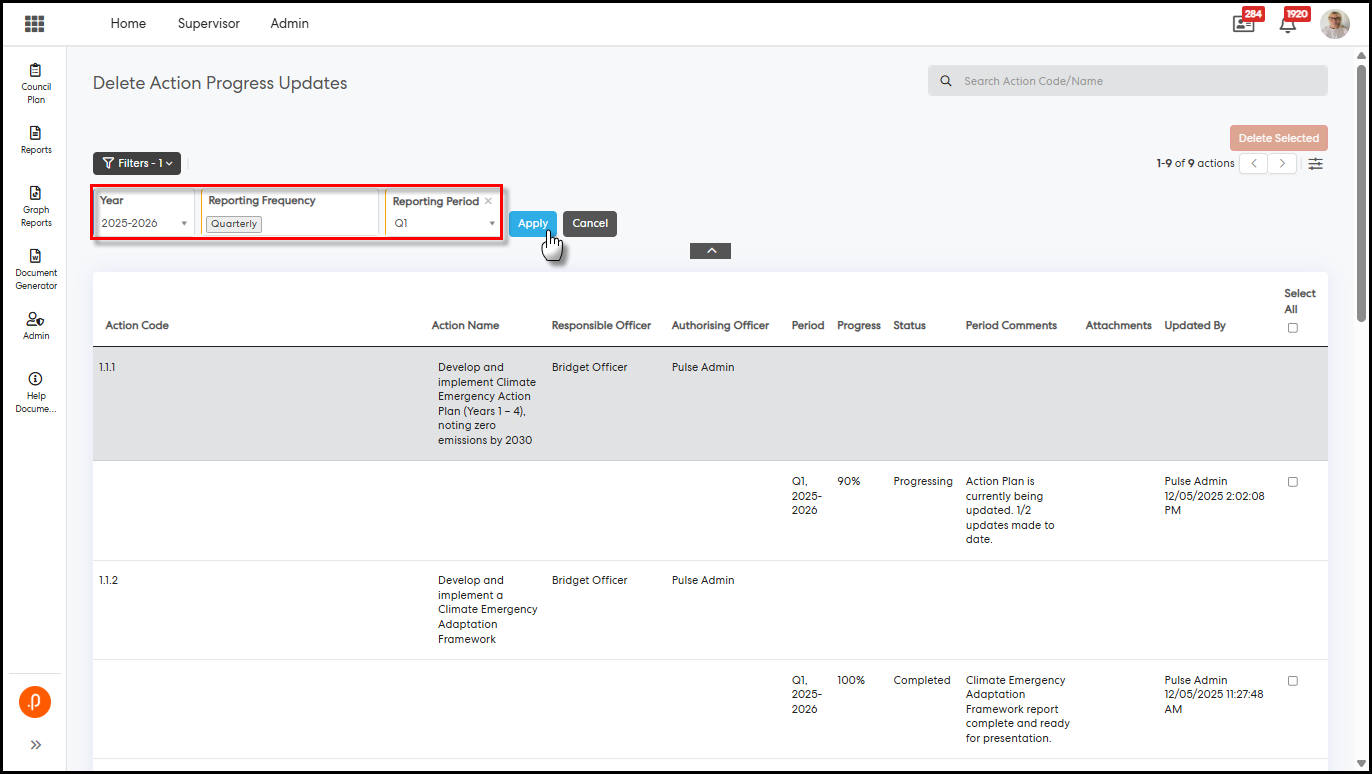
Step 4: Alternatively, start typing the action code or name in the top-right search bar and select the matching action from the dynamically populated dropdown list to filter progress updates for a specific action.
Step 5: Select the progress updates you want to delete by ticking the relevant checkboxes, or click the ‘Select All’ checkbox at the top to delete all updates that match the selected criteria.
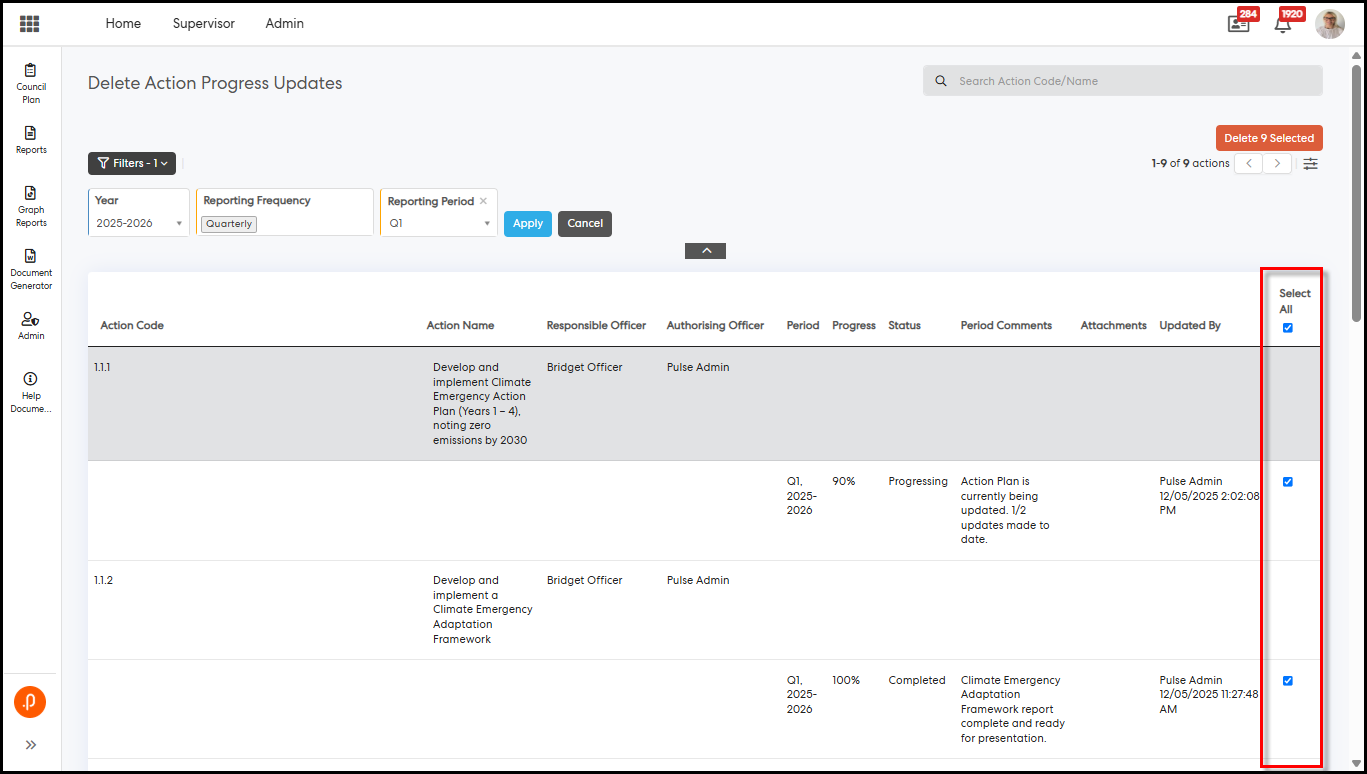
Note: You can also use the page navigator or click ‘More Options’ to increase the default page size and view all updates.
Step 6: Click the ‘Delete {no of updates} Selected’
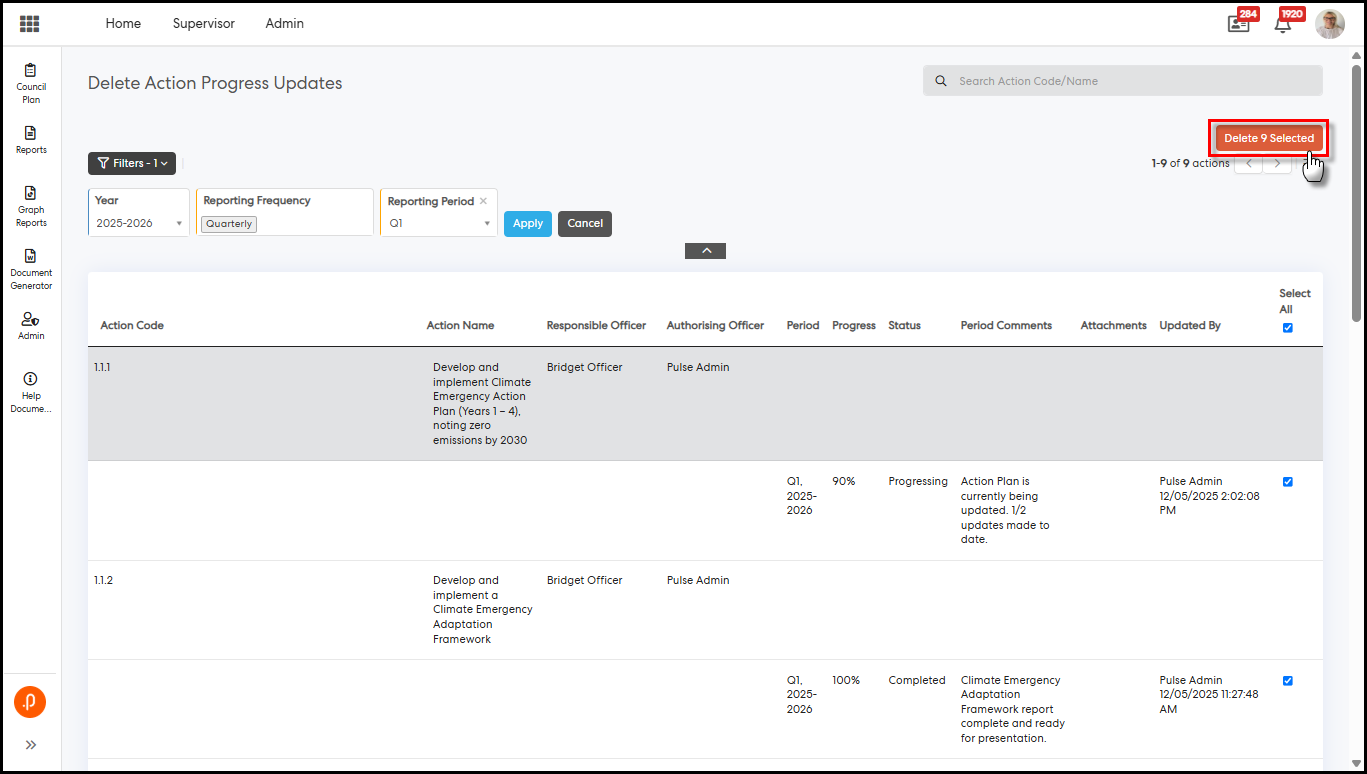
Step 7: Click ‘OK’ to confirm the deletion or ‘Cancel’ to abort the action.
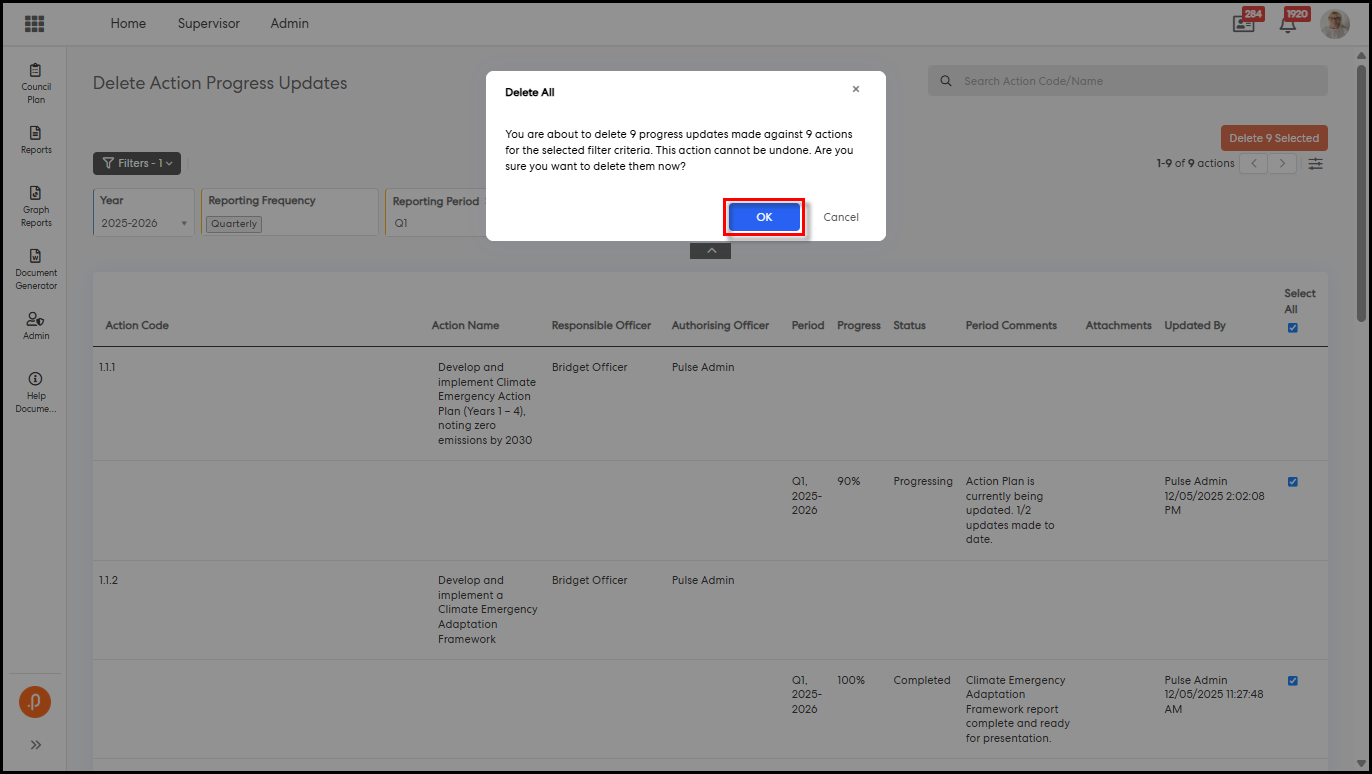
Note: This deletion is permanent and cannot be undone. Ensure that the selected updates genuinely need to be deleted before confirming.
Step 8: Once you click ‘OK’, the system will permanently delete the selected progress updates—including progress, status, periodic and annual comments, update icon status, last updated date, completed date, additional attribute values, performance measures, attachments, and any existing authorisation history—from the linked actions. A confirmation message will appear just below the user profile photo.
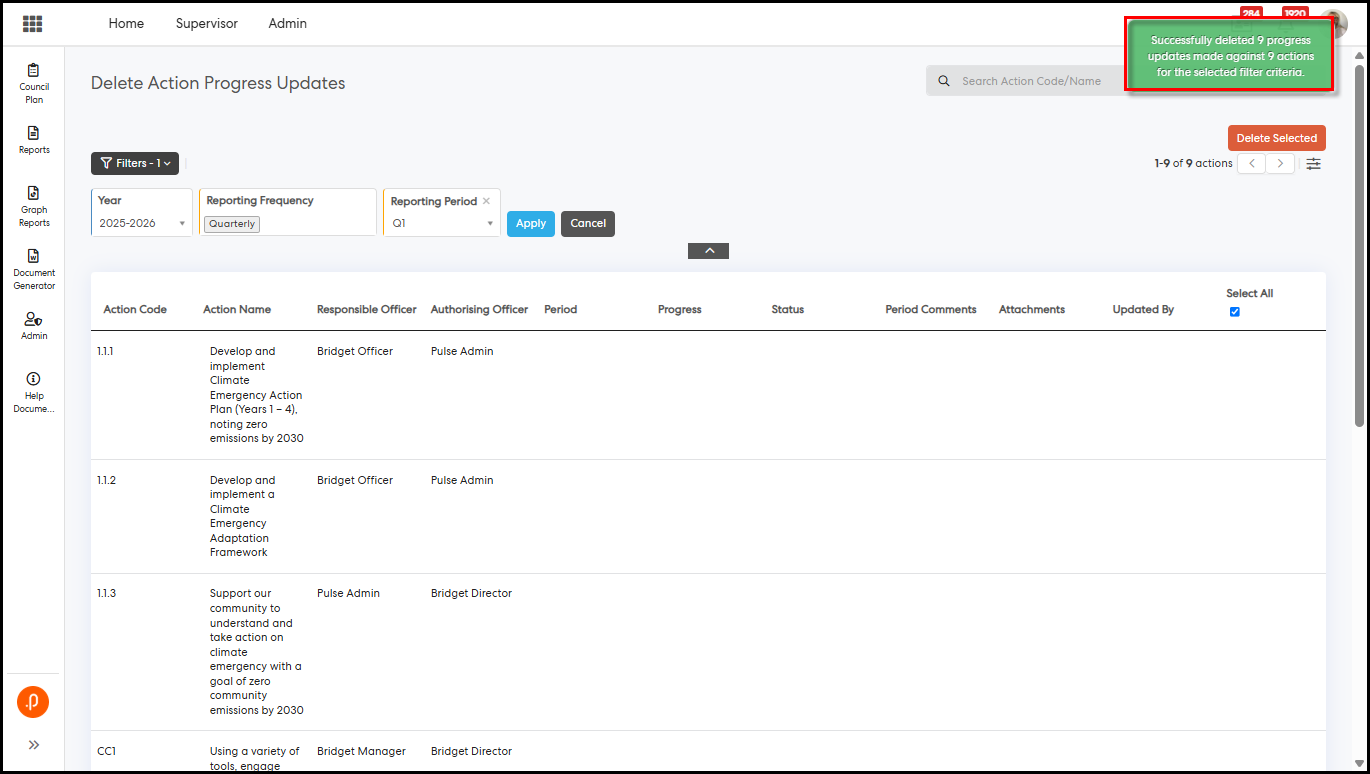
Note: If you need to delete progress updates from past years for a specific action, repeat this process for each reporting year.
If the latest update was deleted:
• Progress, status, comments, update icon, last updated date, etc., will be updated based on the next most recent progress update for the selected reporting year and period.
• The deleted progress updates will also be removed from the authorisation pages.
• The progress roll-up will regenerate automatically if the roll-up feature is enabled.
2. Enterprise Risk Management
2.1 Enhanced Risk Management NotificationsERM module administrators can now configure notifications to alert Risk Area Owners, Risk Admins, or any specified additional users when risks are created, edited, reviewed, deleted, archived, unarchived, or unassigned, and when risk areas are deleted. This feature provides real-time visibility into risk and risk area management activities.
To use the ‘Notify recipients of when a risk is created’notification:
Step 1: Log in to the ERM module as an Admin user.
Step 2: Go to Admin > System Settings> Manage Notification > click ‘Manage Notification’ > click ‘+ Add a new notification’ > select ‘Risks’ from ‘Module:’ > select ‘Notify recipient of Risk Creation’ from ‘Notification:’
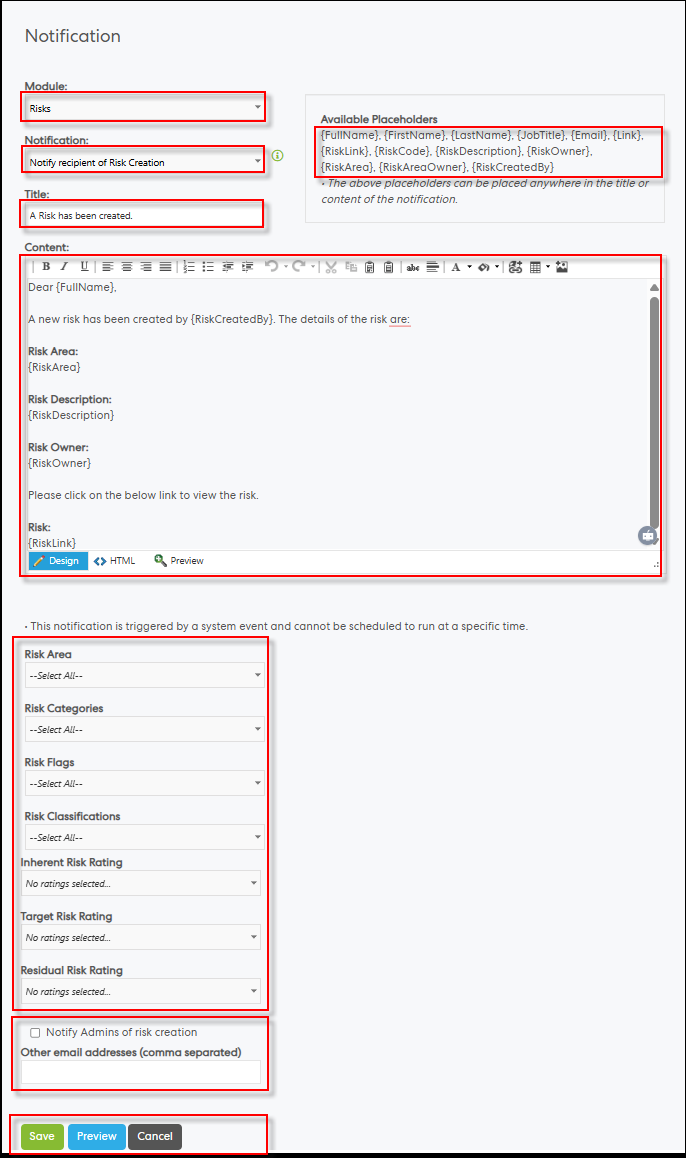
Step 3: Customize the default text under ‘Title’ and ‘Content’ using available placeholders listed under ‘Available Placeholders’. Use the formatting options in the content toolbar. Placeholders:
• {FullName} - Full name of the user
• {FirstName} - First name
• {LastName} - Last name
• {JobTitle} - Job title
• {Email} – Email address
• {Link} – Link to Pulse ERM home
• {RiskLink} - Link to the created risk
• {RiskCode} – Risk code
• {RiskDescription} – Risk description
• {RiskOwner} - Current risk owner
• {RiskArea} - Risk area
• {RiskAreaOwner} - Risk area owner
• {RiskCreatedBy} - Creator of the risk
Step 4 (Optional): Use the risk filter options below the content area to apply specific filter values. To notify on all risks, keep default (select all). Multiple filters are combined using the AND condition.
Step 5 (Optional): Check ‘Notify Admins of risk creation’ to alert ERM admins.
Step 6 (Optional): Add additional recipients in ‘Other email addresses (comma separated)’ using commas to separate addresses.
Step 7: Click ‘Cancel’ to discard changes, ‘Preview’ to view the notification layout, or ‘Save’ to apply the configuration and activate notifications.
To use the ‘Notify recipients of when a risk is edited’ notification:
Step 1: Log in to the ERM module as an Admin user.
Step 2: Go to Admin > System Settings> Manage Notification > click ‘Manage Notification’ > click ‘+ Add a new notification’ > select ‘Risks’ from ‘Module:’ > select ‘Notify recipient of risk edit’ from ‘Notification:’
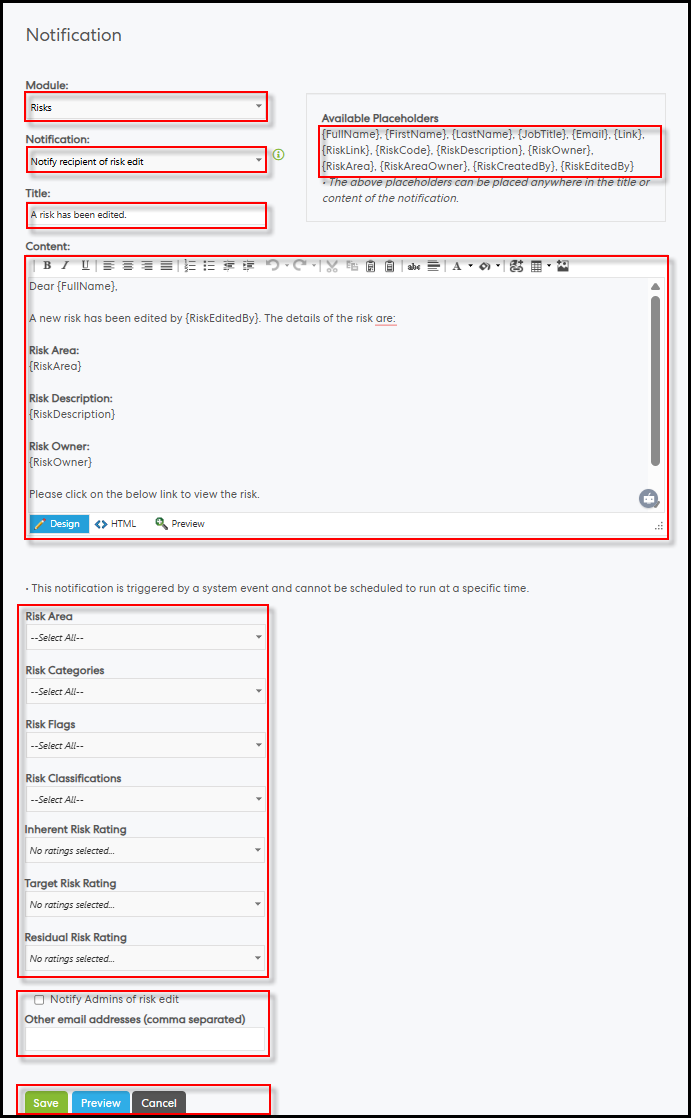
Step 3: Customize the default text under ‘Title’ and ‘Content’ using available placeholders listed under ‘Available Placeholders’. Use the formatting options in the content toolbar. Placeholders:
• {FullName} - Full name of the user
• {FirstName} - First name
• {LastName} - Last name
• {JobTitle} - Job title
• {Email} – Email address
• {Link} – Link to Pulse ERM home
• {RiskLink} - Link to the created risk
• {RiskCode} – Risk code
• {RiskDescription} – Risk description
• {RiskOwner} - Current risk owner
• {RiskArea} - Risk area
• {RiskAreaOwner} - Risk area owner
• {RiskCreatedBy} - Creator of the risk
• {RiskEditedBy} – Editor of the risk
Step 4 (Optional): Use the risk filter options below the content area to apply specific filter values. To notify on all risks, keep default (select all). Multiple filters are combined using the AND condition.
Step 5 (Optional): Check ‘Notify Admins of risk edit’ to alert ERM admins.
Step 6 (Optional): Add additional recipients in ‘Other email addresses (comma separated)’ using commas to separate addresses.
Step 7: Click ‘Cancel’ to discard changes, ‘Preview’ to view the notification layout, or ‘Save’ to apply the configuration and activate notifications.
To use the ‘Notify recipients of when a risk is reviewed’ notification:
Step 1: Log in to the ERM module as an Admin user.
Step 2: Go to Admin > System Settings> Manage Notification > click ‘Manage Notification’ > click ‘+ Add a new notification’ > select ‘Risks’ from ‘Module:’ > select ‘Risk Has Been Updated’ from ‘Notification:’
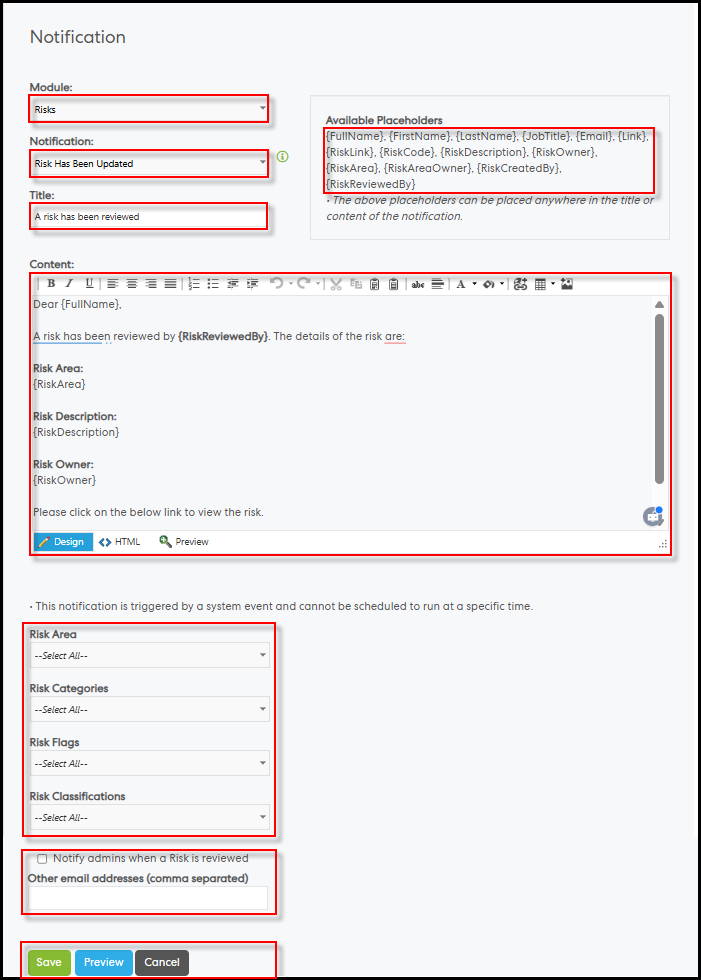
Step 3: Customize the default text under ‘Title’ and ‘Content’ using available placeholders listed under ‘Available Placeholders’. Use the formatting options in the content toolbar. Placeholders:
• {FullName} - Full name of the user
• {FirstName} - First name
• {LastName} - Last name
• {JobTitle} - Job title
• {Email} – Email address
• {Link} – Link to Pulse ERM home
• {RiskLink} - Link to the created risk
• {RiskCode} – Risk code
• {RiskDescription} – Risk description
• {RiskOwner} - Current risk owner
• {RiskArea} - Risk area
• {RiskAreaOwner} - Risk area owner
• {RiskCreatedBy} - Creator of the risk
• {RiskReviewedBy} – Reviewer of the risk
Step 4 (Optional): Use the risk filter options below the content area to apply specific filter values. To notify on all risks, keep default (select all). Multiple filters are combined using the AND condition.
Step 5 (Optional): Check ‘Notify admins when a Risk is reviewed’ to alert ERM admins.
Step 6 (Optional): Add additional recipients in ‘Other email addresses (comma separated)’ using commas to separate addresses.
Step 7: Click ‘Cancel’ to discard changes, ‘Preview’ to view the notification layout, or ‘Save’ to apply the configuration and activate notifications.
To use the ‘Notify recipients of when a risk is unassigned from Officer’ notification:
Step 1: Log in to the ERM module as an Admin user.
Step 2: Go to Admin > System Settings> Manage Notification > click ‘Manage Notification’ > click ‘+ Add a new notification’ > select ‘Risks’ from ‘Module:’ > select ‘Risk unassigned from an officer’ from ‘Notification:’
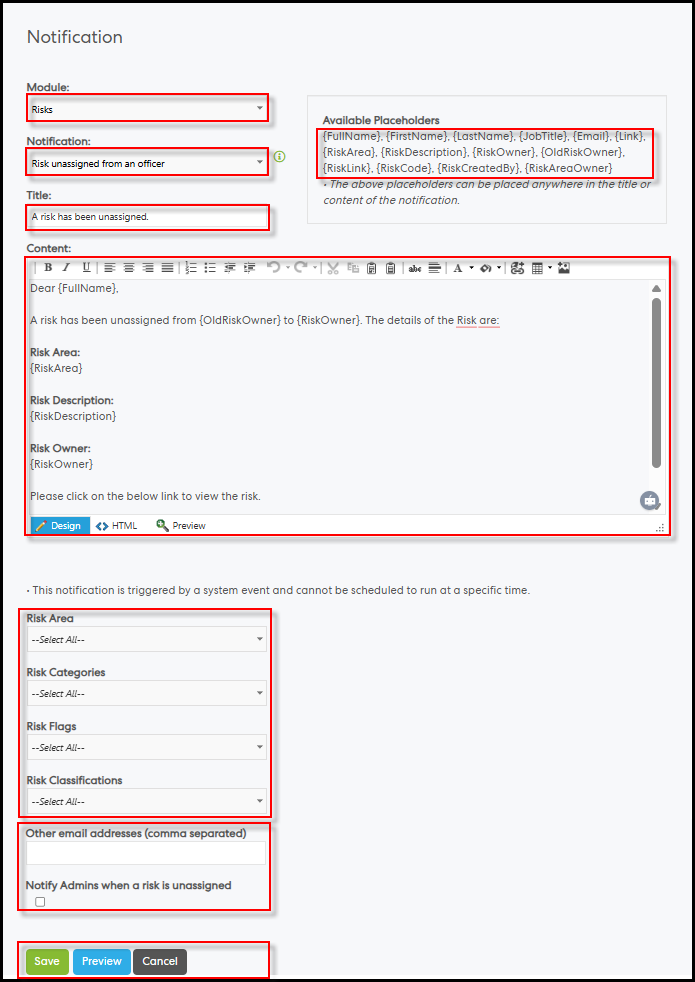
Step 3: Customize the default text under ‘Title’ and ‘Content’ using available placeholders listed under ‘Available Placeholders’. Use the formatting options in the content toolbar. Placeholders:
• {FullName} - Full name of the user
• {FirstName} - First name
• {LastName} - Last name
• {JobTitle} - Job title
• {Email} – Email address
• {Link} – Link to Pulse ERM home
• {RiskArea} - Risk area
• {RiskDescription} – Risk description
• {RiskOwner} - Current risk owner
• {OldRiskOwner} - Previous risk owner
• {RiskLink} - Link to the created risk
• {RiskCode} – Risk code
• {RiskCreatedBy} - Creator of the risk
• {RiskAreaOwner} - Risk area owner
Step 4 (Optional): Use the risk filter options below the content area to apply specific filter values. To notify on all risks, keep default (select all). Multiple filters are combined using the AND condition.
Step 5 (Optional): Add additional recipients in ‘Other email addresses (comma separated)’ using commas to separate addresses.
Step 6 (Optional): Check ‘Notify Admins when a risk is unassigned’ to alert ERM admins.
Step 7: Click ‘Cancel’ to discard changes, ‘Preview’ to view the notification layout, or ‘Save’ to apply the configuration and activate notifications.
To use the ‘Notify recipients of when a risk is archived’ notification:
Step 1: Log in to the ERM module as an Admin user.
Step 2: Go to Admin > System Settings> Manage Notification > click ‘Manage Notification’ > click ‘+ Add a new notification’ > select ‘Risks’ from ‘Module:’ > select ‘Notify recipient when a Risk is archived’ from ‘Notification:’

Step 3: Customize the default text under ‘Title’ and ‘Content’ using available placeholders listed under ‘Available Placeholders’. Use the formatting options in the content toolbar. Placeholders:
• {FullName} - Full name of the user
• {FirstName} - First name
• {LastName} - Last name
• {JobTitle} - Job title
• {Email} – Email address
• {Link} – Link to Pulse ERM home
• {RiskLink} - Link to the created risk
• {RiskCode} – Risk code
• {RiskDescription} – Risk description
• {RiskOwner} - Current risk owner
• {RiskArea} - Risk area
• {RiskAreaOwner} - Risk area owner
• {RiskCreatedBy} - Creator of the risk
• {RiskArchivedBy} – Archiver of the risk
Step 4 (Optional): Use the risk filter options below the content area to apply specific filter values. To notify on all risks, keep default (select all). Multiple filters are combined using the AND condition.
Step 5 (Optional): Check ‘Notify Admins of the Risk Archiving’ to alert ERM admins.
Step 6 (Optional): Add additional recipients in ‘Other email addresses (comma separated)’ using commas to separate addresses.
Step 7: Click ‘Cancel’ to discard changes, ‘Preview’ to view the notification layout, or ‘Save’ to apply the configuration and activate notifications.
To use the ‘Notify recipients of when a risk is unarchived’ notification:
Step 1: Log in to the ERM module as an Admin user.
Step 2: Go to Admin > System Settings> Manage Notification > click ‘Manage Notification’ > click ‘+ Add a new notification’ > select ‘Risks’ from ‘Module:’ > select ‘Notify recipient when a Risk is Unarchived’ from ‘Notification:’
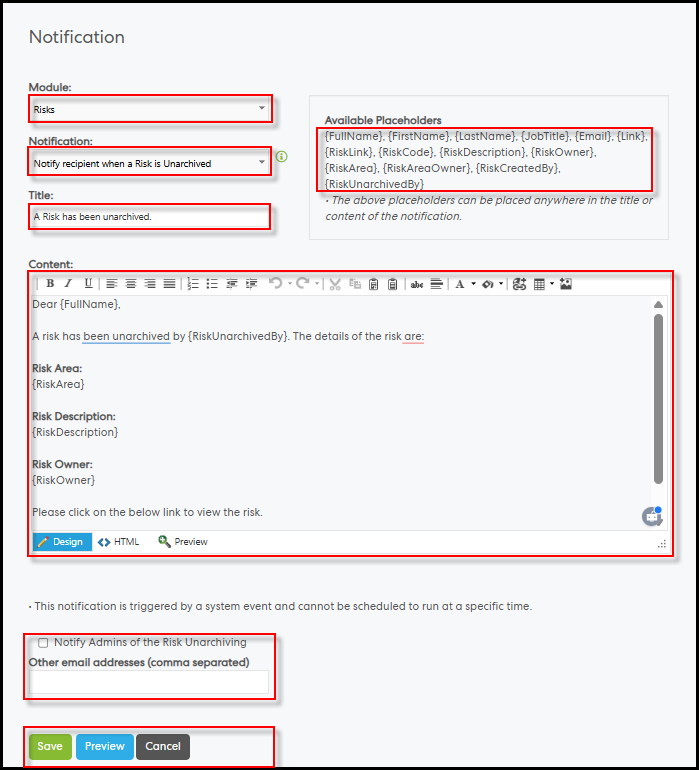
Step 3: Customize the default text under ‘Title’ and ‘Content’ using available placeholders listed under ‘Available Placeholders’. Use the formatting options in the content toolbar. Placeholders:
• {FullName} - Full name of the user
• {FirstName} - First name
• {LastName} - Last name
• {JobTitle} - Job title
• {Email} – Email address
• {Link} – Link to Pulse ERM home
• {RiskLink} - Link to the created risk
• {RiskCode} – Risk code
• {RiskDescription} – Risk description
• {RiskOwner} - Current risk owner
• {RiskArea} - Risk area
• {RiskAreaOwner} - Risk area owner
• {RiskCreatedBy} - Creator of the risk
• {RiskUnarchivedBy} – User who unarchived the risk
Step 4 (Optional): Use the risk filter options below the content area to apply specific filter values. To notify on all risks, keep default (select all). Multiple filters are combined using the AND condition.
Step 5 (Optional): Check ‘Notify Admins of the Risk Unarchiving’ to alert ERM admins.
Step 6 (Optional): Add additional recipients in ‘Other email addresses (comma separated)’ using commas to separate addresses.
Step 7: Click ‘Cancel’ to discard changes, ‘Preview’ to view the notification layout, or ‘Save’ to apply the configuration and activate notifications.
To use the ‘Notify recipients of when a risk is deleted’ notification:
Step 1: Log in to the ERM module as an Admin user.
Step 2: Go to Admin > System Settings> Manage Notification > click ‘Manage Notification’ > click ‘+ Add a new notification’ > select ‘Risks’ from ‘Module:’ > select ‘Notify recipient of Risk Deletion’ from ‘Notification:’
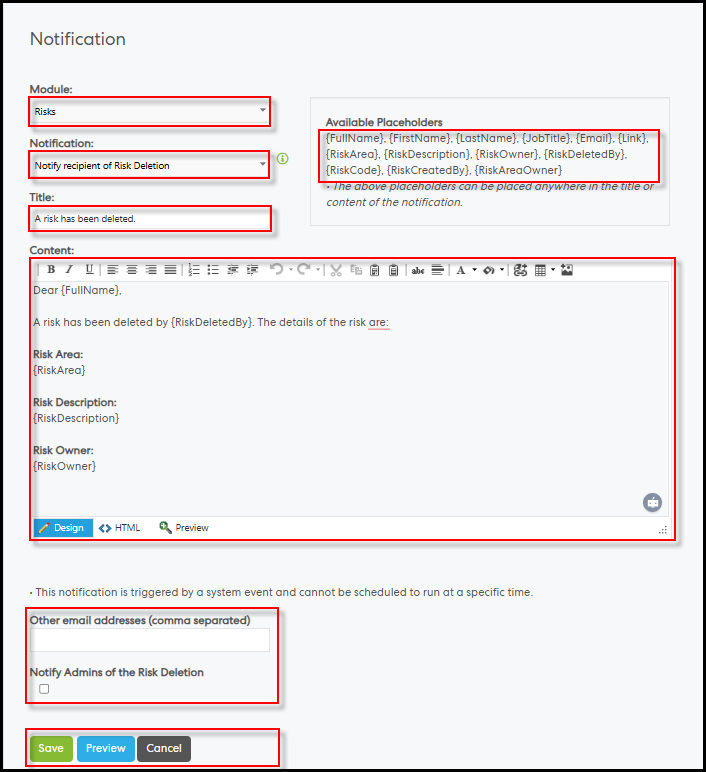
Step 3: Customize the default text under ‘Title’ and ‘Content’ using available placeholders listed under ‘Available Placeholders’. Use the formatting options in the content toolbar. Placeholders:
• {FullName} - Full name of the user
• {FirstName} - First name
• {LastName} - Last name
• {JobTitle} - Job title
• {Email} – Email address
• {Link} – Link to Pulse ERM home
• {RiskArea} - Risk area
• {RiskDescription} – Risk description
• {RiskOwner} - Current risk owner
• {RiskDeletedBy} – User who deleted the risk
• {RiskCode} – Risk code
• {RiskCreatedBy} - Creator of the risk
• {RiskAreaOwner} - Risk area owner
Step 4 (Optional): Add additional recipients in ‘Other email addresses (comma separated)’ using commas to separate addresses.
Step 5 (Optional): Check ‘Notify Admins of the Risk Deletion’ to alert ERM admins.
Step 6: Click ‘Cancel’ to discard changes, ‘Preview’ to view the notification layout, or ‘Save’ to apply the configuration and activate notifications.
To use the ‘Notify recipients of when a risk area is deleted’ notification:
Step 1: Log in to the ERM module as an Admin user.
Step 2: Go to Admin > System Settings> Manage Notification > click ‘Manage Notification’ > click ‘+ Add a new notification’ > select ‘Risks’ from ‘Module:’ > select ‘Notify recipient of Risk Area Deletion’ from ‘Notification:’
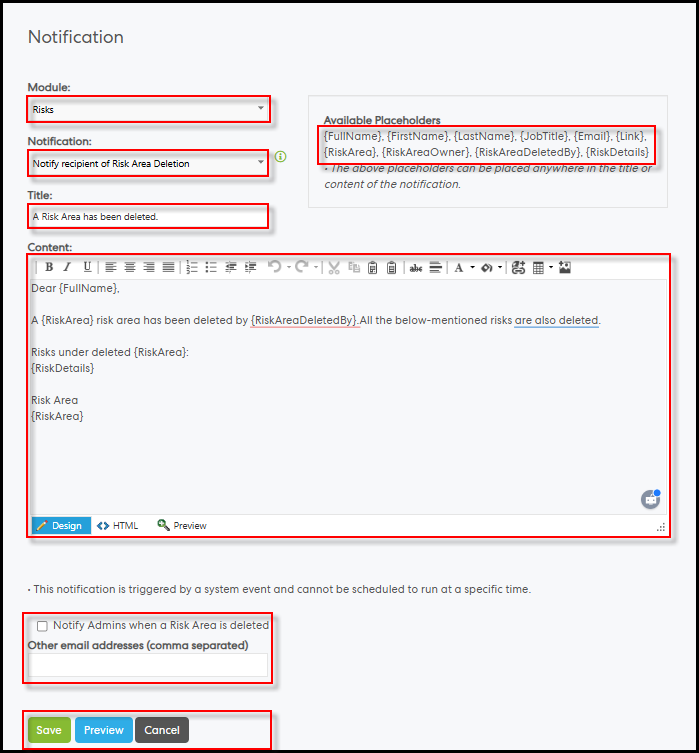
Step 3: Customize the default text under ‘Title’ and ‘Content’ using available placeholders listed under ‘Available Placeholders’. Use the formatting options in the content toolbar. Placeholders:
• {FullName} - Full name of the user
• {FirstName} - First name
• {LastName} - Last name
• {JobTitle} - Job title
• {Email} – Email address
• {Link} – Link to Pulse ERM home
• {RiskArea} - Risk area
• {RiskAreaOwner} - Risk area owner
• {RiskAreaDeletedBy} – User who deleted the risk area
• {RiskDetails} – Risk details
Step 4 (Optional): Check ‘Notify Admins when a Risk Area is deleted’ to alert ERM admins.
Step 5 (Optional): Add additional recipients in ‘Other email addresses (comma separated)’ using commas to separate addresses.
Step 6: Click ‘Cancel’ to discard changes, ‘Preview’ to view the notification layout, or ‘Save’ to apply the configuration and activate notifications.
3. eRecruitment Module
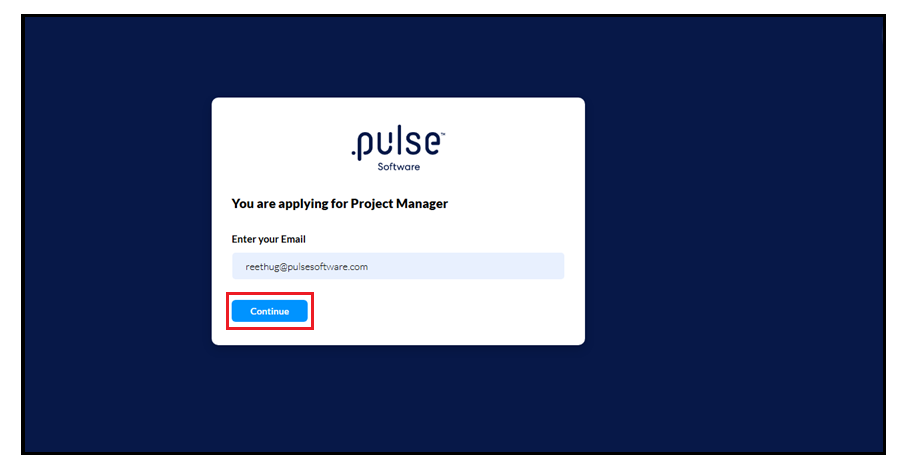
3.1 Introducing Email Verification for Candidate Account CreationPulse has introduced an email verification step as part of the candidate account creation process to enhance data security and reliability.
What's New:
- Candidates are now required to verify their email address before completing registration.
- This ensures the use of valid email accounts and prevents unauthorized or duplicate registrations.
Step 1: The candidate selects a job they wish to apply for, enters their email address, and clicks Continue.
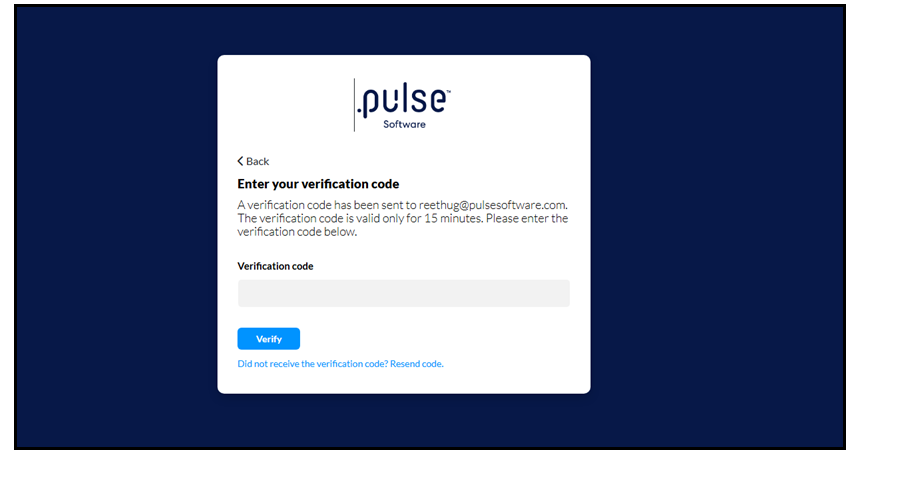
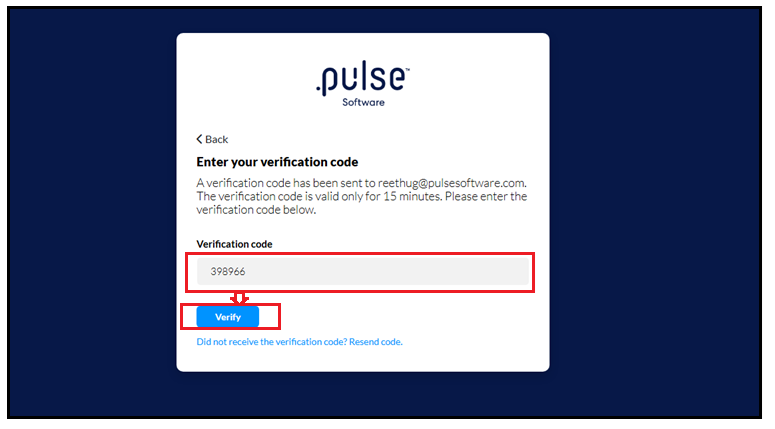
Step 2: This will open the "Enter Your Verification Code" pop-up.
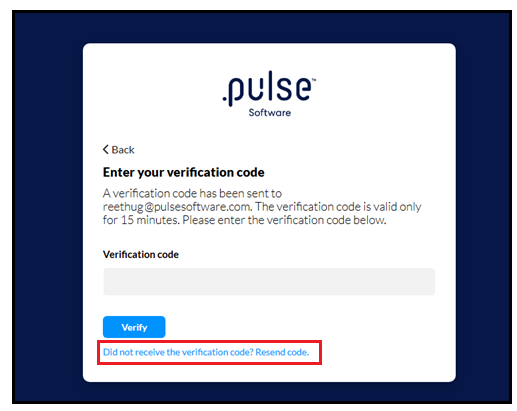
If the candidate does not receive the verification code, they can click on the "Did not receive the verification code? Resend Code" button. This will trigger the system to send a new verification code to the entered email address.
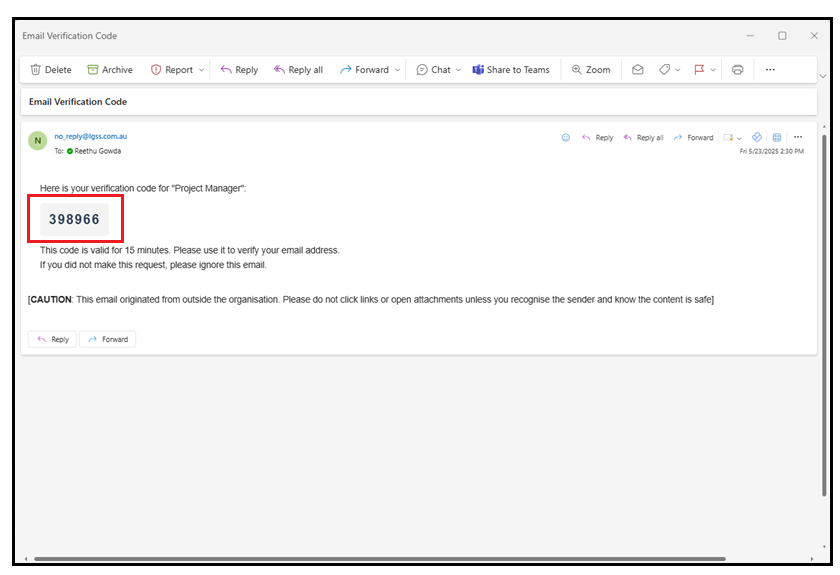
Step 3: The candidate will receive a verification code at the email address provided.
Step 4: The candidate enters the verification code in the pop-up and clicks Verify to continue with the account creation process.
Upon successful verification, the candidate is redirected to the Candidate Account Creation page, where they can fill out their personal details and complete the registration process before proceeding with the job application.

This feature enhancement allows RCM Admins to update key candidate details such as first name, last name, email address, and phone number in the candidate profile. It helps candidates keep their contact information up to date and enables admins to maintain accurate records. With easier updates to personal details, both candidates and admins benefit from smoother communication. Once a profile is updated, all previously submitted application forms and future communications will reflect the changes automatically.
Step 1: Navigate to the Candidate's profile, then click the Edit button to update the details.Example: All Candidates page, which is one of the pages where you can view a candidate’s profile. From there, click View Candidate to open the candidate profile.

Step 2: Update details such as First Name, Last Name, Email Address, or Phone Number, then click the Save button to apply the changes.
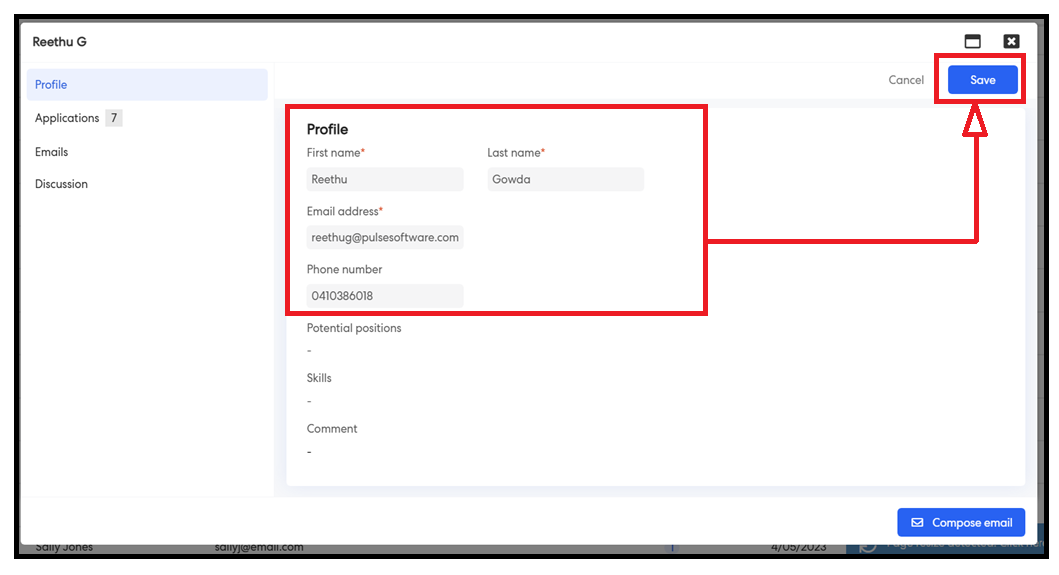
Once a profile is updated, all previously submitted application forms will reflect the changes automatically.
Issues resolved
Corporate Planning & Reporting Module
• Fixed an issue where the "Action Update Escalation - Run Once" notification was not sent if the deadline date was earlier than the run date.
• Fixed an issue where changing the status value from 0% to 99% in either the main or an additional hierarchy's General Settings caused the other hierarchy to revert to the 'Completed' status.
• Fixed an issue where session invitations with multiple periods were overwriting each other.
• Fixed an issue where a specific user was not assigned the correct booking status when added to a training session.
Enterprise Risk Management
• Fixed an issue where an error occurred when downloading the Risk Area Report template in the Document Generator.
• Fixed an issue that prevented viewing of checks against a candidate.
• Fixed an issue where editing an offer letter after adding it caused header text to enlarge.
HR Core
• Fixed an issue where the organisational chart did not display a scroll bar when there were many direct reportees.
• Fixed an issue where the approval banner did not appear when initially opening a project on the first form.