Contents
1. HR Core
1.1 New "Additional Positions" Column FeatureOverview:
This functionality introduces a new Additional Positions column and the ability to manage and display staff positions efficiently in various pages and reports. The new feature will provide users with an enhanced view of staff positions, both primary and additional, and includes configuration, sorting, filtering, and export capabilities.
To use this enhanced feature:
Step 1: Navigate to the Report
- Go to the Manage Employees Page
Step 2: Select the Column Configuration
- Click on the Column Configuration option.
- This will open the Column Configuration Pop-up.
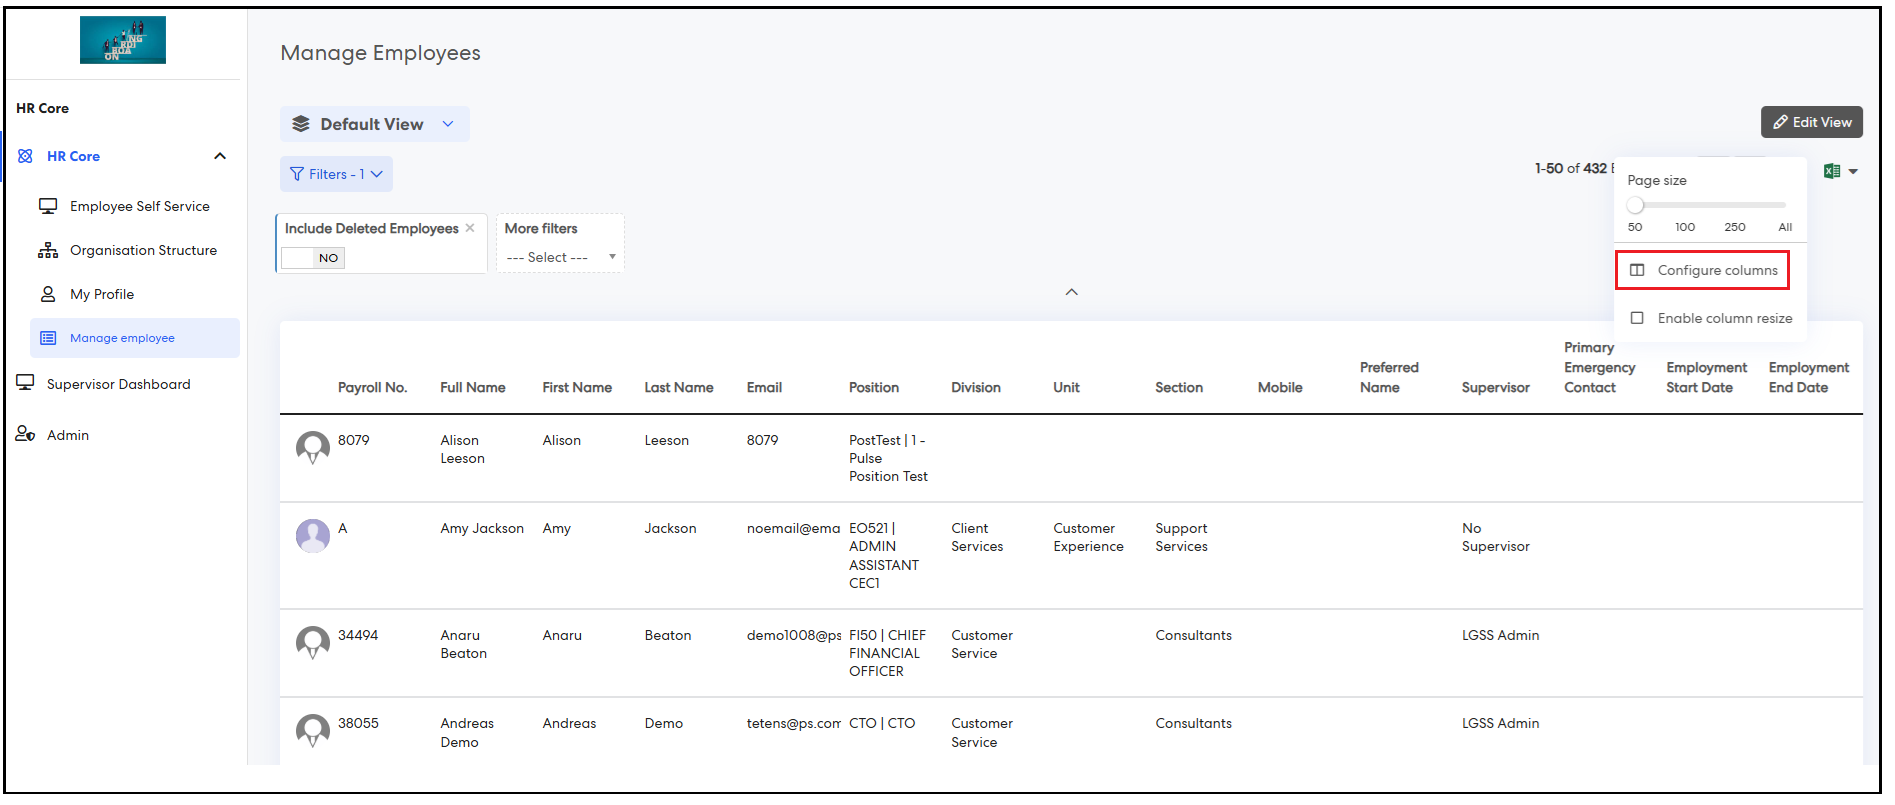
Step 3: Configure the Column
- In the Column Configuration Pop-up, you will see two sections: Available Columns and Enabled Columns.
- From the Available Columns section, locate and drag the Additional Positions column to the Enabled Columns section.
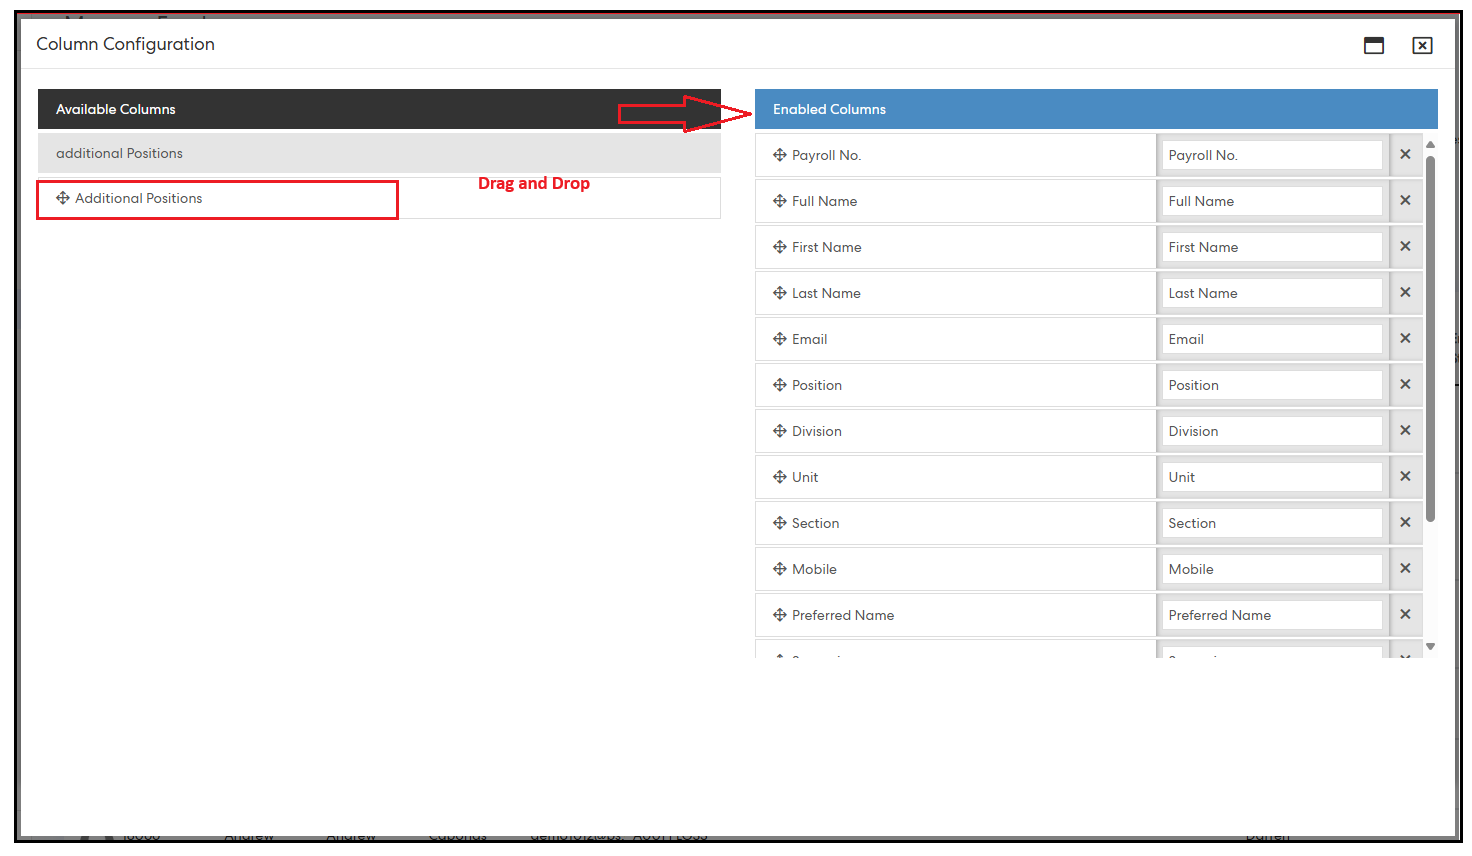
Step 4: Save the Configuration
- Once you have moved the Additional Positions column to the Enabled Columns section, click Close to save the changes.
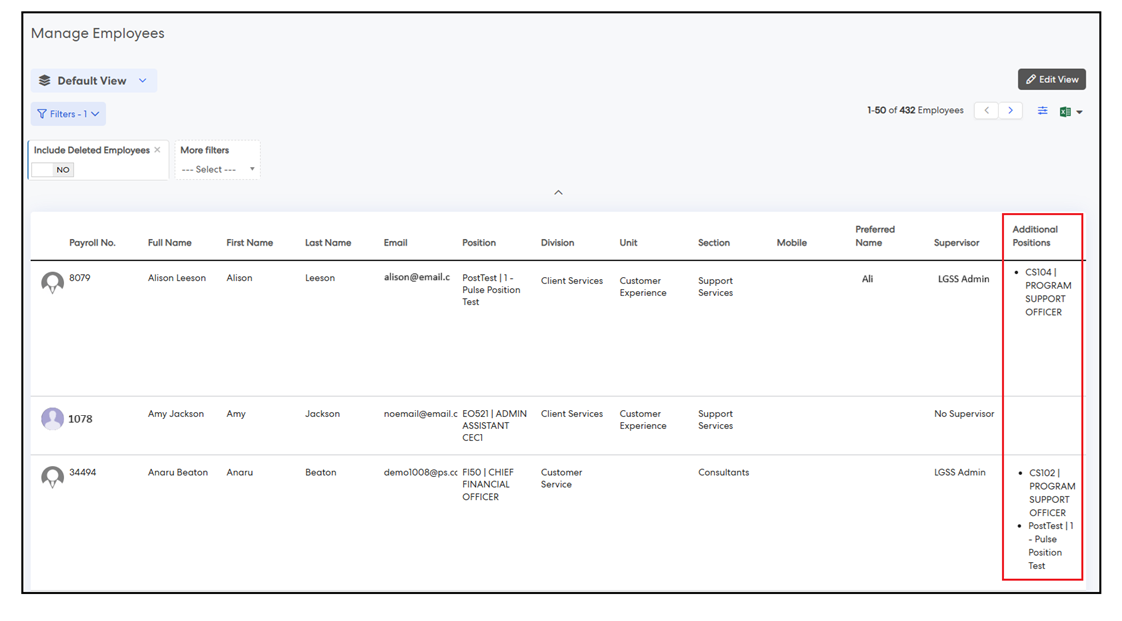
Step 5: Apply Filters
- Navigate to the More Filters option to apply filters for the Additional Positions column.
- In the More Filters pop-up, search for the Additional Positions filter.
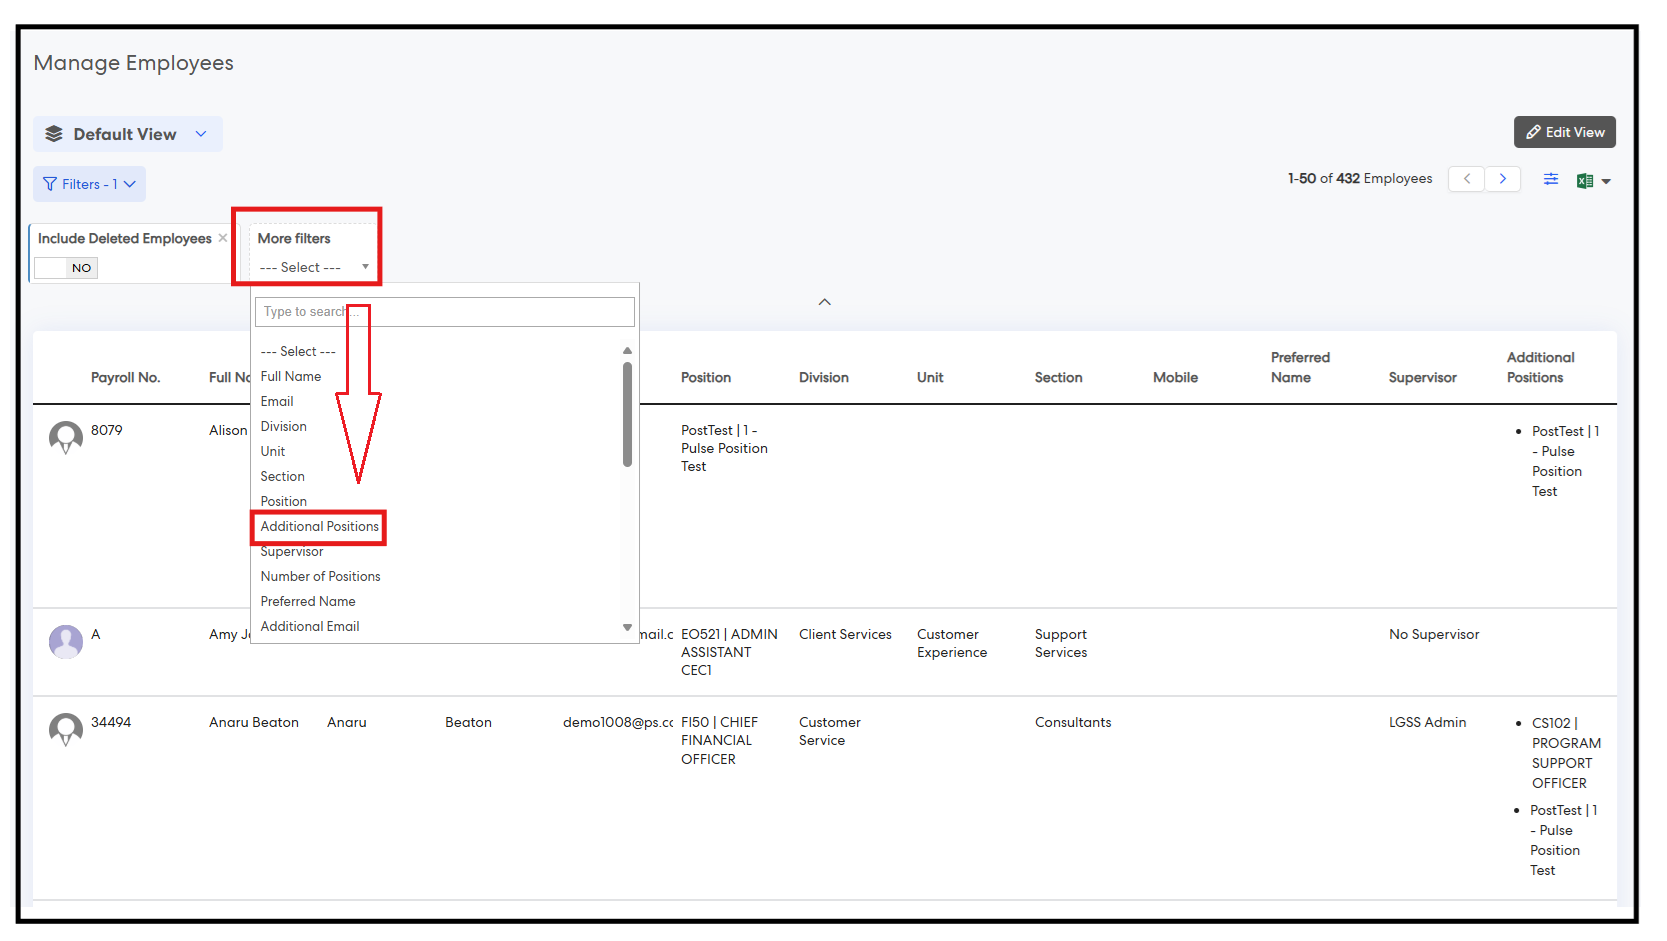
- You can filter based on Position Number or Position Name.
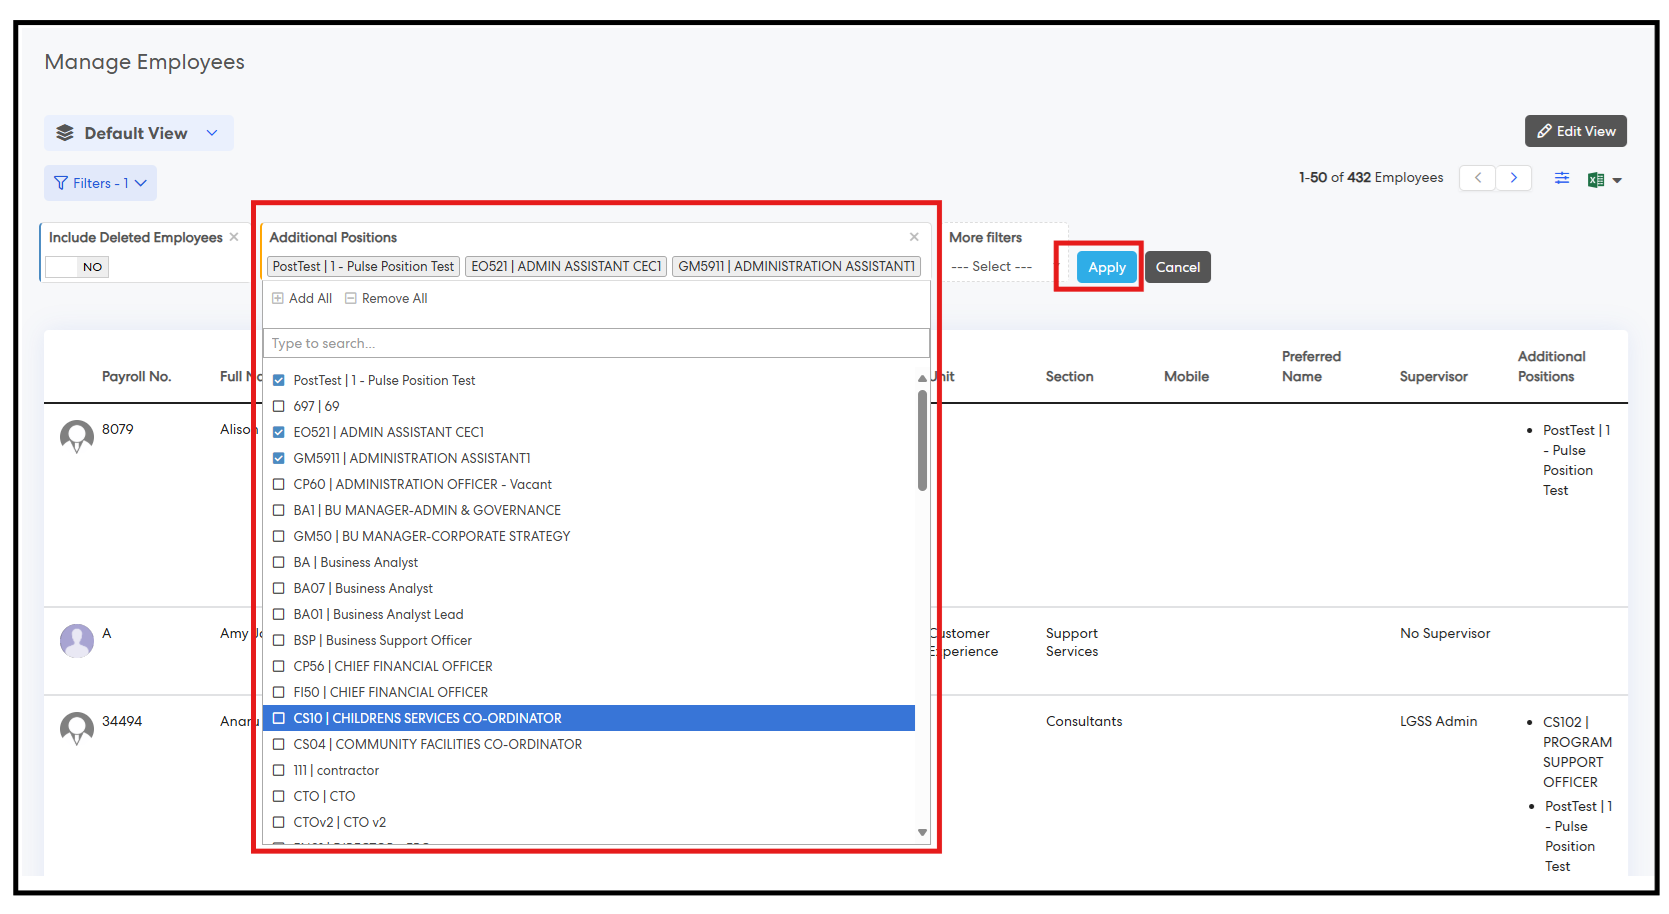
- Once the filter is applied, the report will display only those employees that meet the filter criteria.
Note:
- The Additional Positions column can be added when creating a view and is also available for exporting to Excel. When exporting, the column will be included in the export file as well.
Overview:
We are excited to introduce the Position Centralisation feature, designed to enhance position management by consolidating key position-related information in a centralised view.
Key Features:
- Centralised Position Information – All position details are stored in one centralised location, improving visibility and management.
- FTE & Assignments Tracking – Capture Full-Time Equivalents (FTEs) and their assignments to accurately reflect workforce distribution.
- Position Description Document – Store and manage detailed position descriptions for clarity and consistency in role expectations.
- Extended Information Capture – Add additional attributes to capture more comprehensive position-related data as required.
- Integrated View from Other Modules – Position records now display key information from other Pulse modules:
- Learning Module: View relevant accreditations and training pathways associated with the position.
- Delegations Module: See assigned delegation responsibilities linked to the position.
- Policies Module: Track policies assigned to each position for compliance and governance.
- Enhanced Reporting Capabilities – New reporting features provide deeper insights into position data for better decision-making.
- New Position Organisation Chart – A visual representation of the organisational structure helps in understanding reporting lines and position hierarchies.
Learn more about this feature in this Knowledge Base Article.
2. eLearning Module
2.1 Marking Course Completion FeatureOverview:
This new feature enables users to mark a course or a course package as complete, even if the course status is "Not Started" or "In Progress" in the eLearning report. Upon marking the course or all courses in a package as complete, a confirmation pop-up will display key details regarding the changes, and the course status will be updated accordingly. This functionality helps ensure accurate reporting and maintains clear records of course completion.
How to Enable and Use the "Mark as Complete" Feature:
Step 1: Navigate to the eLearning Report
- Navigate to the Reports menu and select the 'eLearning report' page.
- Locate the staff and the course you wish to mark as complete. Ensure that the course is currently in Not Started or In Progress status.
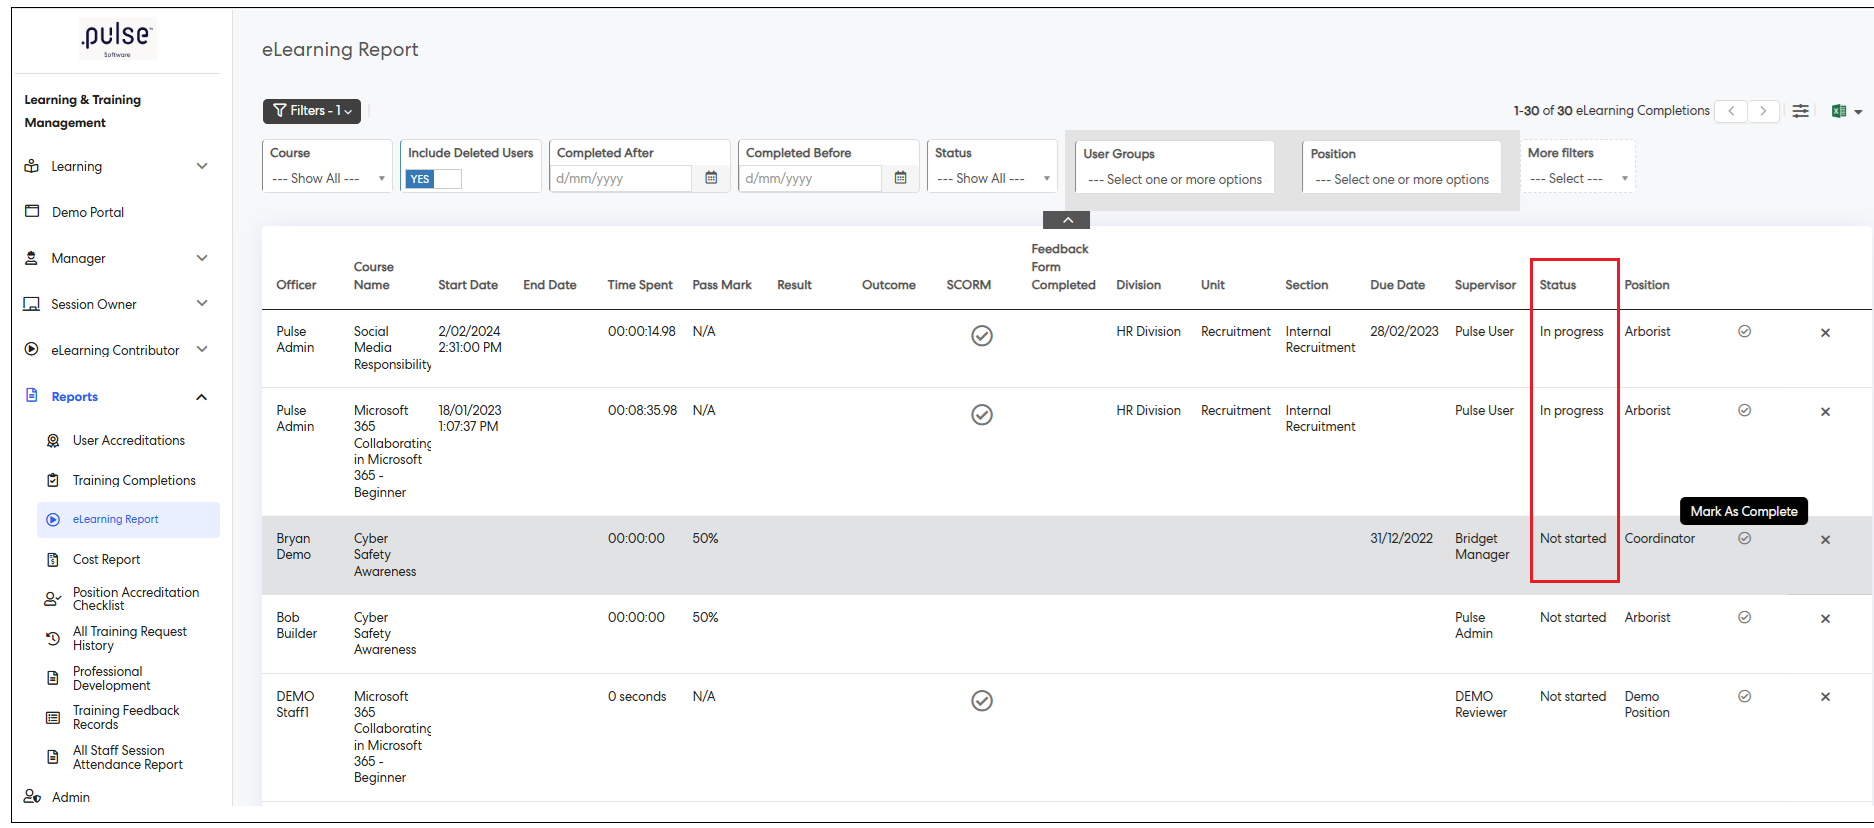
Step 2: Mark the Course as Complete
- Click the 'Mark as Complete' option next to the course.
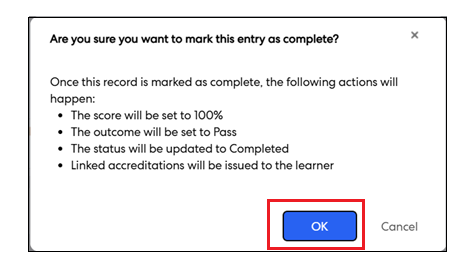
- A confirmation pop-up will appear.
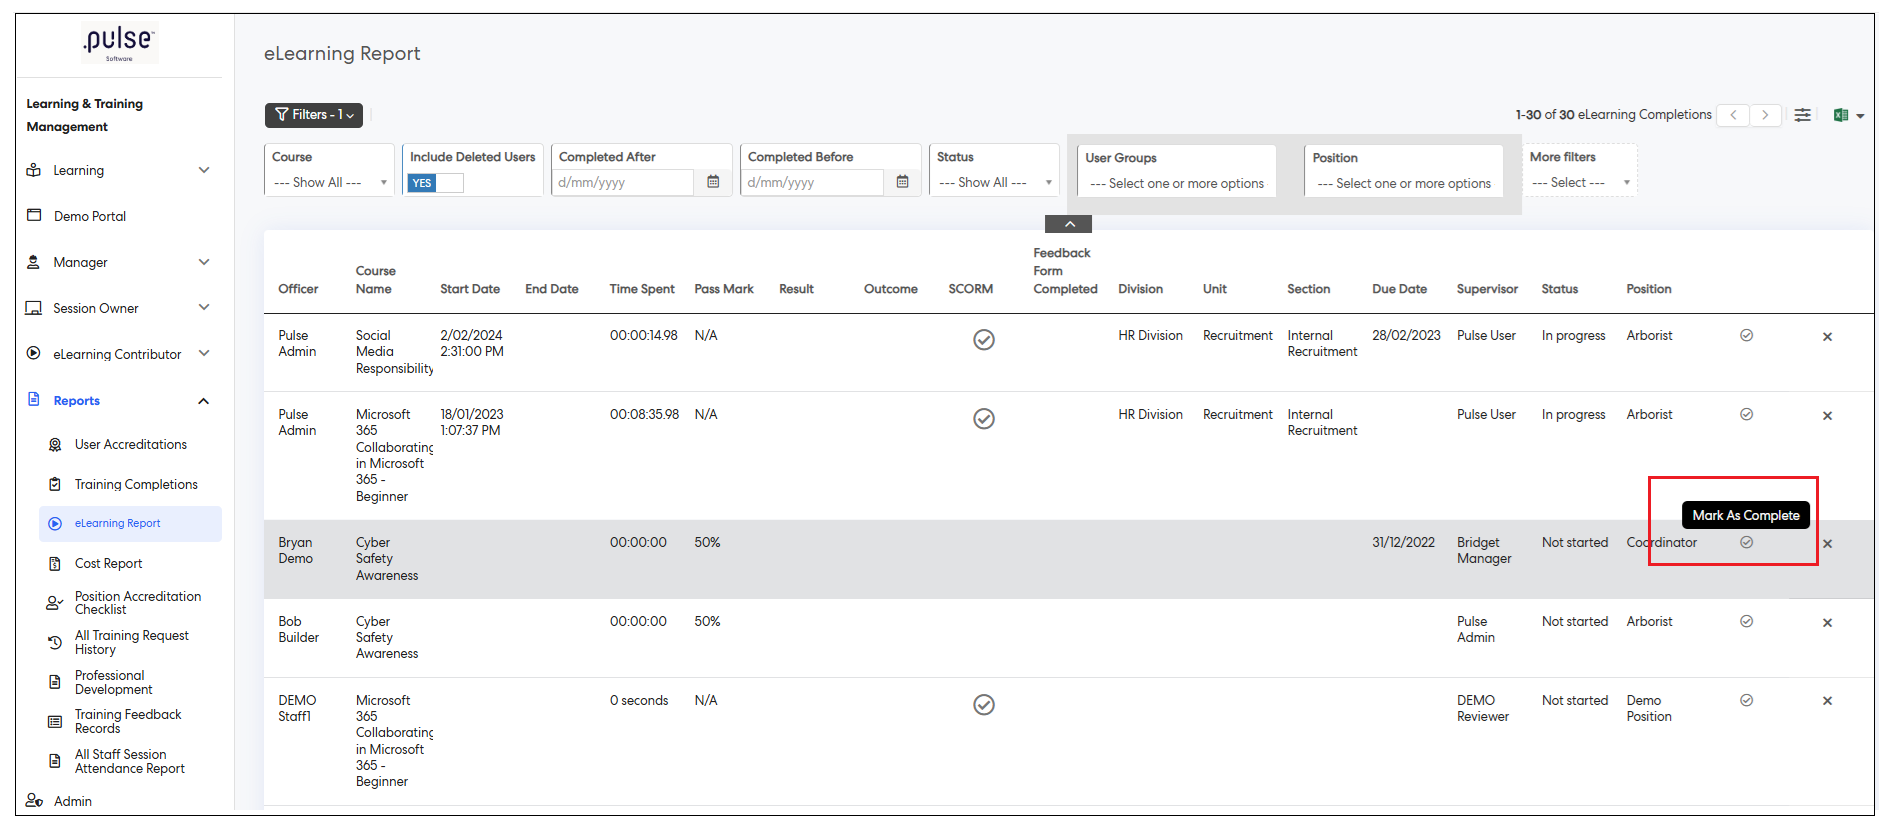
Step 3: Review the Confirmation
Review the details in the confirmation pop-up:
- The course outcome will be set to Pass.
- The score will be set to 100%.
- The status will be updated to Completed.
- Linked accreditations will be issued.
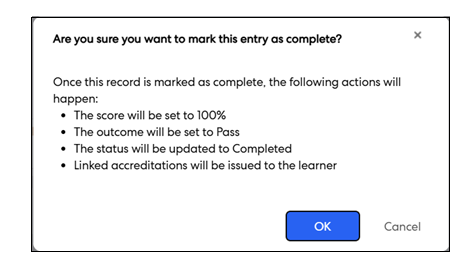
Step 4: Confirm or Cancel
- Click OK to confirm and apply the changes, or click Cancel to abort the process without marking the course as complete.
Step 5: View the Report
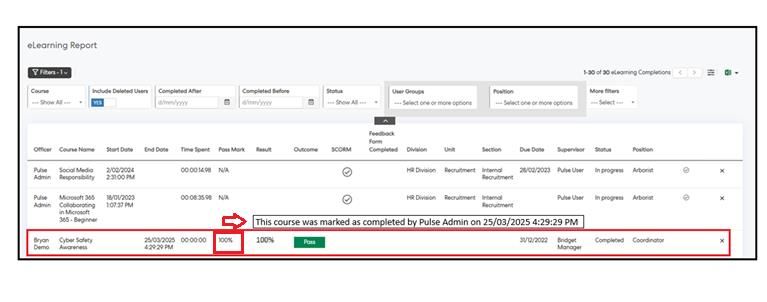
Once confirmed, the course completion details will be captured in the eLearning report:
- Course Outcome (set to Pass)
- Score (set to 100%)
- Time Spent on the course
- End Date (timestamped when the course was marked as complete)
- Marked Complete By (user who marked the course as complete)
- When the administrator hovers over the Pass Mark (100%) in the report, a tooltip will appear, providing the following details:
- Who marked the course as complete.
- When the course was marked as complete.
Step 6: Column Configuration for "Marked Completed By"
To add "Marked Completed By" as a column in your report:
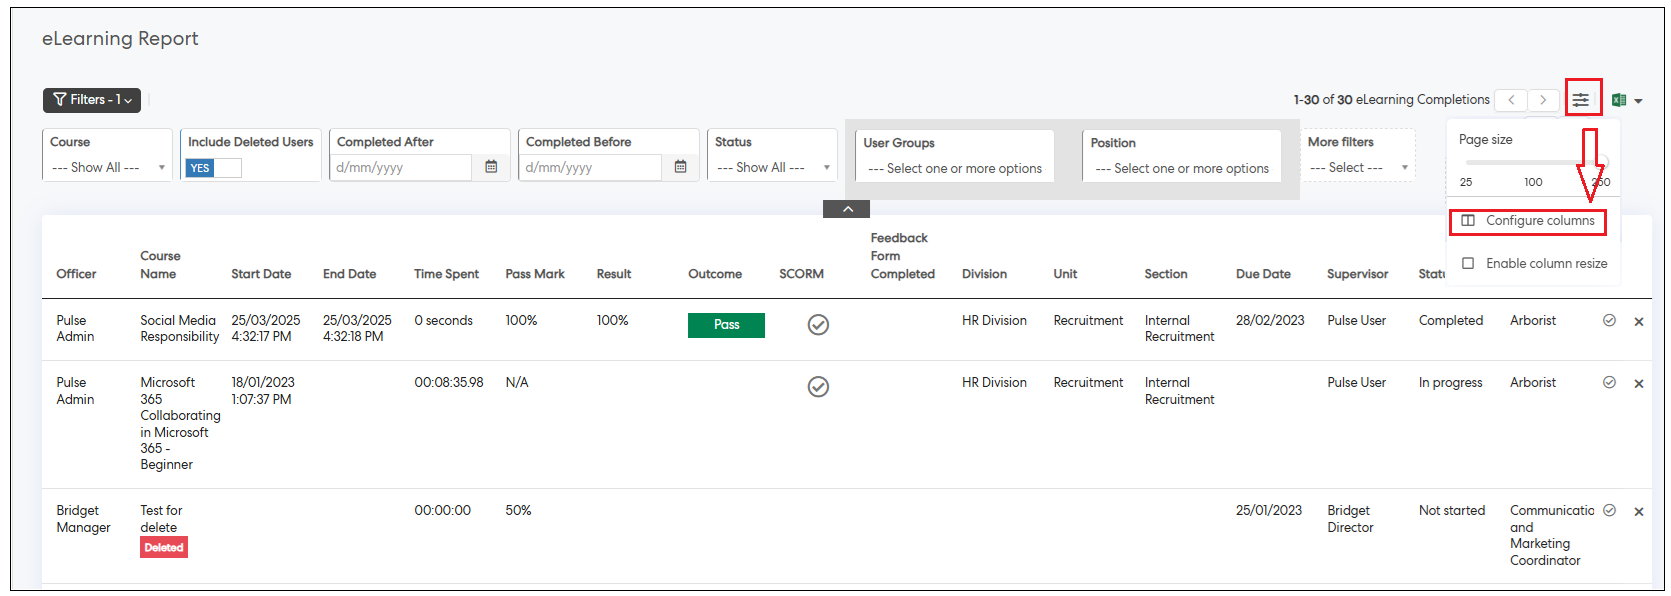
- Navigate to the eLearning report page.
- Click on the "More" option in the top right corner of the page.
- From the dropdown menu, select Column Configuration.
- In the configuration settings, locate "Marked Completed By" in the Available Columns section.
- Drag "Marked Completed By" to the Enabled Columns section.
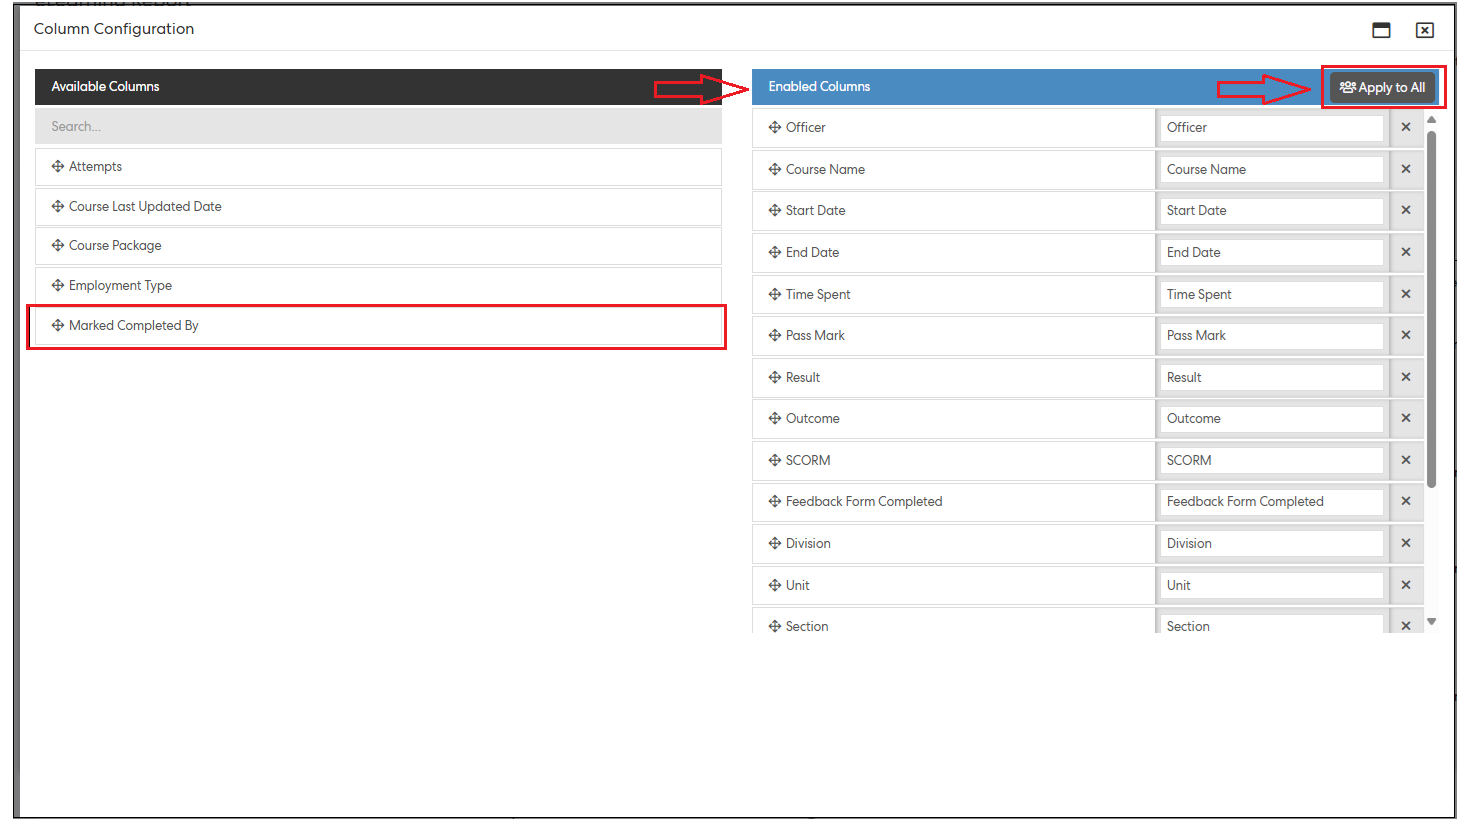
- Click Apply to all to apply the configuration changes to all users.
- A confirmation pop-up will appear. Click OK to confirm the changes.
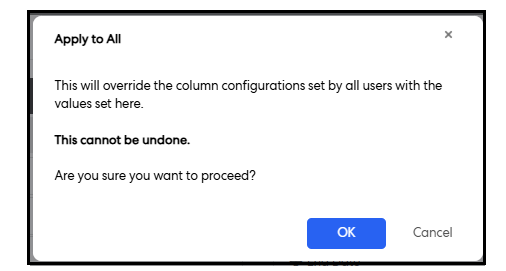
- The "Marked Completed By" column will now be visible in your eLearning report, displaying the user who marked each course as complete.

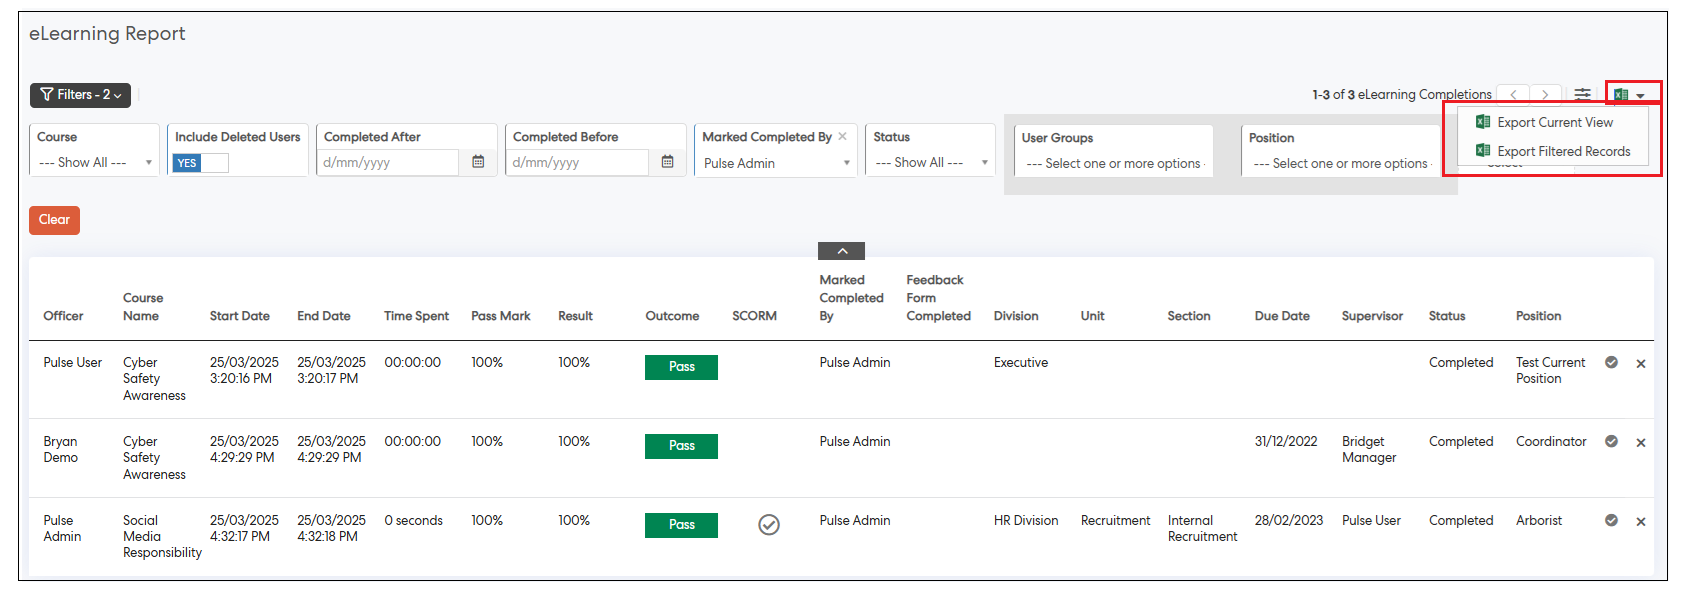
Note: Export to Excel
- The "Marked Completed By" column can be exported to Excel when the administrator selects the Export to Excel option.
- This allows for easy offline tracking and reporting of who marked each course as complete.
Step 7: Filter by "Marked Completed By"
To filter by "Marked Completed By":
- Navigate to the Filter options on the eLearning report page.
- Select More Filters.
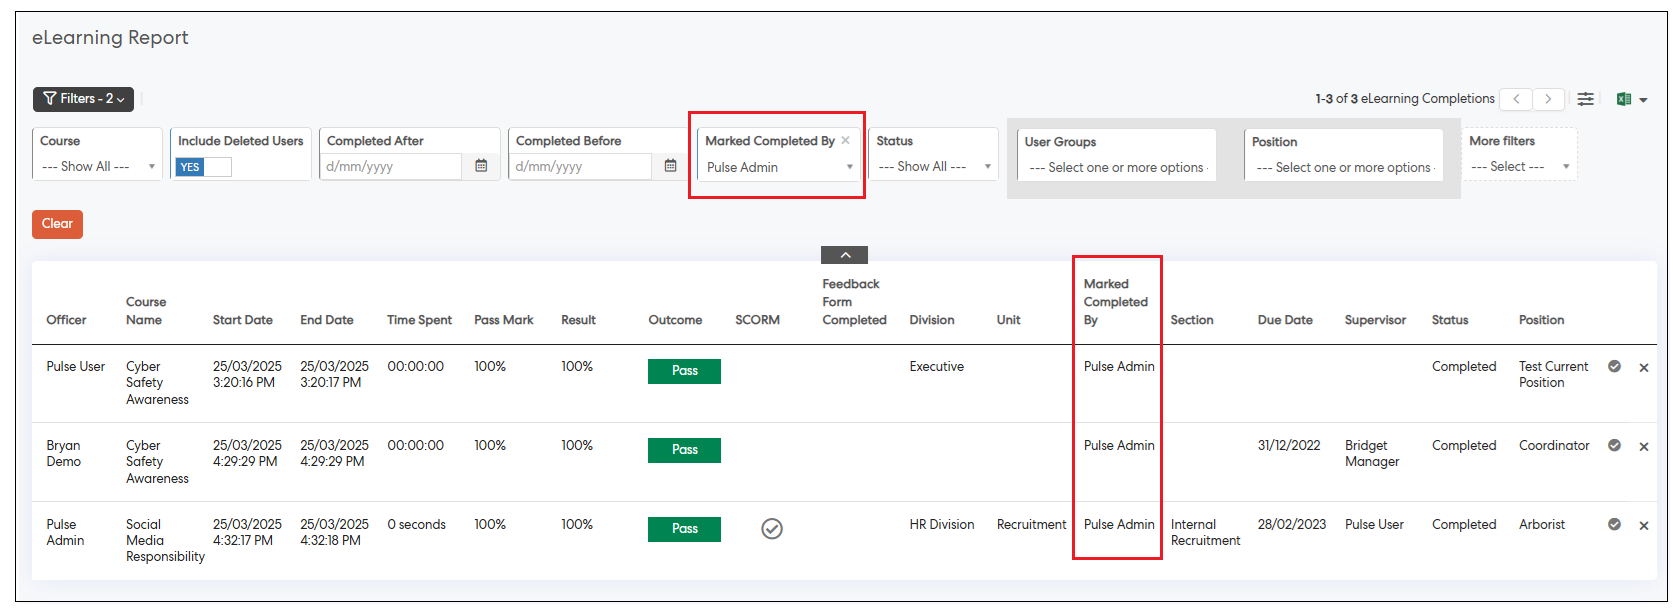
- Locate and select the "Marked Completed By" filter.
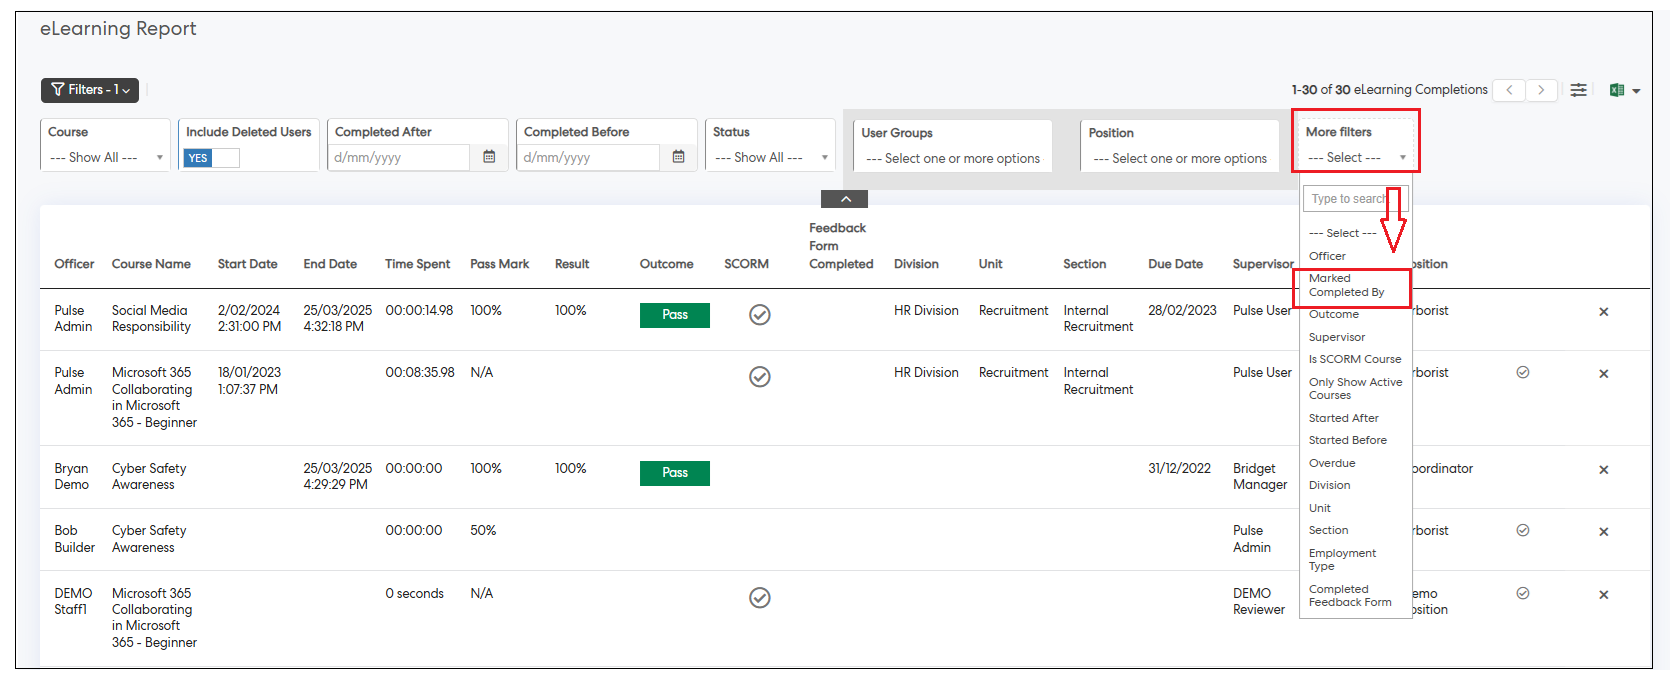
- Apply the filter to view courses marked as complete by specific users.
3. eRecruitment Module
3.1 Enhanced Job Ad Description Generation with AIOverview:
We’ve introduced a new feature that enhances the job ad description generation process, making it more structured and polished. This feature allows users to create job ads efficiently by leveraging AI-generated content that is refined for clarity and precision.
How to Use the New Feature:
Step 1: Navigate to the Job Listing Page
- Go to the Job Listing page within your platform.
Step 2: Add or Edit a Job
- Click on +Add Job to create a new job ad or select an existing job and click Edit.
Step 3: Navigate to the Job Details Section
- In the job editing view, locate the Job Details section.
Step 4: Add or View/Edit Ad Description
- Click on the Add Ad Description button to add a new description or click View/Edit Description to modify an existing ad description.
Step 5: Ad Description Pop-Up
- A pop-up will appear where you can add or edit the ad description.
Step 6: Generate with AI
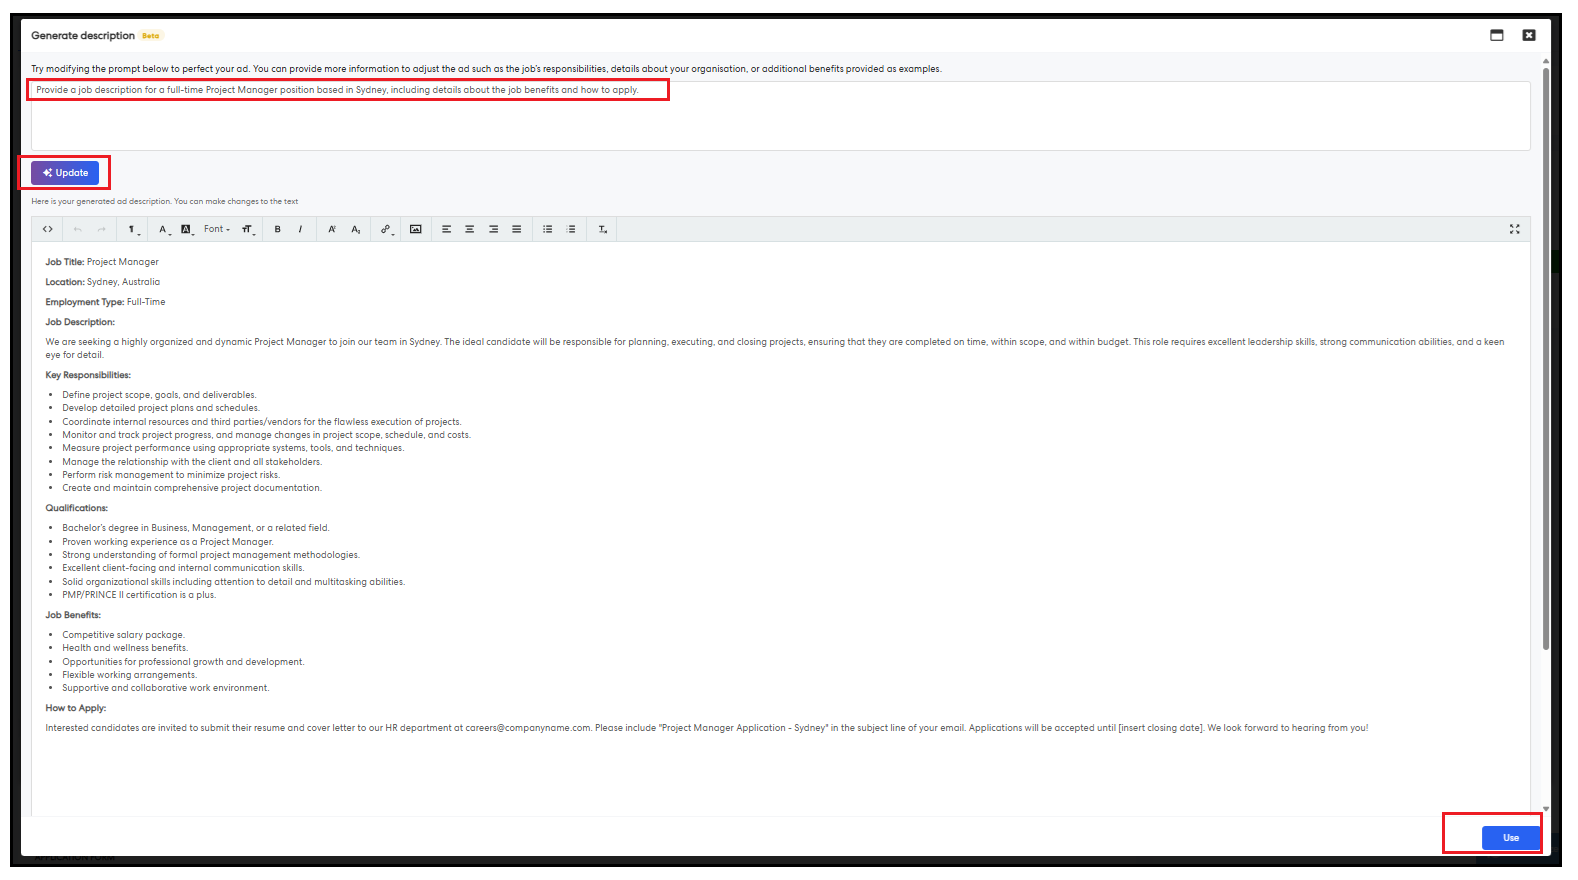
- Click on the Generate with AI button. This will load the AI-generated description pop-up.
- Add the job-related description in the prompt section and select Generate to create the job ad description.
- Once the description is generated, you can further update the prompt to refine the content and regenerate if needed.
Step 7: Result
- The AI-generated response will now be refined and formatted to provide you with a professional and well-organized job description, ready to be used in your job listings.
Issues resolved
eLearning
- Fixed an issue where learning progress was not updated correctly when completing a specific SCORM course using Safari on an iPad.
- Fixed an issue where the 'E-Learning Course Completed' notification was sending duplicate notifications to contributors.
- Fixed an issue where, when a user was deleted from a single training session linked to a training request with two sessions, the user was removed entirely and could not be added to the other session.
- Fixed an issue where multiple accreditation records were created upon SCORM course completion on the user accreditation report page.
