Contents
1. eLearning Module
1.1 Enhanced Add AccreditationThe Add Accreditation feature has been enhanced to enable module administrators, users, and supervisors in the Learning module to effortlessly add accreditations with intelligent validation and renewal functionality. When users add an accreditation, the system will check for any existing, unarchived records and, if found, renew them. This simplifies the accreditation addition process for users, ensuring accurate management and renewal of accreditations and fewer unmanaged duplicates.
To add an accreditation:
Step 1: Log in to the Pulse system and navigate to the Learning Module:
Step 2: Navigate to Add Accreditation:
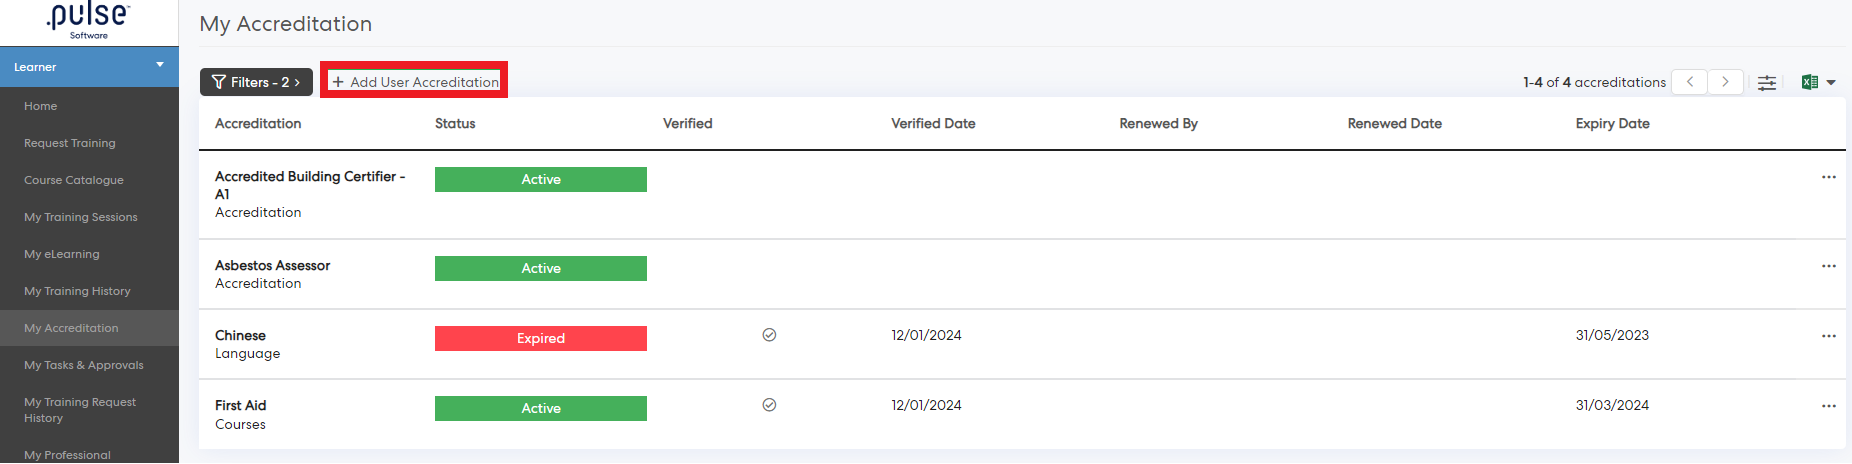
2(a): For Users: Go to the learner's menu -> Navigate to the "My Accreditation" page -> Click on the "+Add User Accreditation" button to load the add accreditation pop-up and submit the accreditation.
2(b) For Supervisors:
Staff Accreditation Report: Go to the Supervisor Menu -> Navigate to the "Supervisor dashboard" page -> Click on the "Staff Accreditation" button -> Access the staff accreditation page, then click on the "+Add User Accreditation" button to load the add accreditation pop-up to submit accreditation for a specific staff.

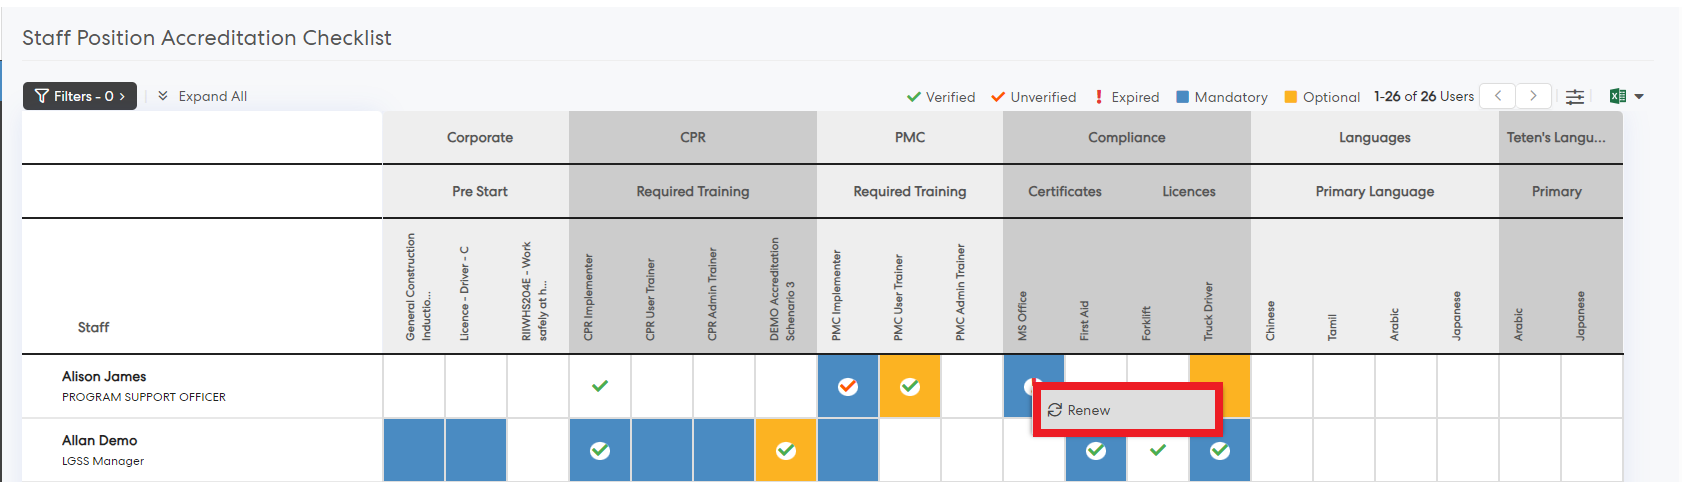
Staff Position Accreditation Checklist Report: Go to the Supervisor Menu ->Navigate to the "Supervisor dashboard" page -> Click on the 'Staff Position Accreditation Checklist Report' button -> Access the staff position accreditation checklist page, then navigate to the staff and accreditation and click on the "+Add" button to load the add accreditation pop-up to submit accreditation for a specific staff.

2(c) For Module Administrators:
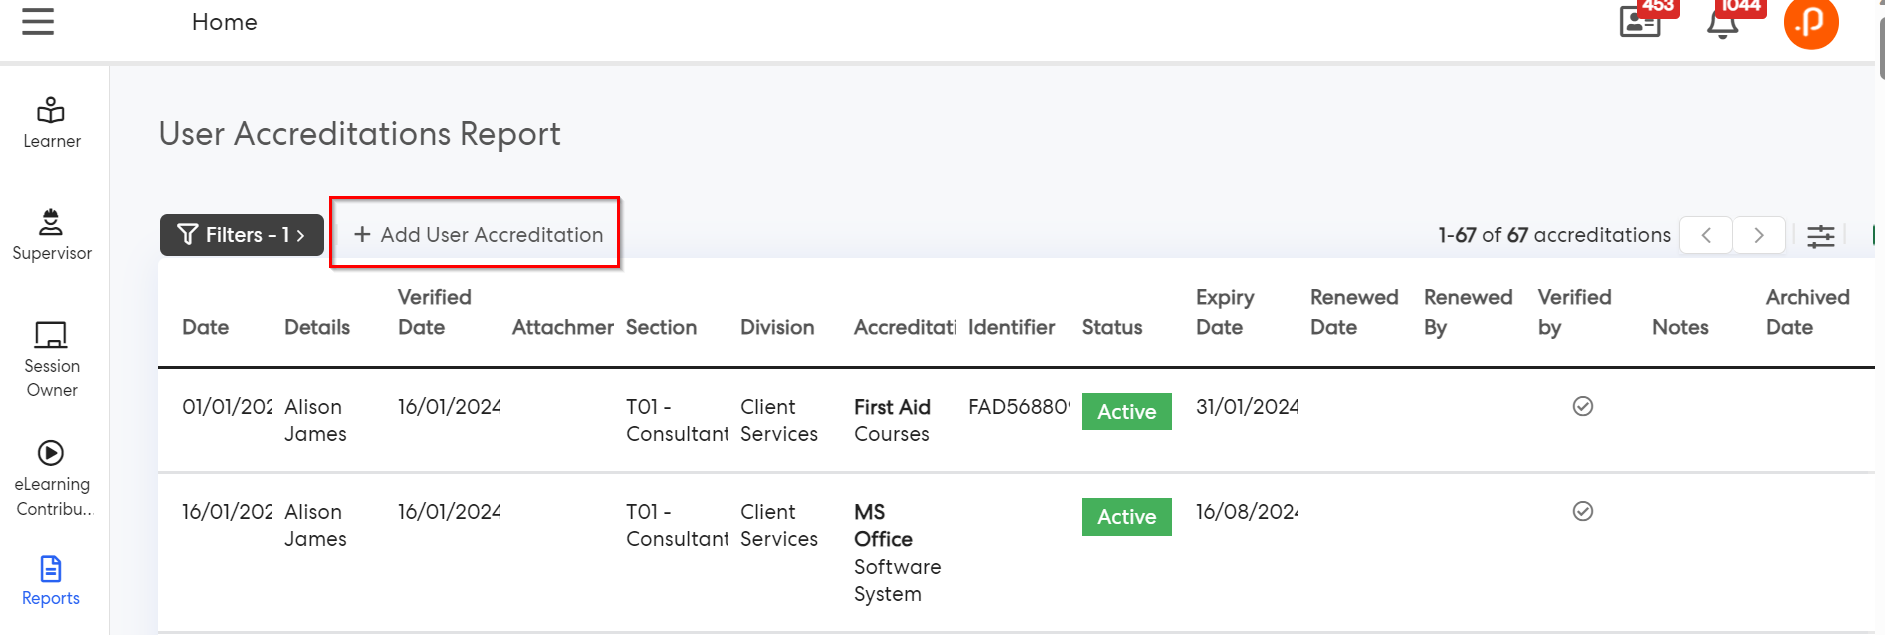
User Accreditation Report: Go to the Report menu -> Navigate to the "User Accreditations" page -> Click on the "+Add User Accreditation" button to load the add accreditation pop-up to submit accreditation for a specific staff.

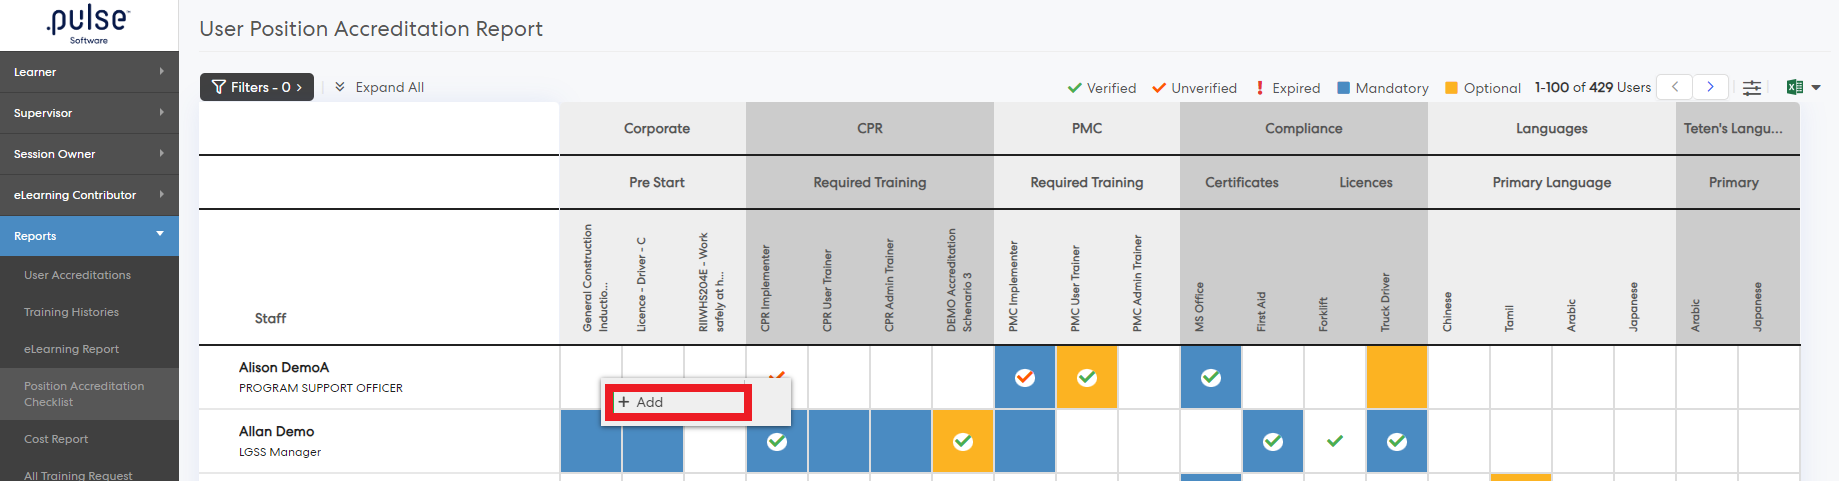
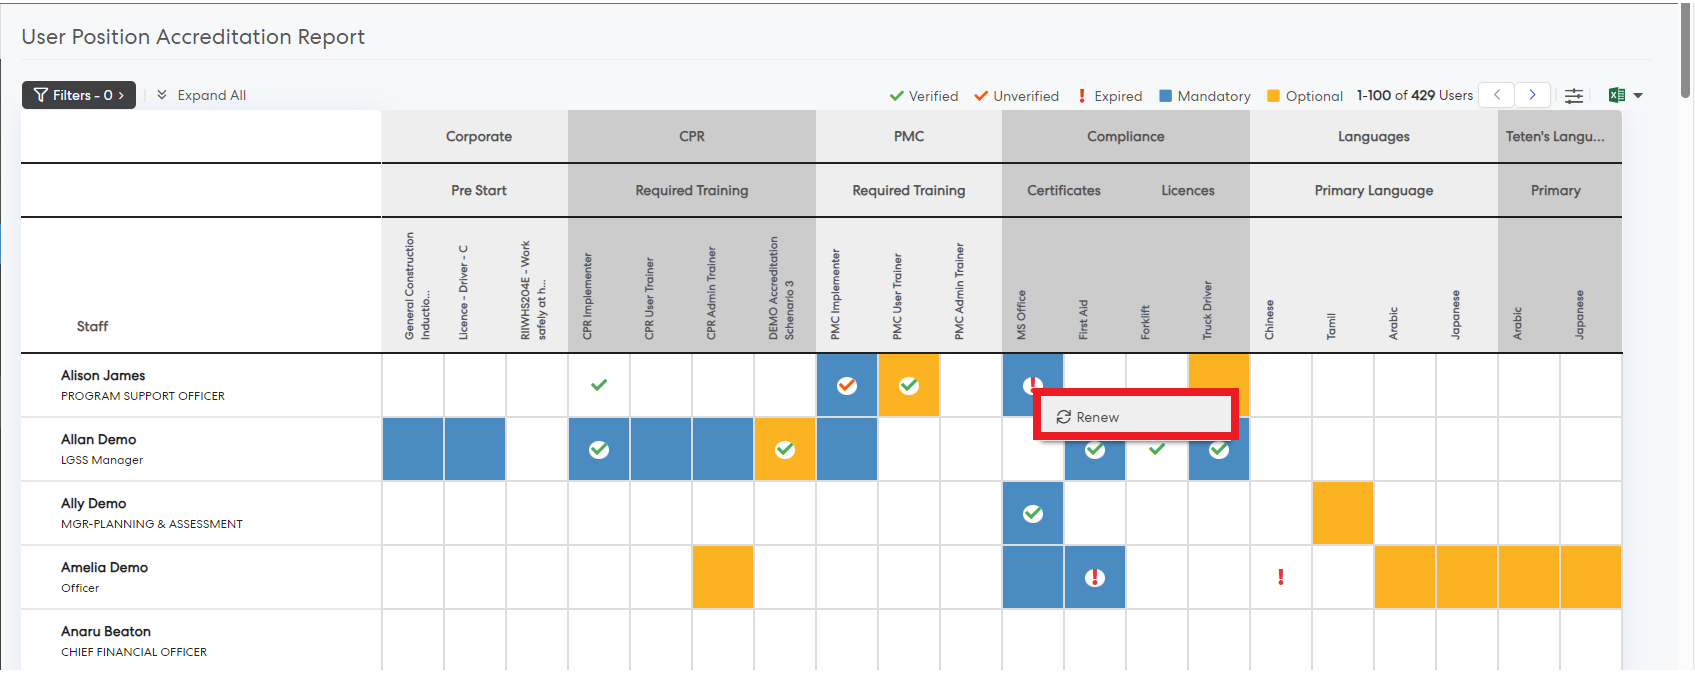
User Position Accreditation Checklist Report: Go to the Report menu -> Navigate to the "User Position Accreditation Checklist report" page -> Access the user position accreditation checklist page, then navigate to the staff and accreditation and click on the "+Add" button to load the add accreditation pop-up to submit accreditation for specific staff.
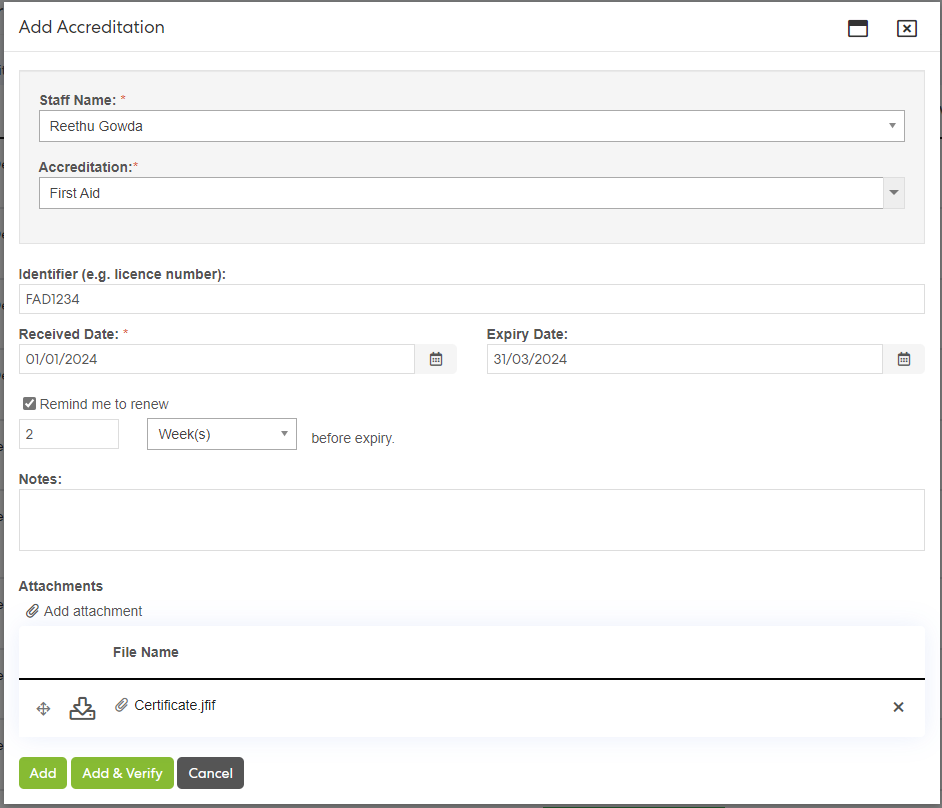
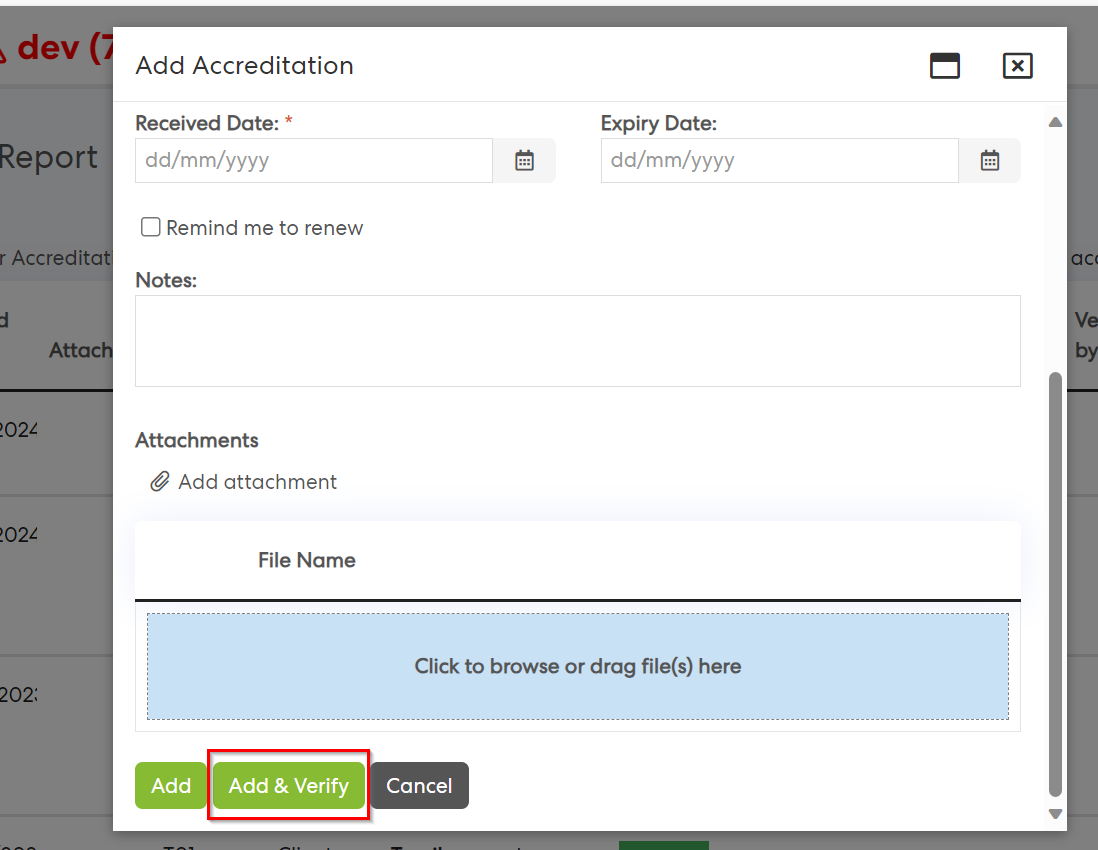
Step 3: Enter Accreditation Details: Populate the accreditation details, including type, name, and other required information. When the details are populated, the system checks for existing active or expired accreditations with matching attributes such as Accreditation type and name.
If no existing records with the same attributes are found, the system adds the new accreditation as a record, capturing the user's entered details.
If existing records with the same attributes are found, a banner is displayed to inform the user about the identified accreditations that will be renewed when the new accreditation is added.
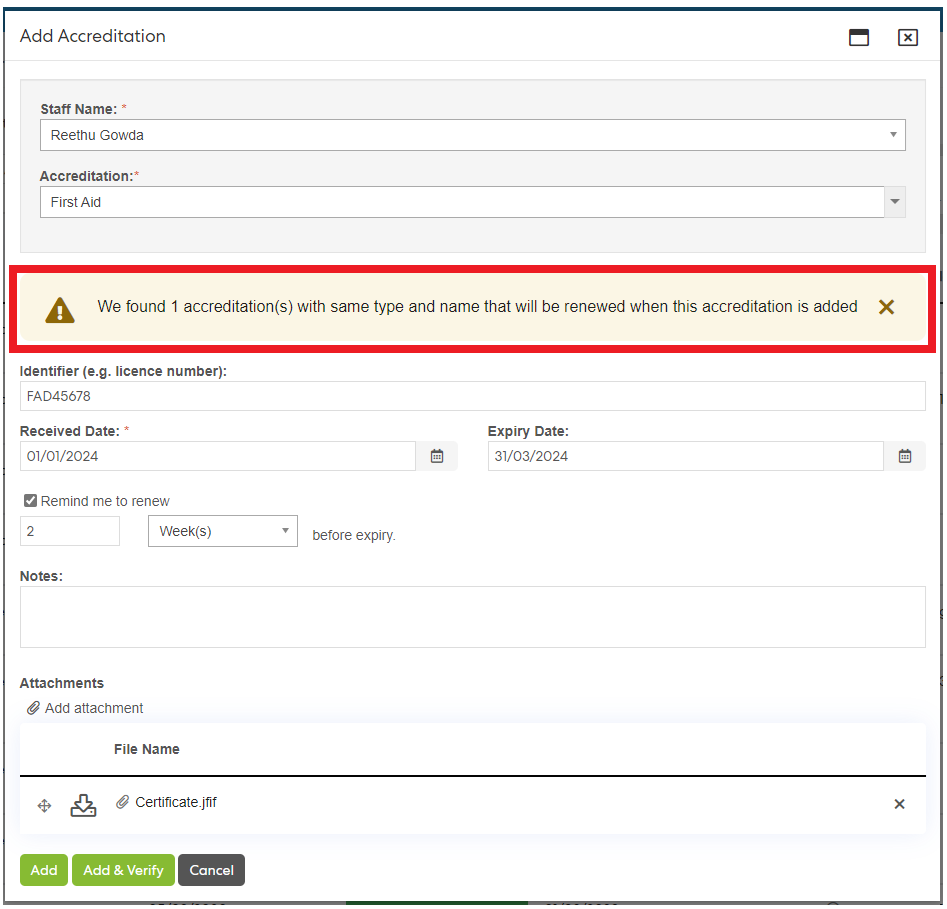
Step 4: Review and Submit: Users can review the entered details and validation results before submitting the new accreditation. When the new accreditation is added, the system automatically renews identified previous records with updated details, including status, renewal date, and renewed information.

Note: Module administrators and the Supervisor of a staff can verify while uploading the accreditation of the staff.
1.2 Enhanced Renew AccreditationWe have redesigned the accreditation renewal process for users/staff, supervisors, and module administrators, to ensure the easy maintenance of expired, or renewed accreditations. This will help users avoid creating and maintaining multiple versions of the same accreditation. During the renewal process, the system will verify for identical records and renew them, rather than creating duplicate accreditation records, streamlining the management of accreditations with enhanced efficiency and accuracy.
1.2.1 To renew an accreditation:
Step 1: Log in to the Pulse system and navigate to the eLearning Module:
Step 2: Navigate to Renew Accreditation:
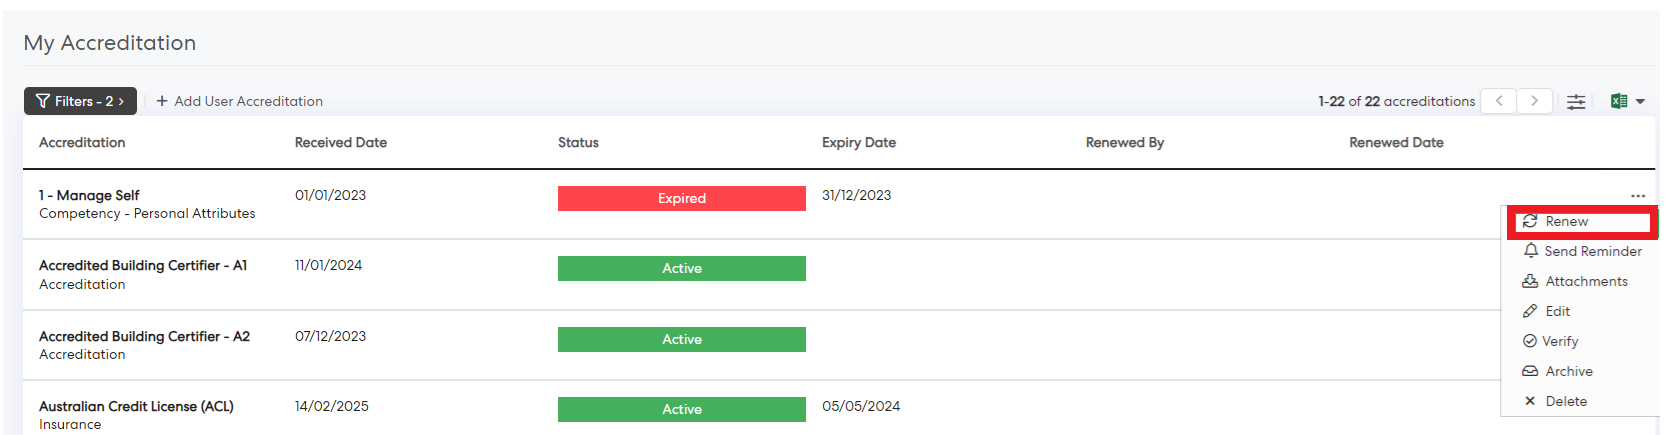
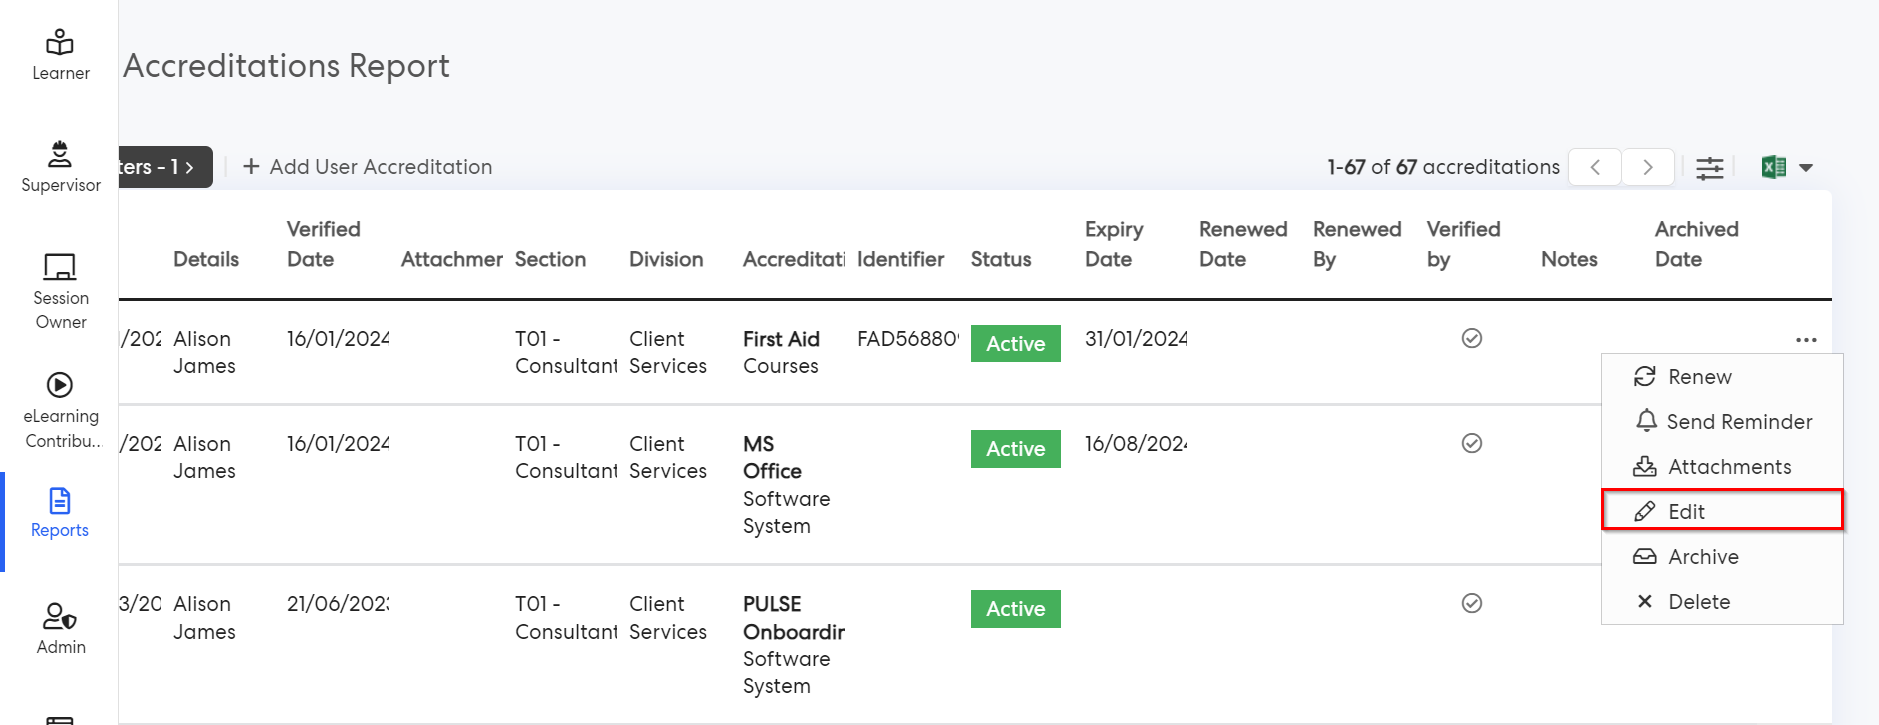
2(a) For Users: Access the Learner menu -> Navigate to the "My Accreditation" page -> Locate the staff accreditation record -> Click on the "..." (Ellipsis) button ->Select "Renew" button to submit the accreditation.

2(b) For Supervisors:
Staff Accreditation Report: Access the Supervisor Menu ->Navigate to the "Supervisor dashboard" page -> Click on the 'Staff Accreditation' button -> Access the staff accreditation page -> Locate the staff accreditation record -> click on the "..." (Ellipsis) button ->select "Renew" button to submit an accreditation.

Staff Position Accreditation Checklist Report: Access the Supervisor Menu ->Navigate to the "Supervisor dashboard" page -> Click on the 'Staff Position Accreditation Checklist Report' button -> Access the staff position accreditation checklist page -> Locate the staff and accreditation which requires renewal and locate the staff accreditation record ->Select "Renew" button to submit an accreditation.
2(c) For Module Administrators:
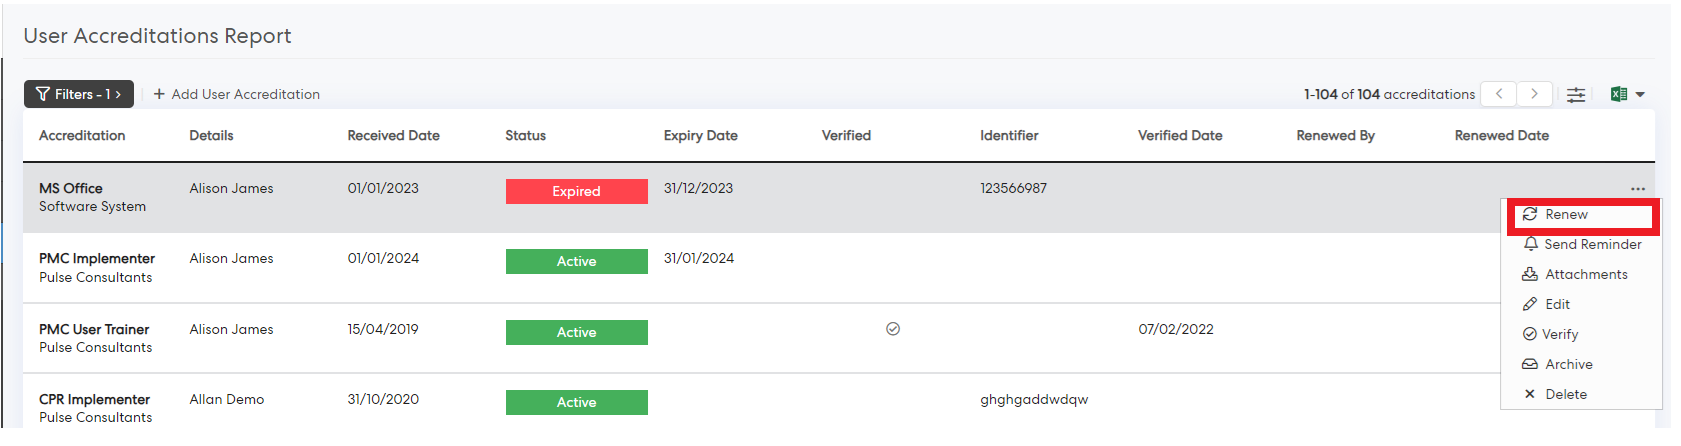
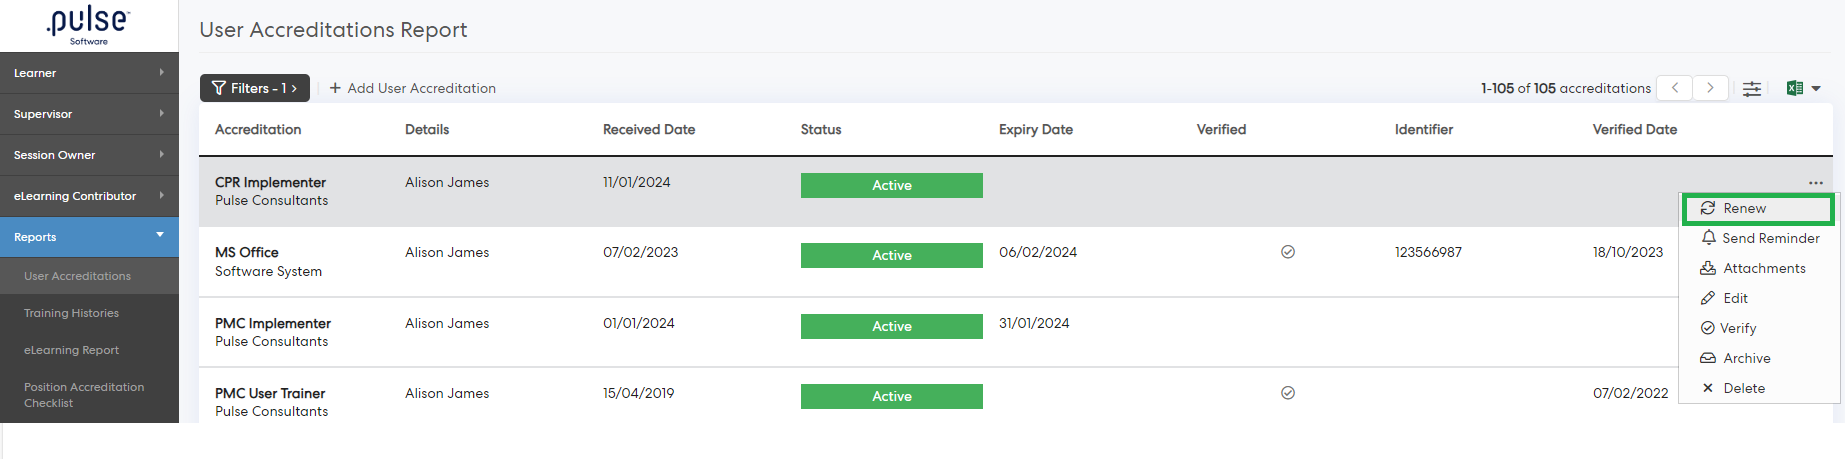
User Accreditation Report: Access the Report menu -> Navigate to the "User Accreditations" page -> Locate the staff accreditation record -> Click on the "..." (Ellipsis) button ->Select "Renew" button to submit an accreditation.
User Position Accreditation Checklist Report: Access the 'Report' menu -> Navigate to the "User Position Accreditation Checklist report" page -> Access the user position accreditation checklist page -> Locate the staff and accreditation which requires renewal and ->Select the "Renew" button to submit an accreditation.
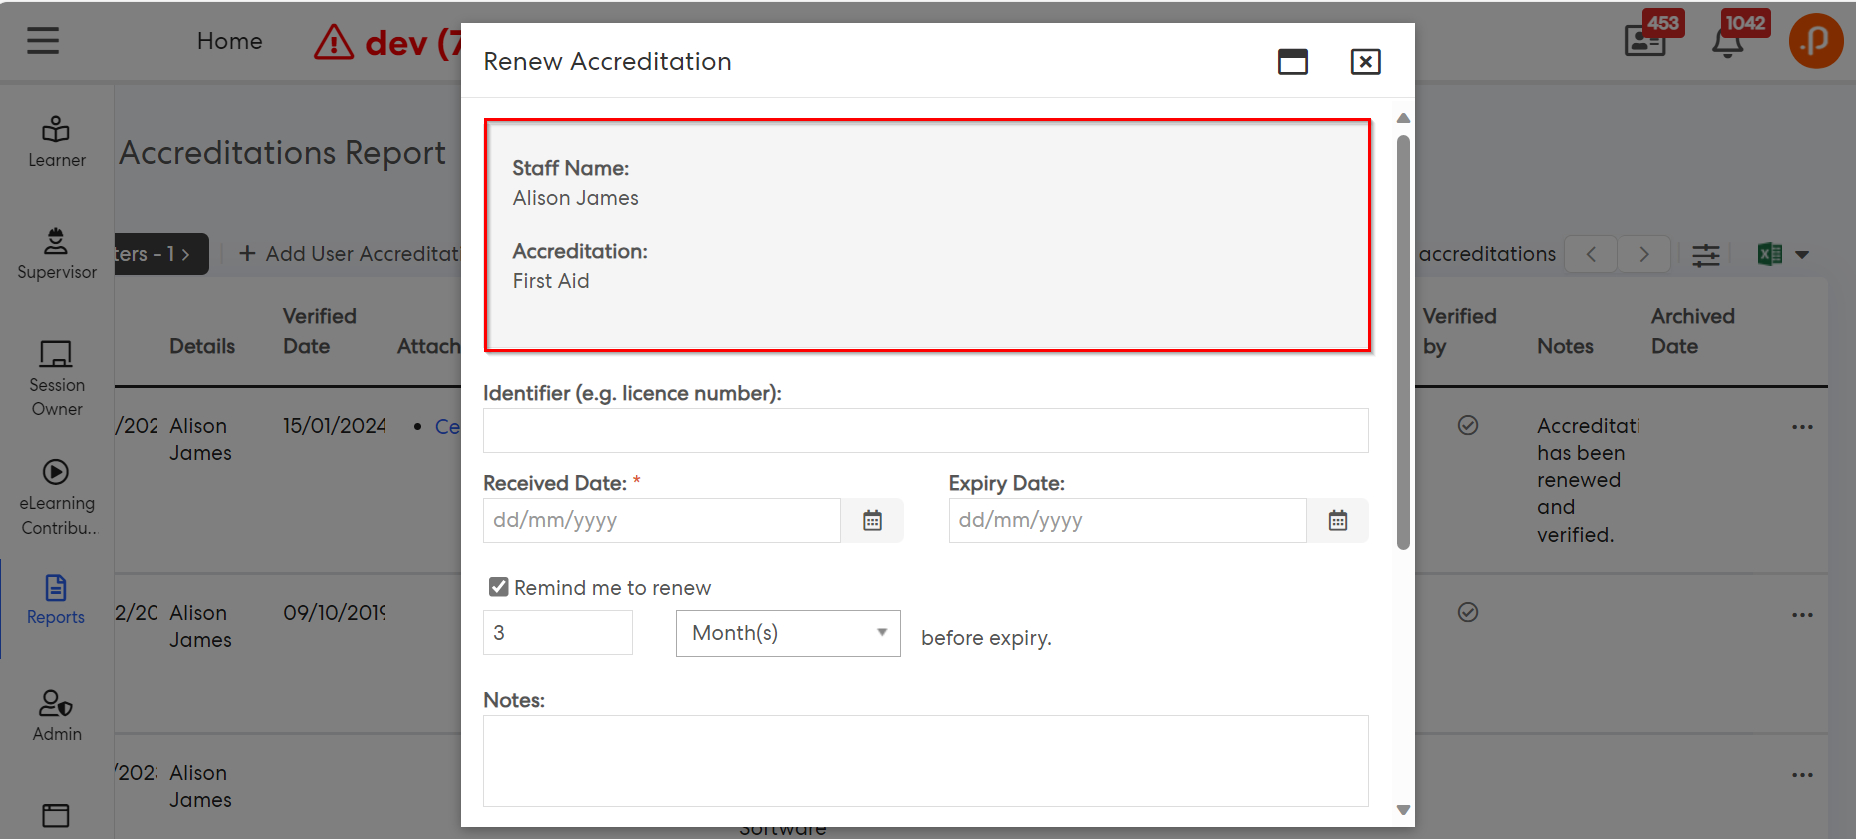
Step 3: Within the "Renew Accreditations" pop-up, users can access staff names and accreditation details that require renewal and proceed to populate the latest accreditation details for submission.
Additionally, in case existing records with matching attributes are found (Same accreditation type and name), a banner will be displayed to inform the user about the identical unarchived accreditations that will be renewed upon adding the new accreditation.
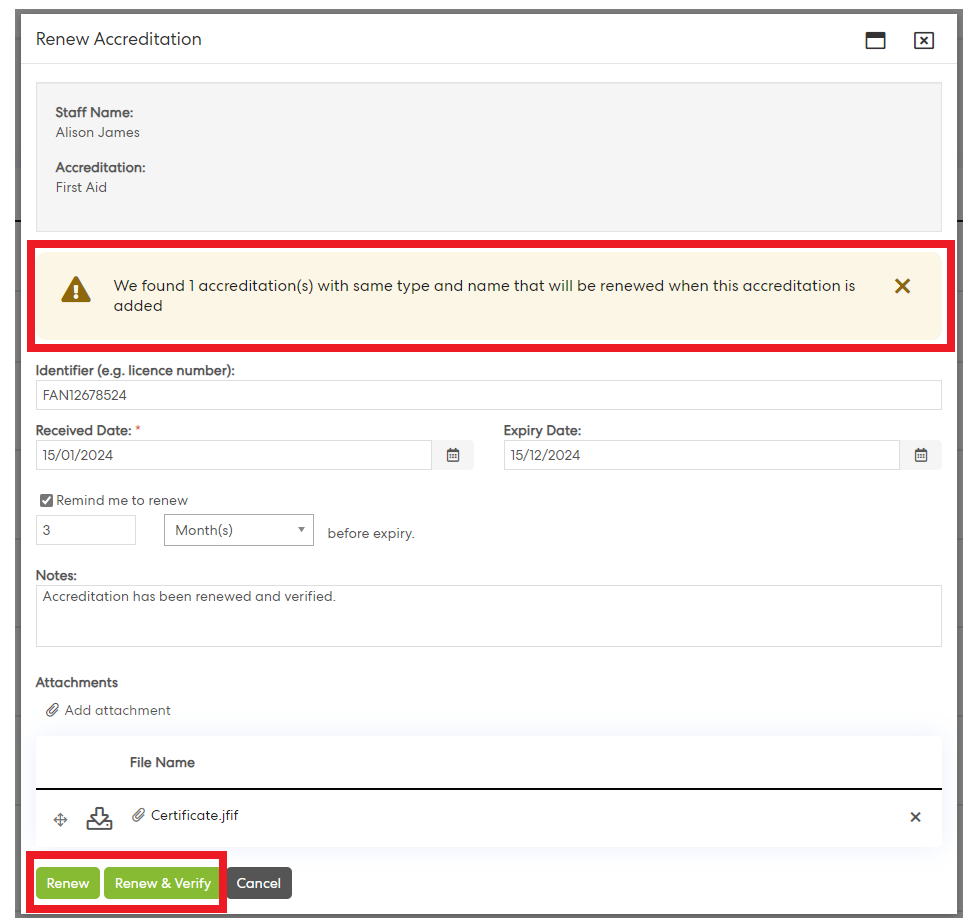
Step 4: Upon renewal of an existing accreditation, the system will create a new record capturing the latest accreditation, complete with appropriate status and details. Notably, supervisors and admins have additional control when renewing old accreditations of the staff members and adding new ones, enabling them to verify the newly added accreditation without the need for an extra step.
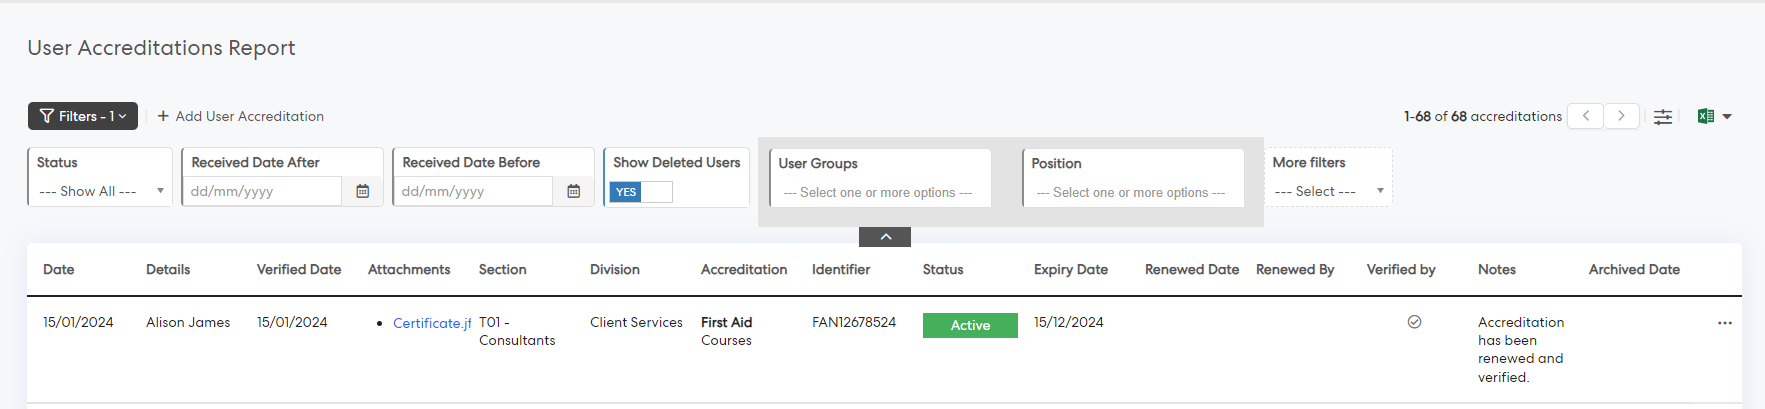
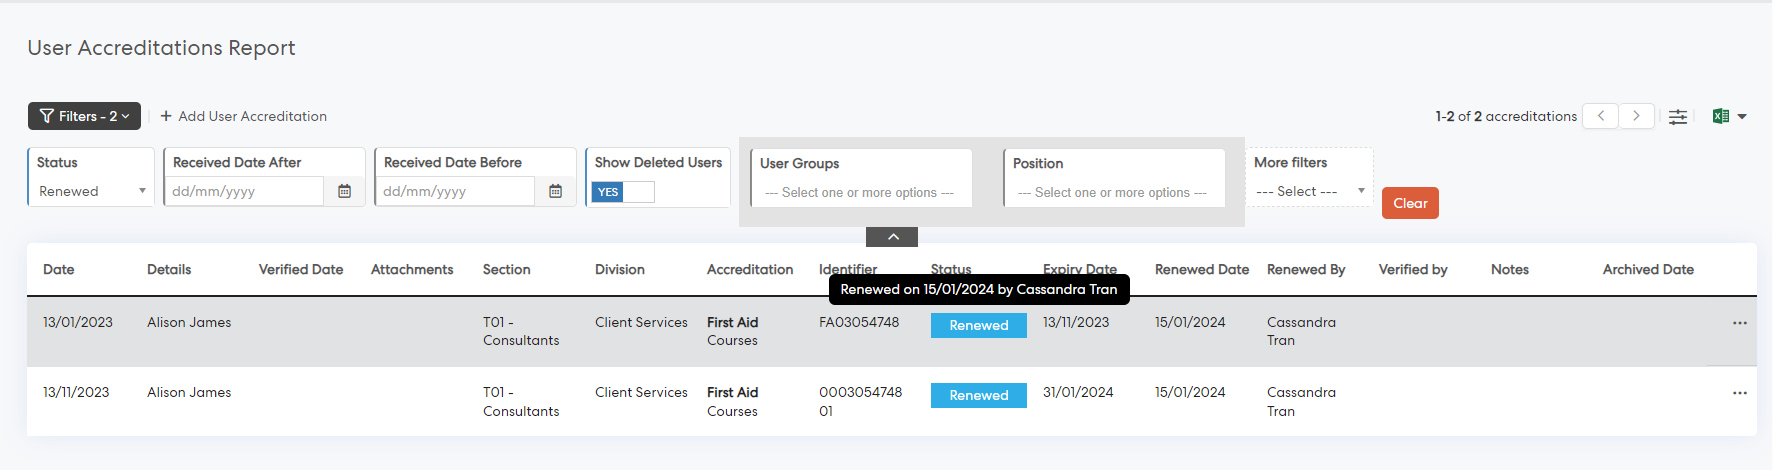
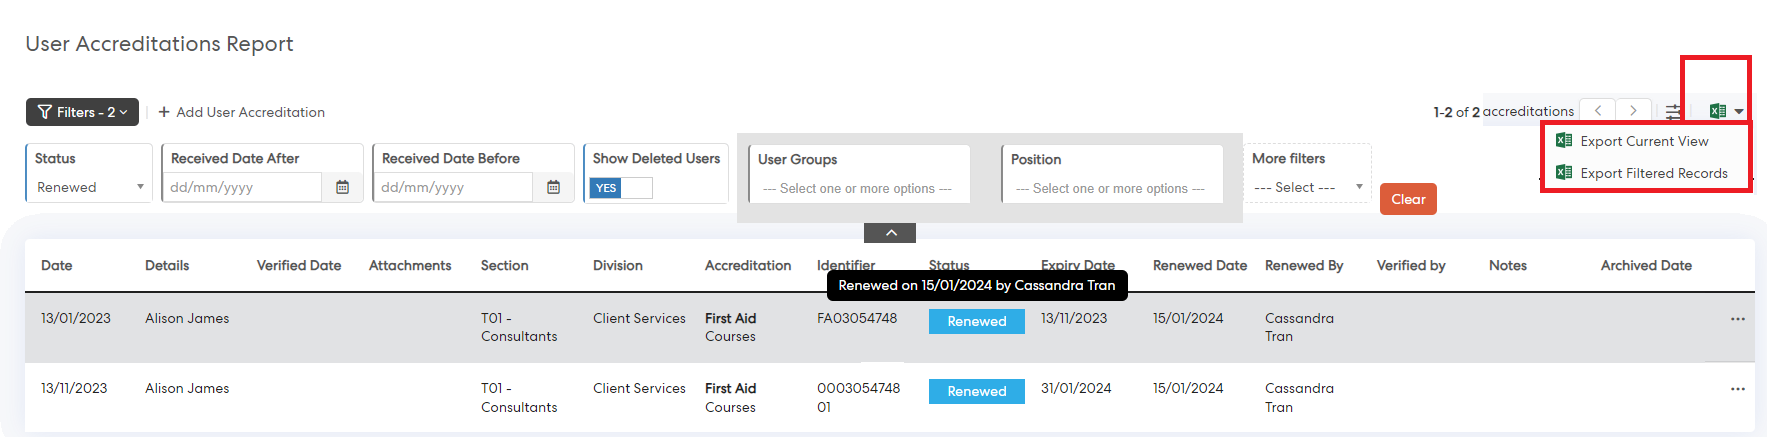
Step 5: Upon renewal of an existing accreditation, the existing record will reflect the renewed status of the old accreditation, ensuring clear visibility into the process. When a user hovers over the "renewed" status, it will display the renewal details such as the date of renewal and the user who renewed it.
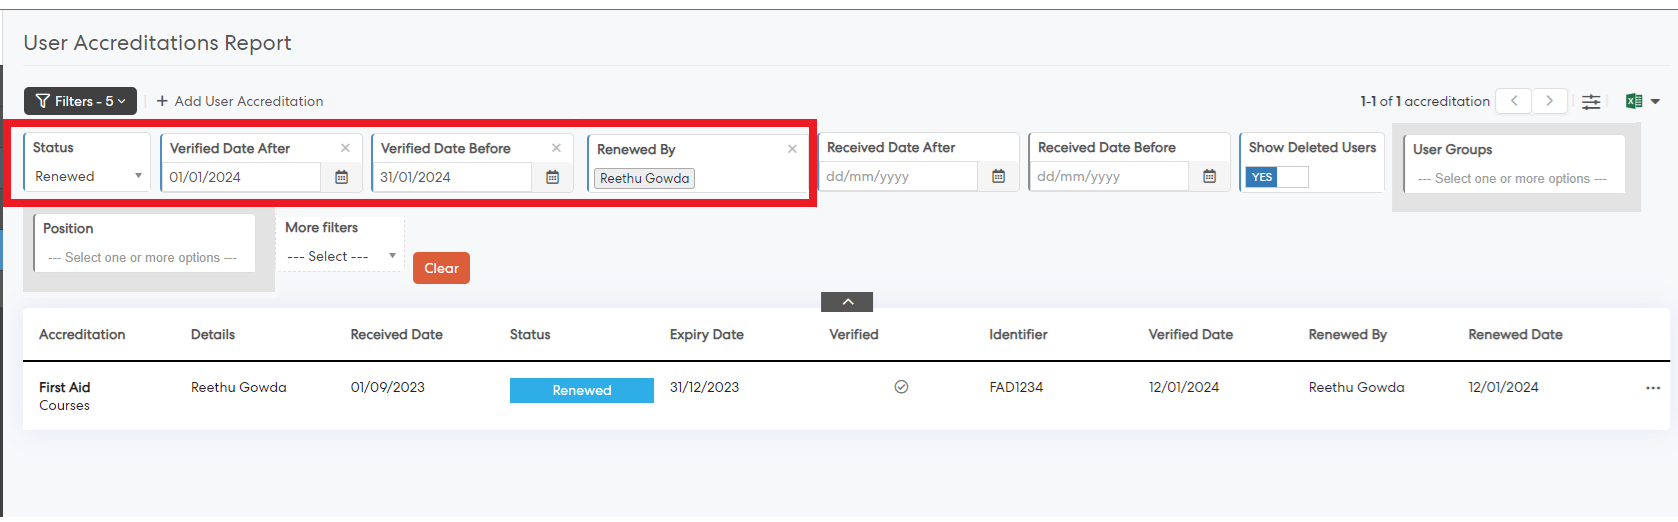
1.2.2 New Filters to capture the renewal process:
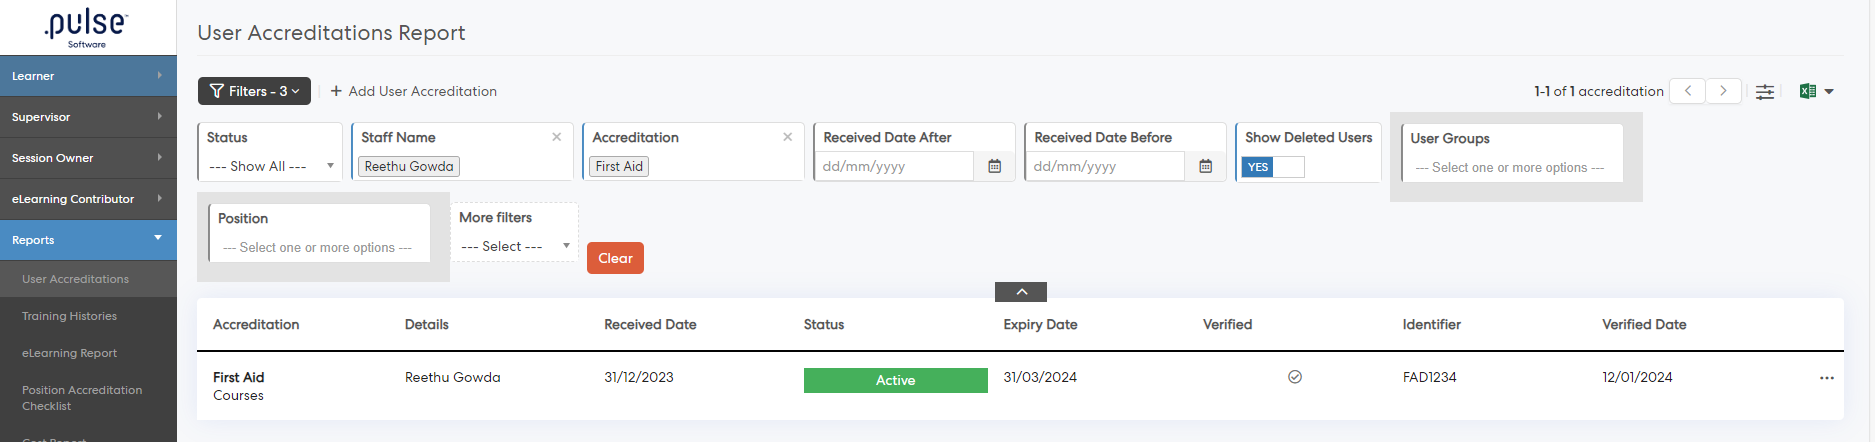
Users including learners, supervisors of a staff, or module administrators can now filter staff accreditation records with the renewal process using new filters. A new status labelled 'Renewed' has been added, and additional filters such as Renewed Date After, Renewed Date Before, and Renewed By have been introduced.
This allows for more efficient management of staff accreditation records, offering users the ability to filter and track the renewal status with an enhanced accuracy.
1.2.3: Export to Excel Enhancement:
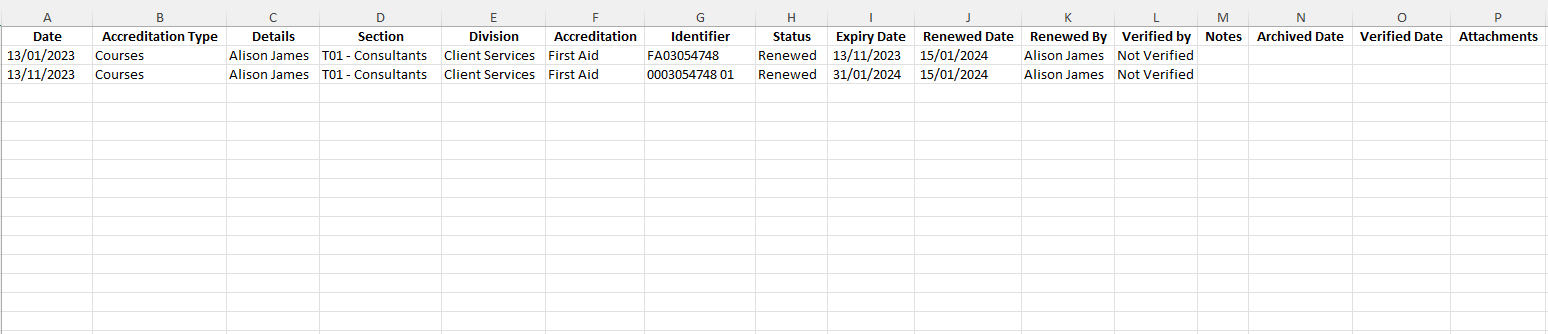
The export to excel feature has been enhanced to provide users with the ability to export staff accreditation records with renewal details. This enhancement allows users to export accreditation data, including the renewal status, renewed date, and renewed by.
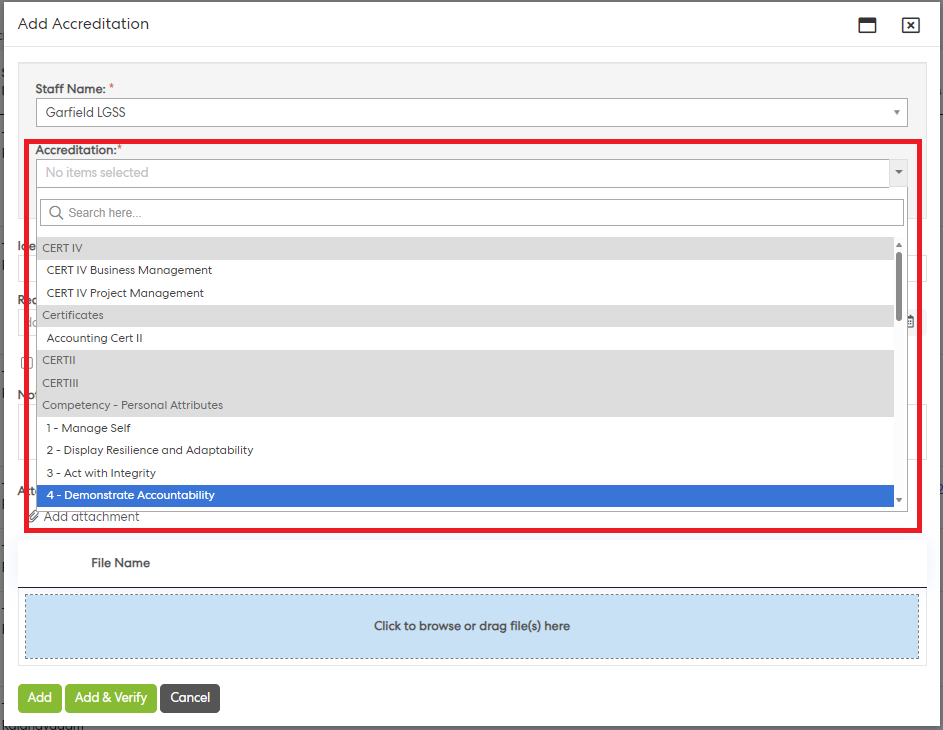
When adding an accreditation, users, supervisors, and module admins of the Learning module can now select the "Accreditation type" and "Accreditation" from a single, combined dropdown list. This enables users to more quickly, and simply add accreditations by allowing them to search for accreditations across multiple accreditation types and reducing the number of clicks required.
In addition, the "Staff Name" and "Accreditation" fields have been added as a read only information on the "Edit/Renew" Accreditation pop up, ensuring users, supervisors, and module admins know exactly what accreditation they are assigning to whom.
To Add, Edit, or Renew an Accreditation:
Step 1: Log in to Pulse Software and navigate to the eLearning module.
Step 2: Go to Reports -> User Accreditations
2(a) To Add an Accreditation
Click on the "+Add User Accreditation"

Users will be able to see all accreditations in a single dropdown, which are grouped by their accreditation type.

2(b) To edit/renew an Accreditation:
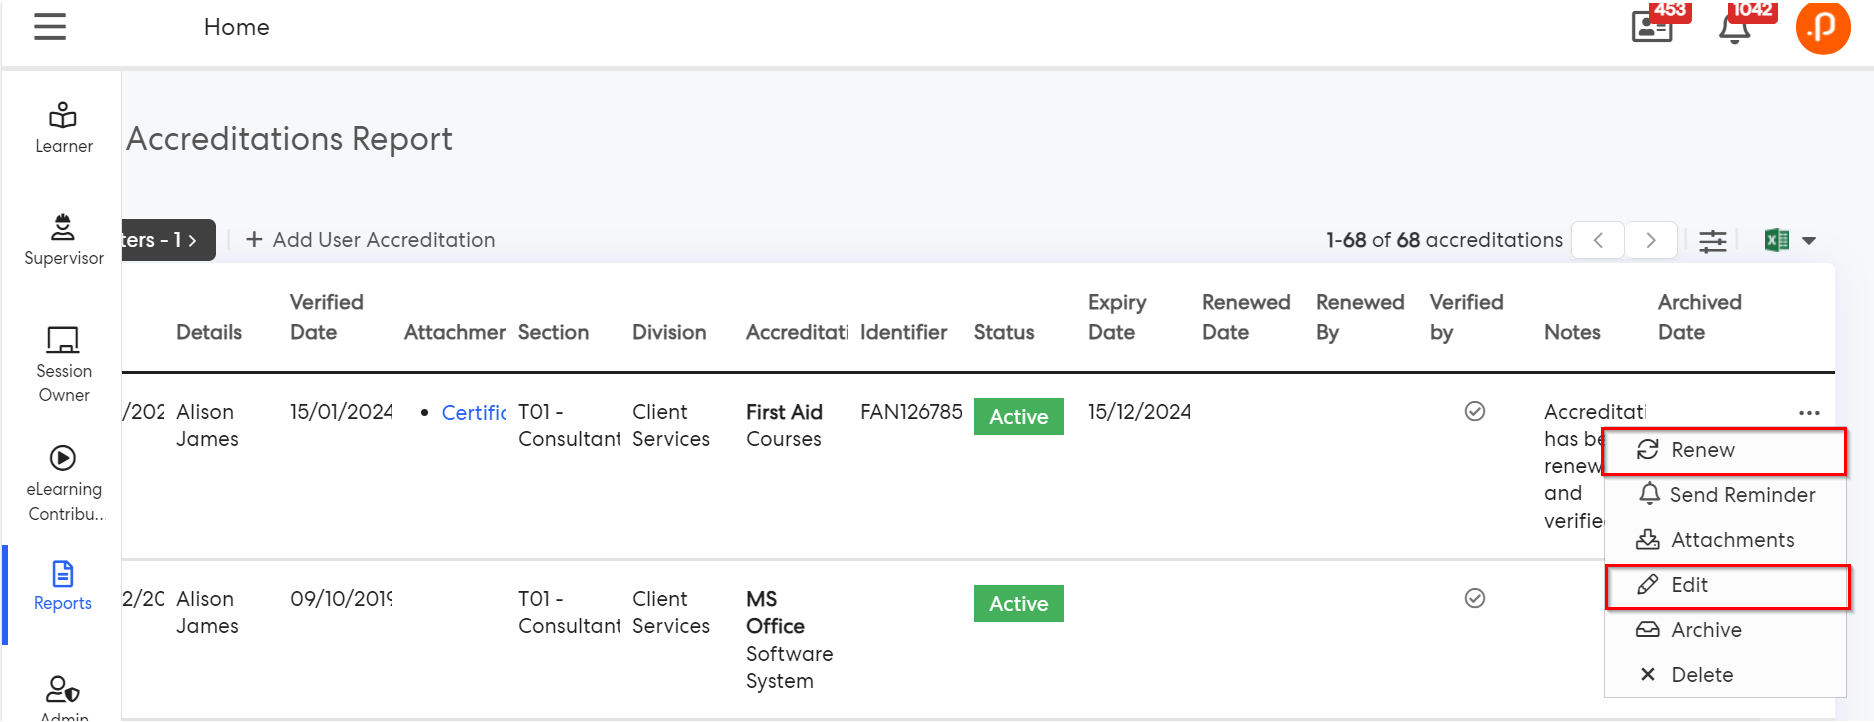
In the "User Accreditation Reports" page, click on the ellipsis (3-dot button) -> select "Renew" or "Edit" buttons to renew or edit an accreditation.
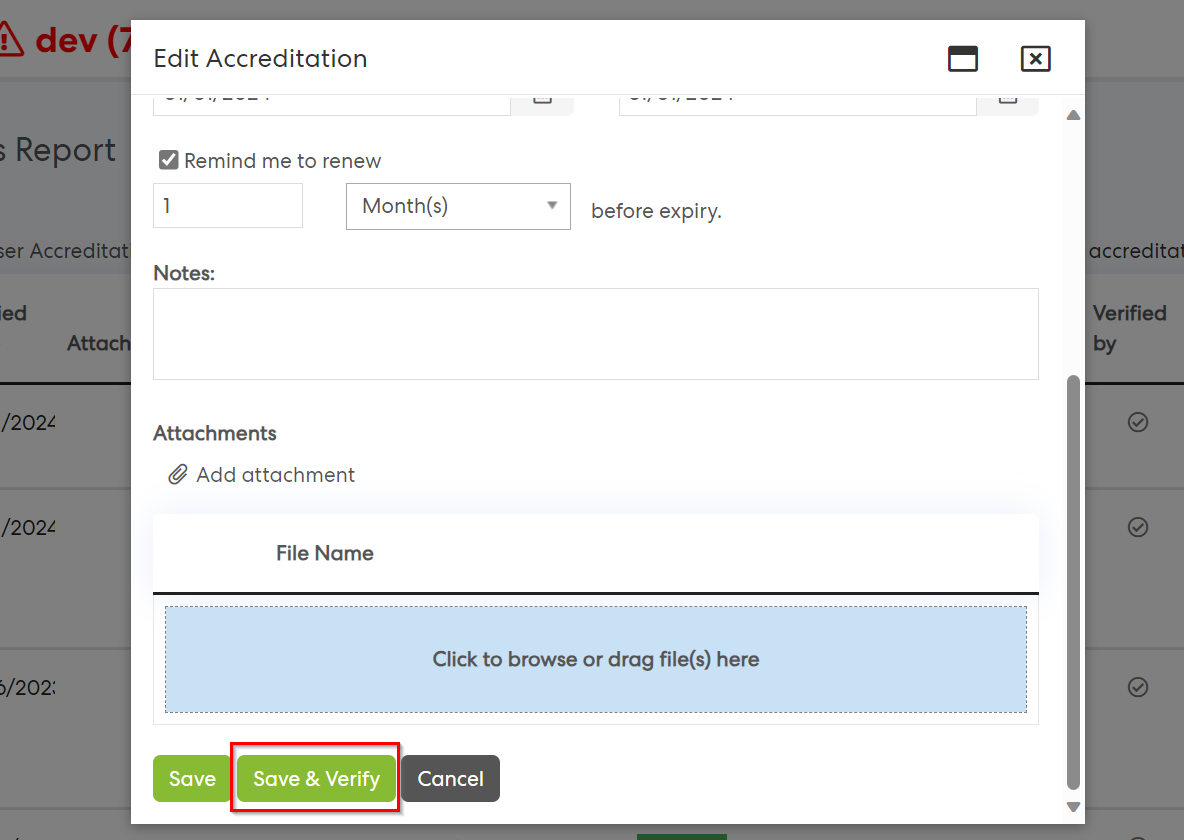
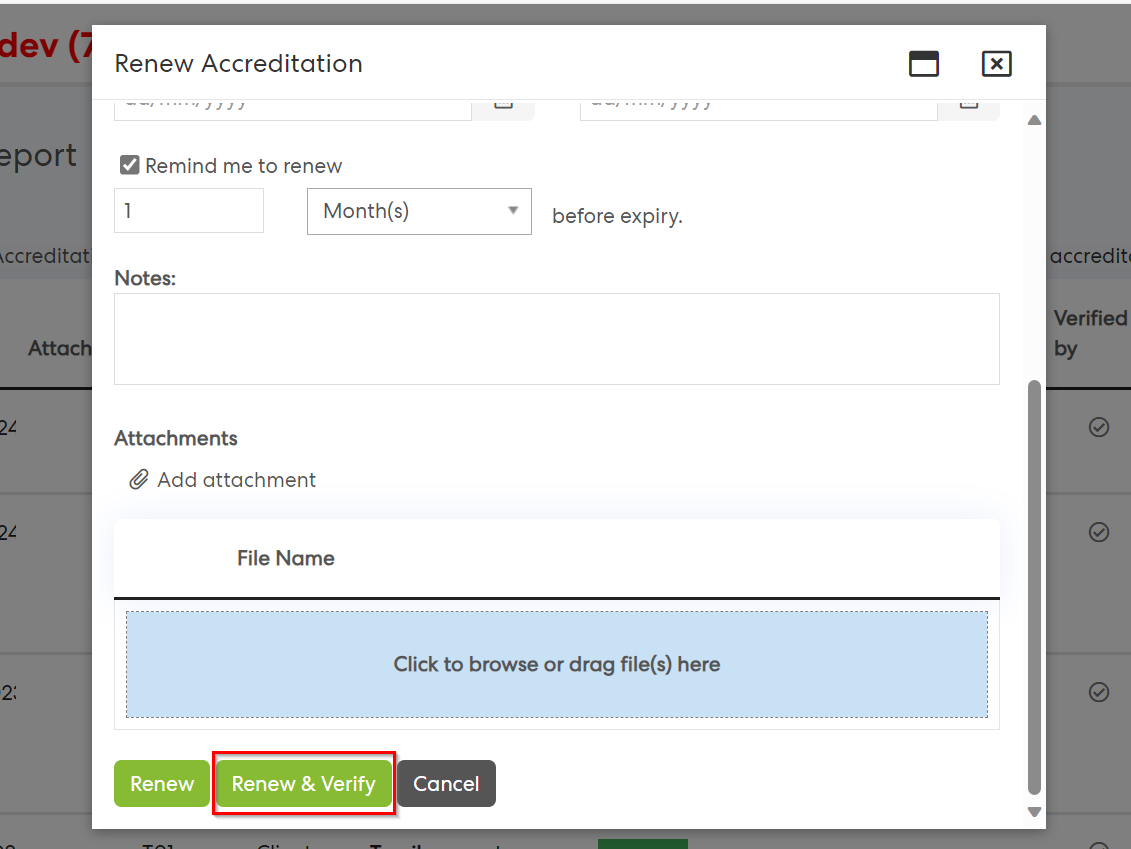
We have streamlined the accreditation management process by enabling supervisors and admins to submit and verify accreditations in a single step. This eliminates the need for an extra verification step after adding, editing, or renewing accreditations, reducing the time and effort required.
When a supervisor, or administrator, adds, edits, or renews an accreditation, they can now choose to "Add & verify", "Save & Verify", or "Renew & Verify" the accreditation in a single step.
Adding/Editing/Renewing Accreditations:
(A) To add & Verify a new accreditation:
Module Administrator: Navigate to the Report Menu -> select the "User Accreditations" page -> and click on the "+Add User Accreditation" to add a new accreditation.
Supervisor: Navigate to the Supervisor Menu and select the "Supervisor Dashboard" page. Then, click on the "Staff Accreditation" button and click on the "+Add User Accreditation" to add a new accreditation
(B) To edit an existing accreditation:
Within the User Accreditation page -> Navigate to the accreditation of a staff -> Click on the ellipsis -> Select "Edit" to modify an existing accreditation.
Click on the edit button to edit the Accreditation. Once completed, admins can click on the "Save & Verify" button to save the changes.
C) To renew & Verify an existing accreditation:
Within the User Accreditation page -> Navigate to the accreditation of a staff -> Click on the ellipsis -> Select "Renew" to renew an expired accreditation.
Note: After adding, editing, or renewing an accreditation, the system will capture the verification details in the user accreditation report.
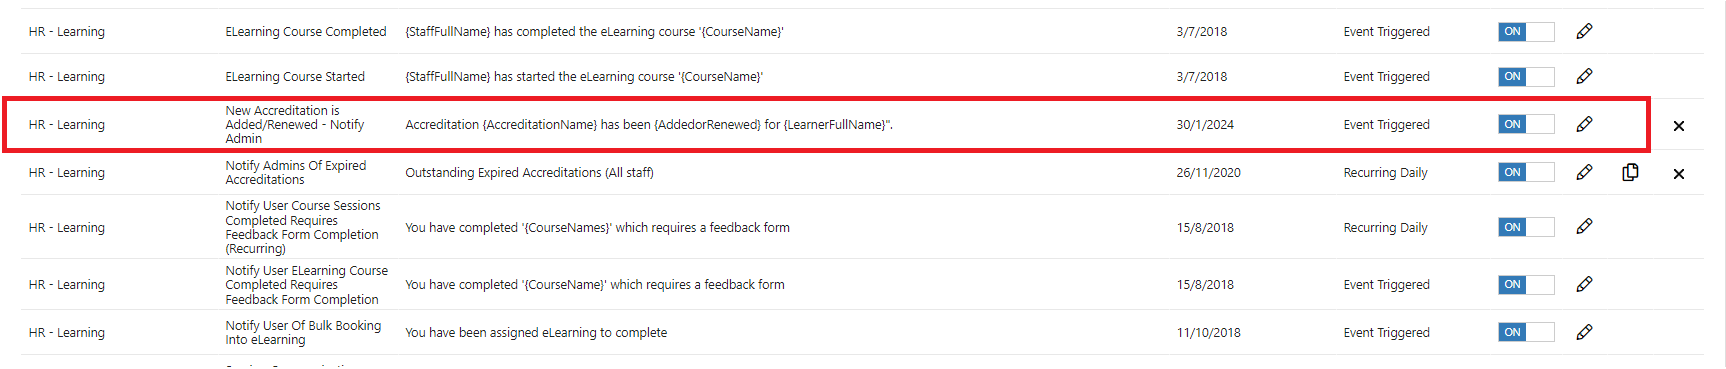
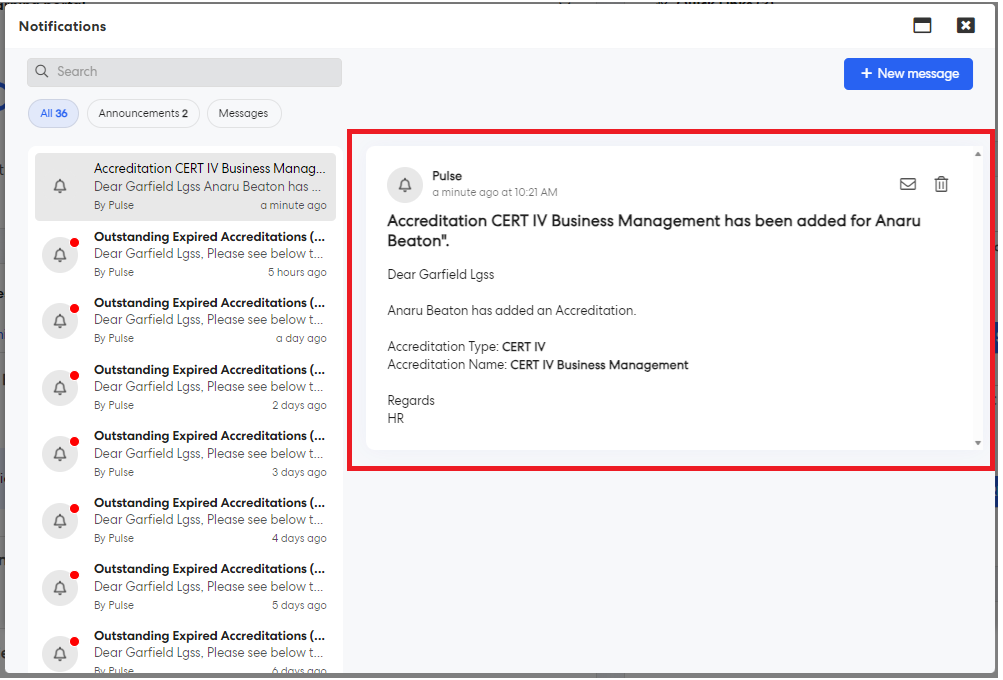
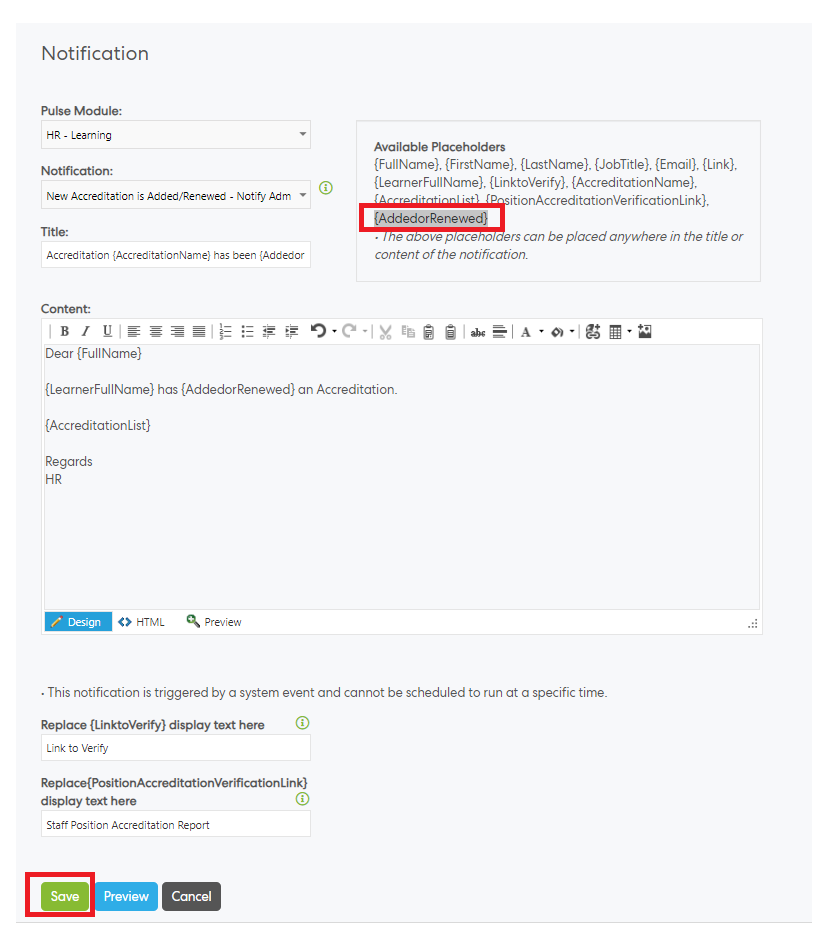
As part of ongoing enhancements to the Accreditations functionality, we have renamed the "New Accreditation is Added - Notify LAM Admin", and "New Accreditation is Added - Notify Supervisor" notification templates to "New Accreditation is Added/Renewed - Notify Admin", and "New Accreditation is Added/Renewed - Notify Supervisor" to more accurately describe their function. In addition, we have added a placeholder, {AddedorRenewed}, to described whether the Accreditation has been newly added, or is a renewal of an existing accreditation.
This notifications will be triggered when a user has been awarded an accreditation, either by manually adding a new accreditation, or by the system upon completion of a learning activity. In addition, the notification will also be triggered when an accreditation has been renewed.
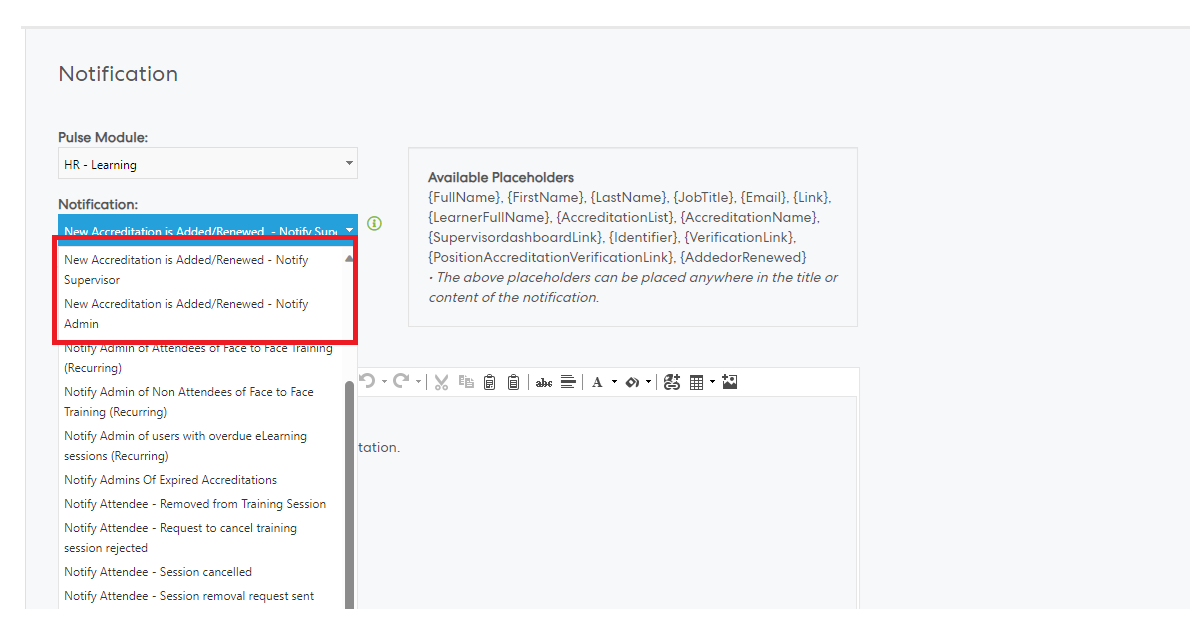
To make use of this new placeholder:
- Admin users can navigate to Learning > Admin > Manage Notification settings, edit one of the above mentioned notification templates,
- Insert the {AddedorRenewed} placeholder where required. For example, the new title might read; "Accreditation {AccreditationName} has been {AddedorRenewed} for {LearnerFullName}".

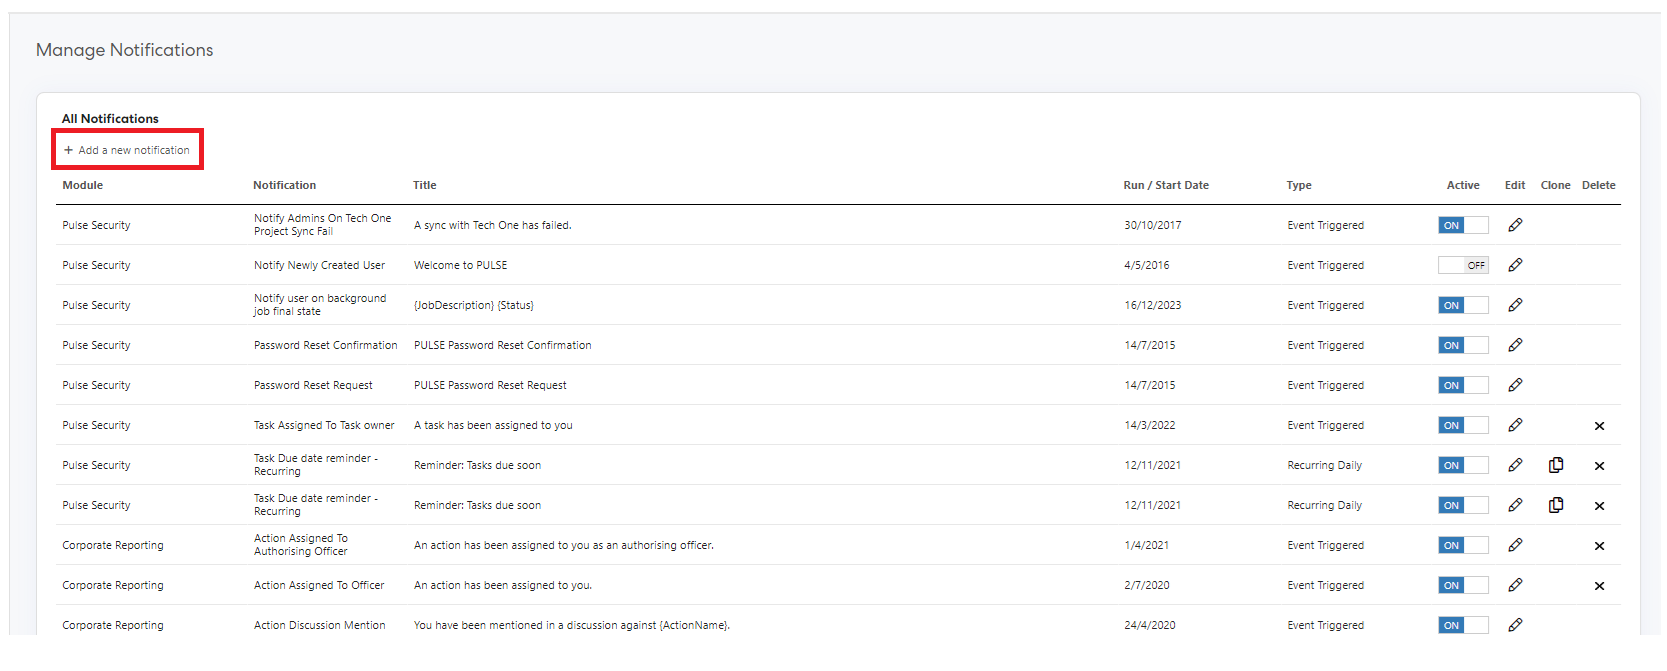
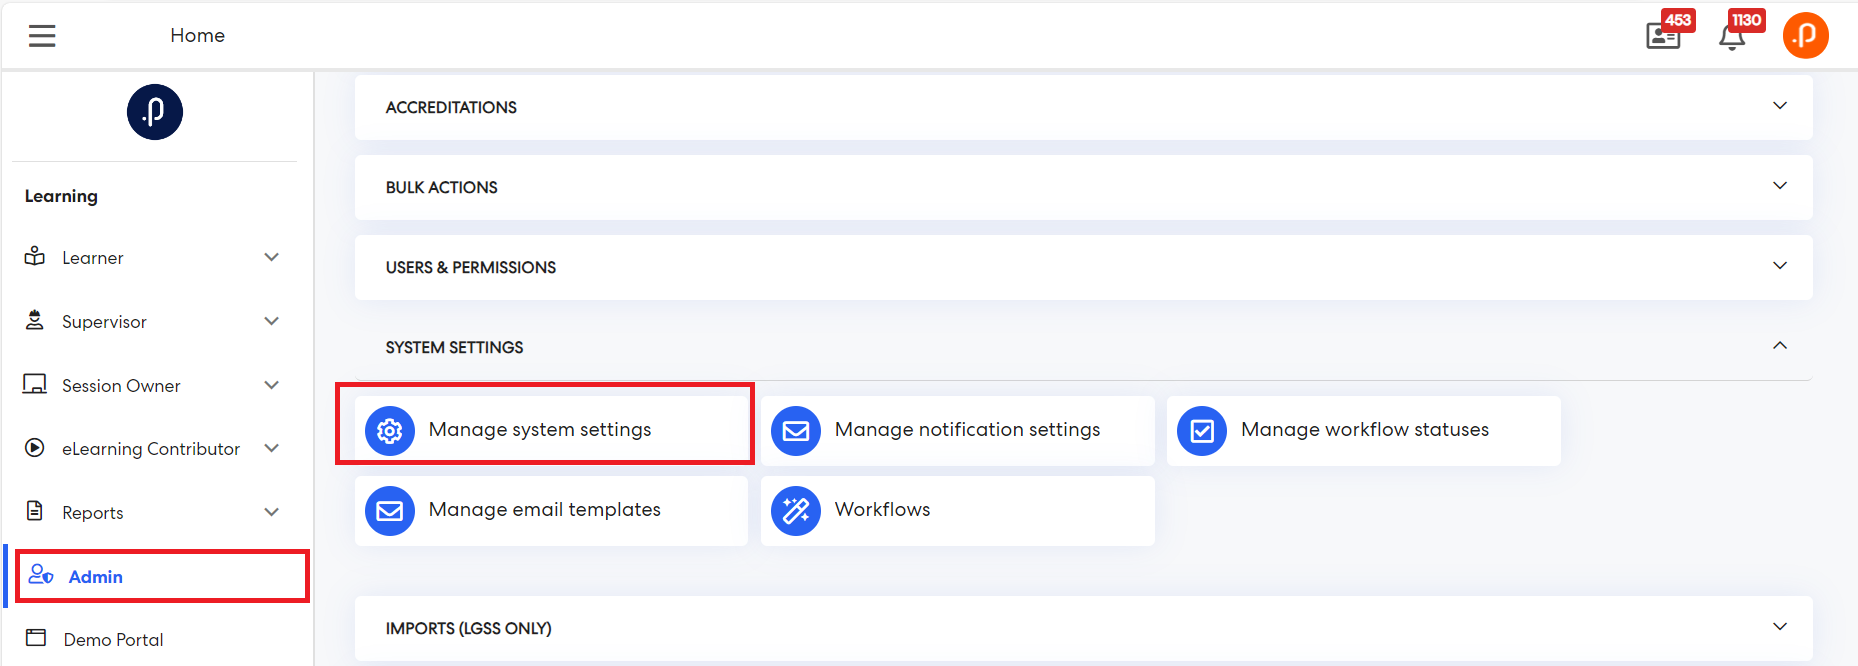
If these notification are not enabled, Admin users can enable them by:
- Navigate to Learning > Admin > Manage Notification settings
- Click "+ Add a new Notification"
- Select "HR - Learning" from the "Pulse Module" drop down list
- Select one of the templates from the "Notification" drop down list
- "New Accreditation is Added/Renewed - Notify Admin"
- "New Accreditation is Added/Renewed - Notify Supervisor"
- Make the required changes to the "Title" or "Content" fields
- Click Save
Pulse has introduced the ability to configure whether or not a user can edit a verified accreditation.
By preventing users from editing their verified accreditations, organisations can ensure the integrity and validity of all accreditations, knowing that their users are unable to make changes without verification.
Admin users can set this configuration option by:
Step 1:Login to the pulse system and navigate to the eLearning module
Step 2: Go to the Admin menu -> System settings tile and click on "Manage System settings" -> Configuration page loads -> Navigate to the Accreditations section-> Enable the configuration key "Disable learners ability to edit a verified accreditation"
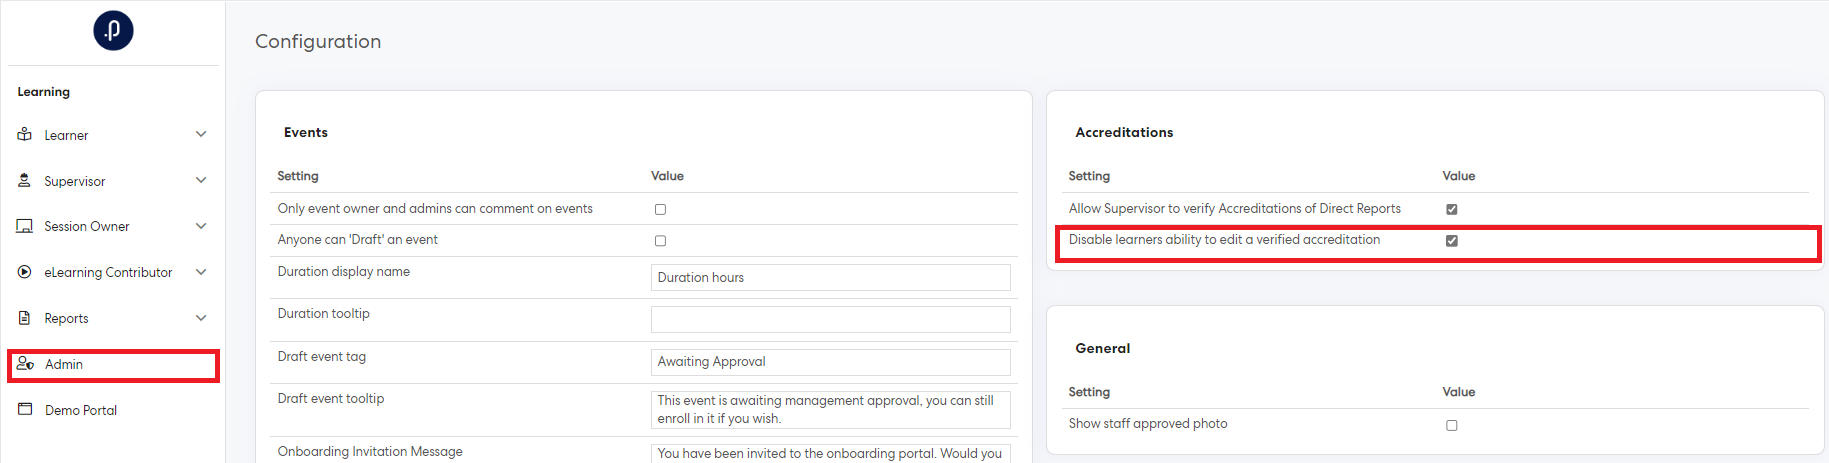
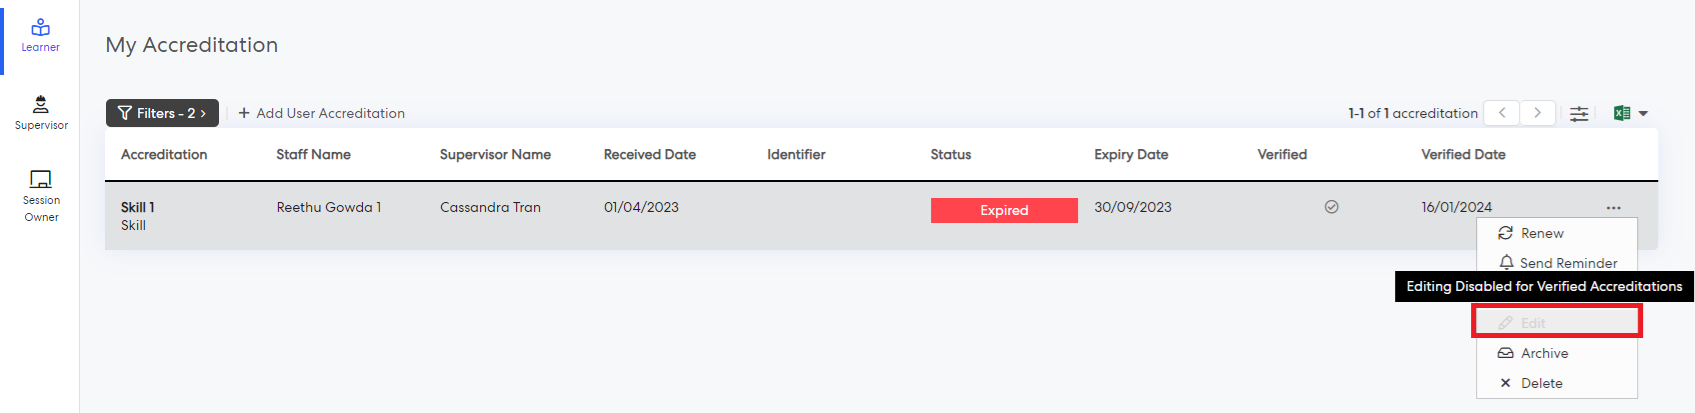
When the configuration key is activated, learners can no longer edit verified accreditations. The edit button will be disabled, and when hovering over the edit icon, a tooltip will display "Editing Disabled for Verified Accreditations."
2. eRecruitment Module
2.1 Updating the Employee Termination labelIn order to accommodate the various terminology used by businesses when an employee/employer part ways, previously labeled "Reason of Termination" in the employee profile work details tab will now be shown as "End of Employment comments".
3. Enterprise Risk Management Module
3.1 Ability to show Linked Risks on the ‘’All Risks’’ pageThe "All Risks" page will now include a new toggle filter that enables the display of risks linked from external sources within the filtered modules.
To view and filter on linked risks, follow the below steps;
Step 1: Login to Pulse and go to ERM Module.
Step 2: Go to the Risks Menu -> All Risks.
Step 3: Choose a Module from the ‘’Risk Source’’ filter.
Step 4: Choose the new option "Show Linked Risks" from the "More Filters" section.
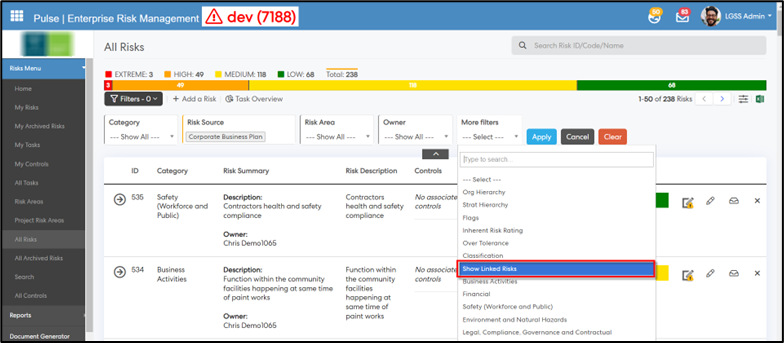
Step 5: Once the new toggle filter ‘’Show Linked Risks’’ appears, toggle the button to ‘’YES’’ and then click on the ‘’Apply’’ button.
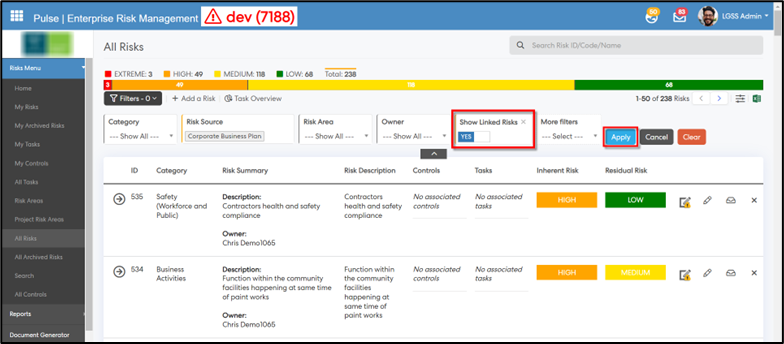
The presence of a link icon before the risk description helps you identify risks that are linked from external sources with the filtered modules.
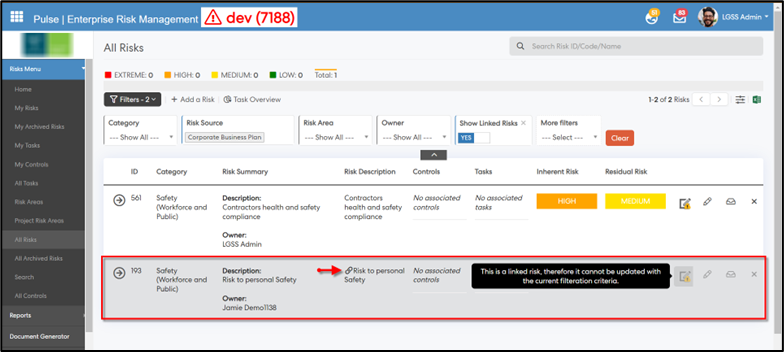
Note: Updates, edits, archiving, and deletion are disabled for the linked risks that are shown in the filtered view.
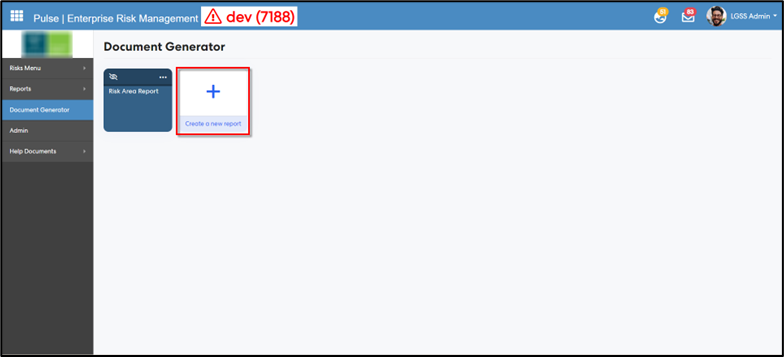
3.2 Ability to show Linked Risks in the Risk Area Report of the Document GeneratorThe Risk Area Report of the Document Generator will now incorporate a new ‘’Risk Source’’ option in filters and an ‘’Include Linked Risks’’ checkbox in the ‘’Show Risks Table’’ section. This allows the display of risks linked from external sources within the filtered modules.
To generate a document that includes linked risks, follow the below steps;
Step 1: Login to Pulse and go to ERM Module.
Step 2: Go to the Document Generator.
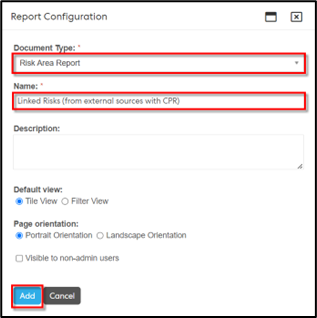
Step 3: Click on "+ Create a new report" in the document generator page.
Step 4: Select "Risk Area Report" as the Document Type, enter a name in the designated field, and then click the "Add" button.
Step 5: Select ‘’Risk Sources’’ from the filters.
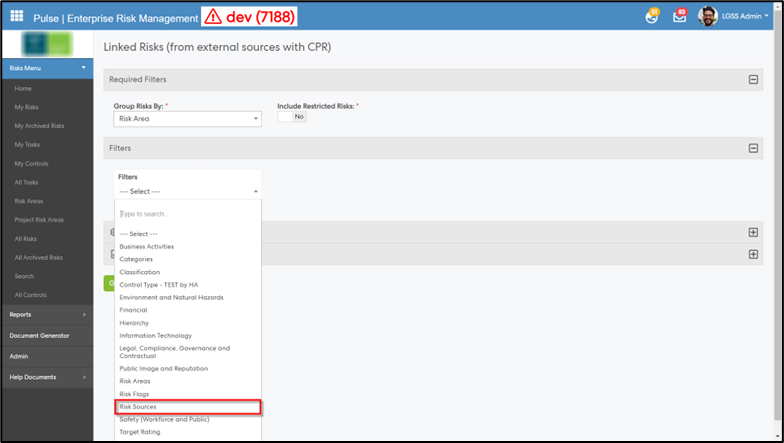
Step 6: Choose a Module from the ‘’Risk Sources’’ filter.
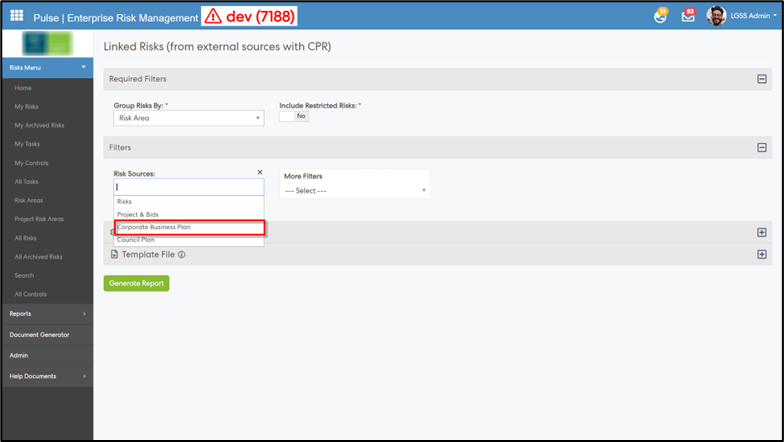
Step 7: Select the “Include Linked Risks” checkbox in the ‘’Show Risks Table’’ section within the Configuration area, and then proceed to generate the report.

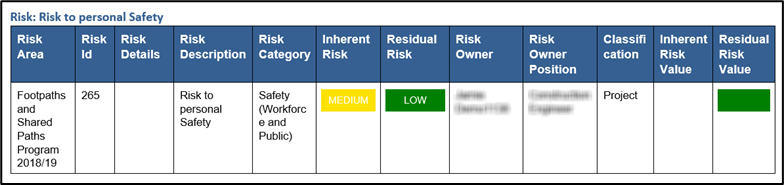
Step 8: The report will include risks linked from external sources within the filtered modules, as illustrated below.
4. Corporate Planning & Reporting Module
4.1 Ability for supervisors to view all their staff's actions on a dashboardSupervisors in the CPR, CPR-AH, Audit, and Compliance modules can now utilize the new 'My Team’s Action' dashboard to efficiently track actions, tasks, service areas, CPIs, and CPMs assigned to their direct or indirect reportees.
To view this feature, follow the below steps;
Step 1: Login to Pulse and go to CPR, CPR-AH, Audit, or Compliance Module.
Step 2: Go to the top menu > ‘’My Team’s Actions’’
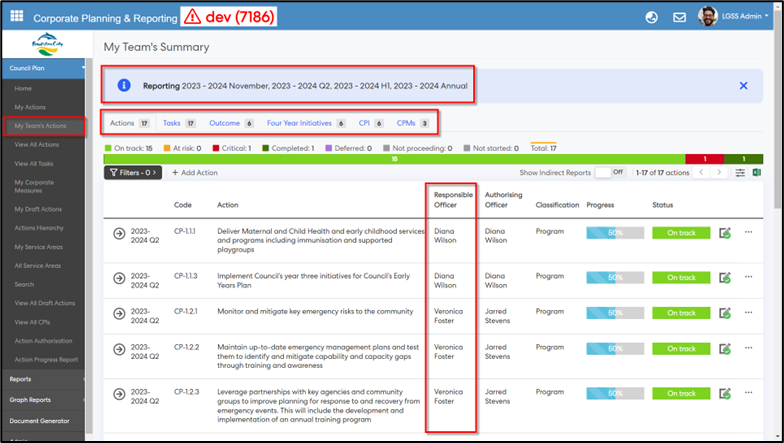
For the presently enabled reporting year and periods, this provides supervisors a "My Actions" typed view where they can monitor their teammate's following items through different tabs:
- Actions (Tab 1)
- Tasks (Tab 2)
- Service Areas (Tab 3 & 4)
- Corporate Performance Indicators (CPIs) (Tab 5)
- Corporate Performance Measures (CPMs) (Tab 6)
Note: The Service Areas tabs may differ based on the progress updates enabled at various hierarchy levels.
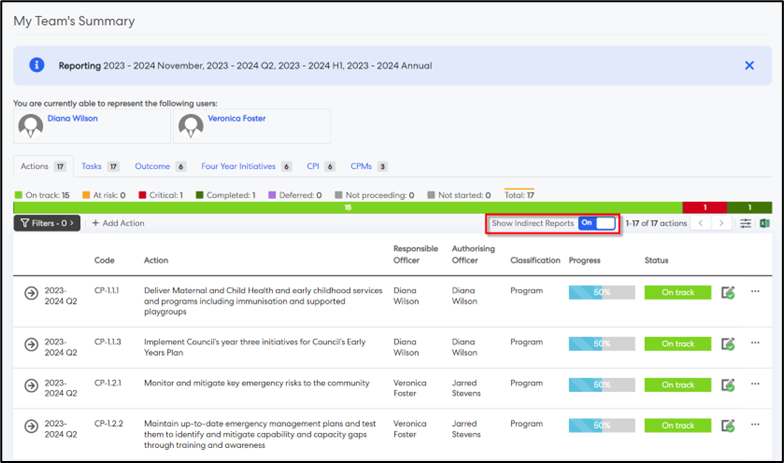
Step 4: Toggle the "Show Indirect Reports" button to 'On' to display items in the current view for which the reportees of the supervisor's teammates are responsible for updating.
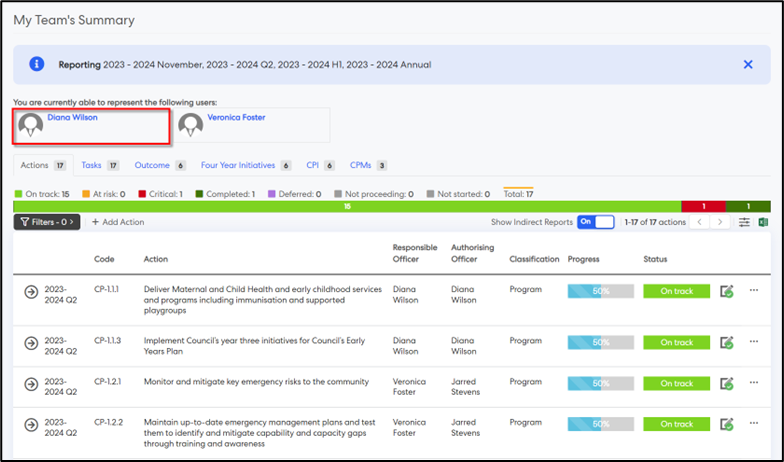
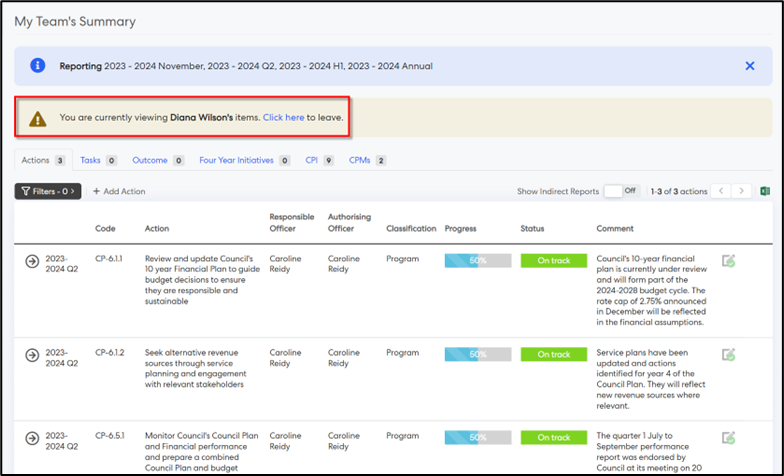
Step 5: Clicking on the representee's user card will display the action summary for that supervisor's team on their behalf.
Issues resolved
Project Management & Control Module
- Fixed an issue where users were not able to update the pre-projects dropdowns or scored questions.
- Fixed an issue where the column configuration duplicated the additional attributes in the "Pre-projects" page.
Corporate Planning & Reporting Module (AH)
- Fixed an issue where the "My Teams Actions" page was not hidden in the Additional Hierarchies module.
Forms Module
- Fixed an issue where the users were not able to see the "Create Workflow" button when selecting the workflow option in the Add Form pop-up.
- Fixed an issue where the users were not able to upload cover image to forms.
eLearning Module
- Fixed an issue where the "My Learning Courses" page was not showing additional pages for more records.
Onboarding Module
- Fixed an issue where the users were not able to complete the accreditation without Learning module's permission
eRecruitment Module
- Fixed an issue where the Job details page was showing an error message when changing the window size.
- Fixed an issue where the candidates were getting HTML formatted emails.
Performance Reporting Framework
- Fixed an issue where the Indicator Progress Comparison Report was showing inaccurate results.